


Photo by Sangga Rima Roman Selia on Unsplash
Fullstack Solution: Only allow admins to create users in your app
Using AWS Amplify to quickly configure Cognito and React


Many services show how to allow users to authenticate into your application, though real-world auth flows are often determined by your application's business requirements.
This tutorial will show how to build an app that lets anyone sign in, but only Admin users can sign others up.
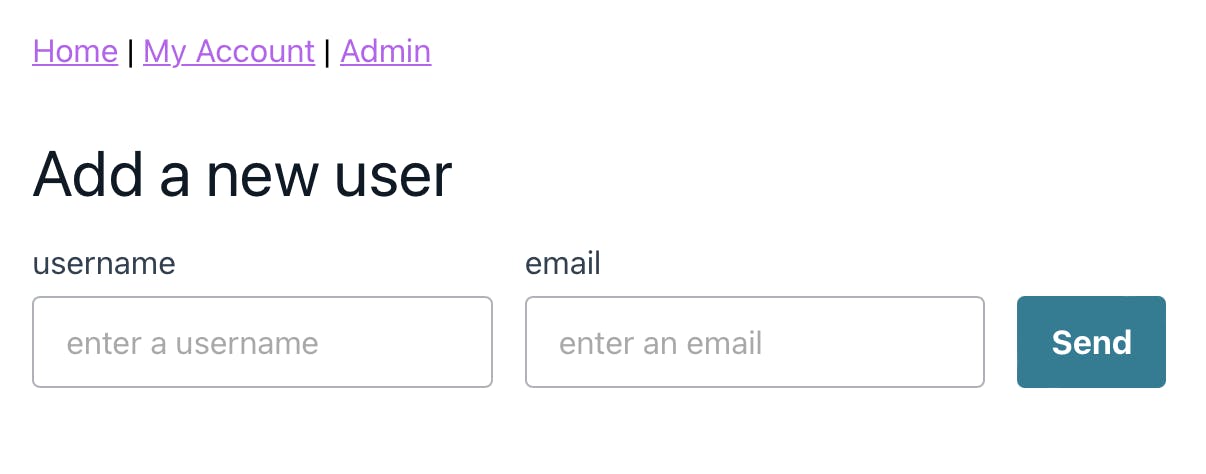
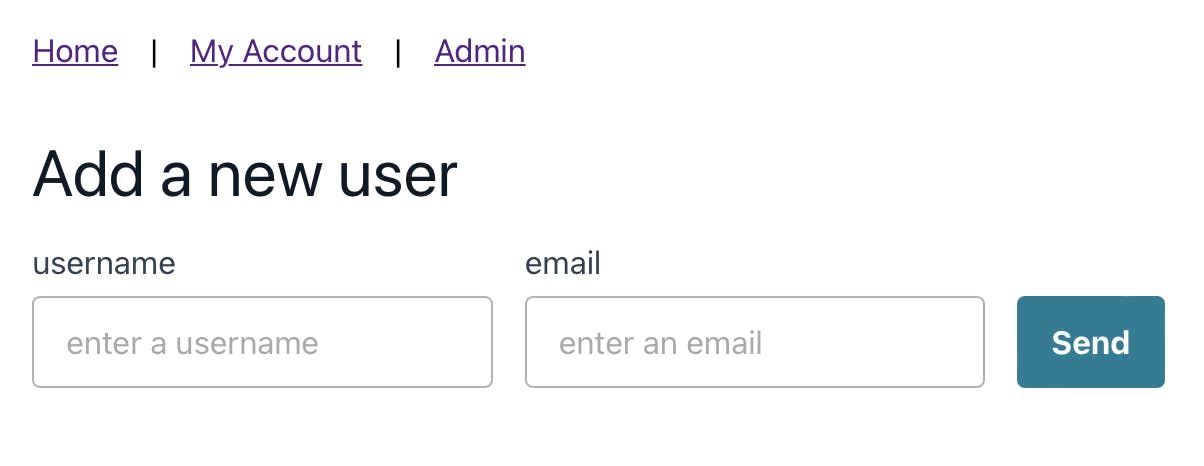
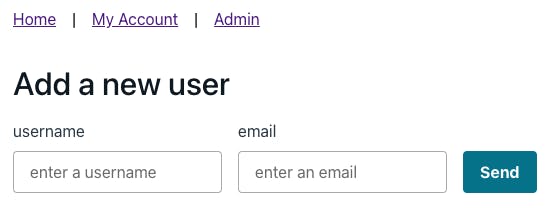
Below is an example of the form we'll be building 👇🏽
Bootstrapping our application
To get started we'll create a new application. Run the following in your terminal:
npx create-react-app@latest admin-only-auth
From there we'll change into the project directory and install a few dependencies.
cd admin-only-auth && npm i aws-amplify @aws-amplify/ui-react react-router-dom@6
- aws-amplify: Allows us to bind our fronted to our AWS backend
- @aws-amplify/ui-react: A React component library built based on theme-ui
- react-router-dom: Our routing solution
With our packages installed, the last step is to initialize it with AWS Amplify.
Still, in your project directory, run the following command:
amplify init -y
The above command assumes the Amplify CLI is installed. If not, run
npm i -g @aws-amplify/cli. This project uses version7.6.19
With our packages installed and our application initialized, let's open up the project in VS Code and begin working with the files.
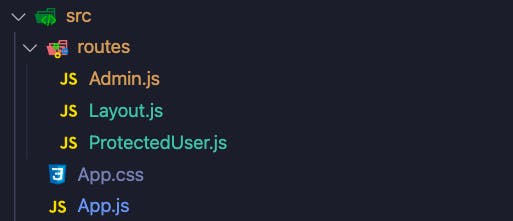
File structure
In this app, we'll have 3 files that map to our application routes:
- App.js: Unprotected homepage available at
/ - Protected.js: Protected route for signed-in users available at
/me - Admin.js: Protected route for just admin users available at `/admin
In addition, we'll have a file called Layout.js that will handle our navigation.
We'll keep the file structure fairly simple and create a routes directory that contains our protected routes as well as our layout.
Note that outside of our
routesdirectory is ourApp.jsfile. No reason to keep it there, feel free to move inside theroutesdirectory if you like 🙂
Setting up our routes
Because we're using version 6 of React Router, we'll structure our index.js so that it contains all of our routes, along with configuring Amplify.
import React from 'react'
import ReactDOM from 'react-dom'
import App from './App'
import Amplify from 'aws-amplify'
import config from './aws-exports'
import { AmplifyProvider } from '@aws-amplify/ui-react'
import '@aws-amplify/ui-react/styles.css'
import { BrowserRouter, Route, Routes } from 'react-router-dom'
import Layout from './routes/Layout'
import Admin from './routes/Admin'
import ProtectedUser from './routes/ProtectedUser'

Amplify.configure(config)

ReactDOM.render(
    <React.StrictMode>
        <AmplifyProvider>
            <BrowserRouter>
                <Routes>
                    <Route path="/" element={<Layout />}>
                        <Route index element={<App />} />
                        <Route path="me" element={<ProtectedUser />} />
                        <Route path="admin" element={<Admin />} />
                    </Route>
                </Routes>
            </BrowserRouter>
        </AmplifyProvider>
    </React.StrictMode>,
    document.getElementById('root')
)
A few callouts:
- AmplifyProvider: This wraps our application so that we can easily access our users from any authenticated route.
- : This lets us specify the component we'd like to render and at what path. In the event we are on our homepage, we render our
<App/>component. All components are wrapped in a<Layout/>
From here, let's go ahead and create the code for the rest of our routes.
Layout.js
This file is meant to contain some simple base styling as well as our navigation.
Paste in the following snippet:
import { Flex, View } from '@aws-amplify/ui-react'
import React from 'react'
import { Link, Outlet } from 'react-router-dom'
import '../index.css'

function Layout() {
    return (
        <View margin="1rem">
            <Flex as="nav" style={{ marginBottom: '2rem' }}>
                <Link to="/">Home</Link> | <Link to="me">My Account</Link> |{' '}
                <Link to="admin">Admin</Link>
            </Flex>
            <main>
                <Outlet />
            </main>
        </View>
    )
}

export default Layout
The callout here is the <Outlet/> component. This is from React Router and essentially says, "render any child component right here."
Another area of interest is that this is our first look at the components provided to us by Amplify.

App.js
This file is essentially the same as what comes out of the box with create-react-app and is here just to showcase having an unprotected route.
Feel free to leave as is, or paste in the following code:
import logo from './logo.svg'
import './App.css'

function App() {
    return (
        <div className="App">
            <header className="App-header">
                <img src={logo} className="App-logo" alt="logo" />
                <p>
                    Edit <code>src/App.js</code> and save to reload.
                </p>
                <a
                    className="App-link"
                    href="https://reactjs.org"
                    target="_blank"
                    rel="noopener noreferrer"
                >
                    Learn React
                </a>
            </header>
        </div>
    )
}

export default App
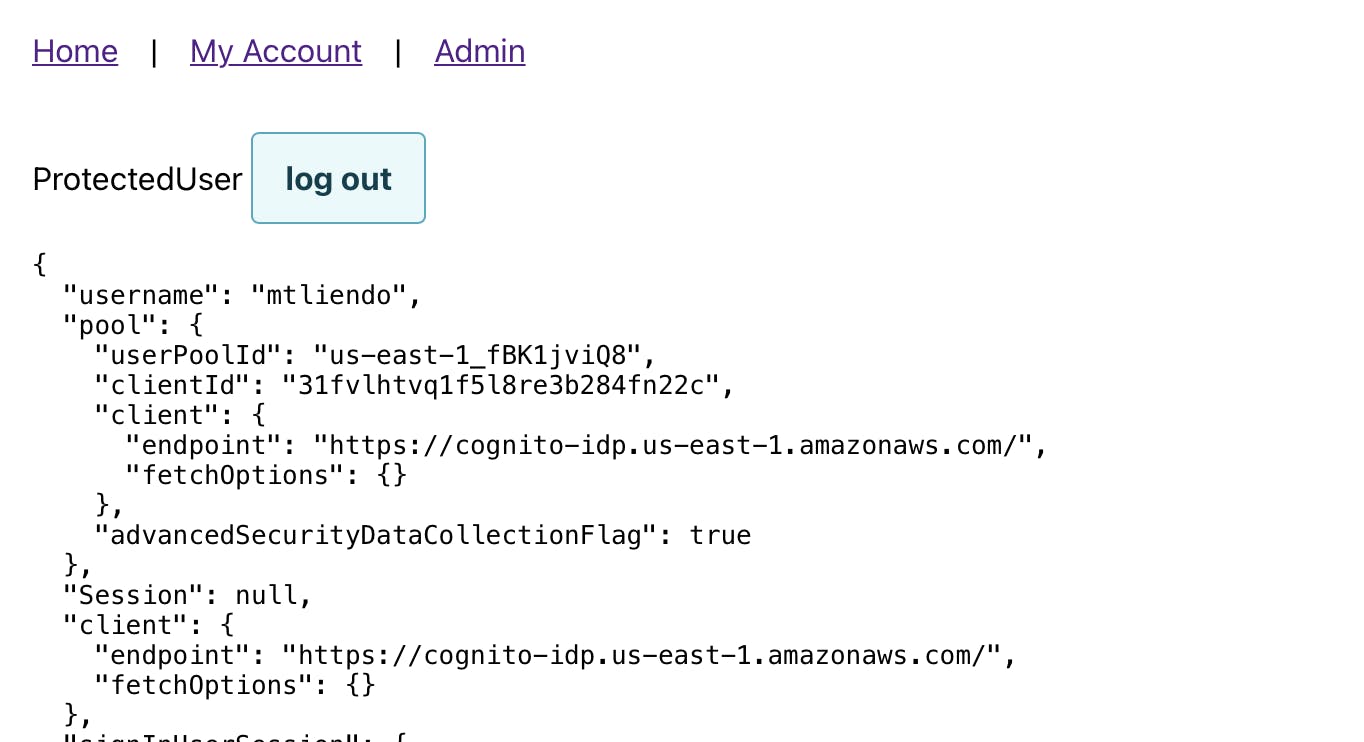
Protected.js
This is our first file that requires an authenticated user to be accessed!
We'll keep it simple and just log out the user details to the page, but note that we're making first use of the user and signOut props. These are provided to us by our AmplifyProvider component.
import { Button, withAuthenticator } from '@aws-amplify/ui-react'
import React from 'react'

function ProtectedUser({ user, signOut }) {
    return (
        <div>
            ProtectedUser <Button onClick={signOut}>log out</Button>
            <code>
                <pre>{JSON.stringify(user, null, 2)}</pre>
            </code>
        </div>
    )
}

export default withAuthenticator(ProtectedUser, { hideSignUp: true })
🗒️ Don't worry if you can't log in just yet, this is just to show what it will look like once we set up our auth backend
Also note that by simply passing { hideSignUp: true } to the withAuthenticator wrapper, we get a full sign in flow, minus the ability for users to signup.
Admin.js
This is our main file. This route will be protected so that only authenticated users can go to it, but it will include an additional check to make sure the user is in the admin group.
Additionally, we will make use of the components provided by AWS Amplify.
import {
    Button,
    Flex,
    Heading,
    TextField,
    View,
    withAuthenticator,
} from '@aws-amplify/ui-react'
import React, { useState } from 'react'
import { API } from 'aws-amplify'

function Admin({ user }) {
    const [isButtonDisabled, setIsButtonDisabled] = useState(false)

    return user.signInUserSession.idToken.payload?.['cognito:groups']?.includes(
        'admin'
    ) ? (
        <View as="main">
            <Heading style={{ marginBottom: '1rem' }} level={3}>
                Add a new user
            </Heading>
            <Flex>
                <Flex
                    as="form"
                    direction={{ base: 'column', large: 'row' }}
                    onSubmit={handleFormSubmit}
                >
                    <TextField
                        label="username"
                        name="username"
                        placeholder="enter a username"
                    />
                    <TextField label="email" name="email" placeholder="enter an email" />
                    <View alignSelf={'flex-end'}>
                        <Button
                            disabled={isButtonDisabled}
                            type="submit"
                            variation="primary"
                        >
                            Send
                        </Button>
                    </View>
                </Flex>
            </Flex>
        </View>
    ) : (
        <Heading level={3}>Contact your admin for permission</Heading>
    )
}

export default withAuthenticator(Admin, { hideSignUp: true })
This file includes everything already discussed in other files, though I did want to point out how easy responsive design is when combining a <Flex/> component with an object to specify the direction🔥
The last thing to do in this file is to create the handleSubmit function.
This will make a call to a REST endpoint (we'll create this backend next), and create the user by passing in their username and email.
Underneath our useState call, add the following function:
const handleFormSubmit = async (e) => {
        e.preventDefault()
        setIsButtonDisabled(true)

        const username = e.target.username.value
        const email = e.target.email.value

        try {
            await API.post('adminActions', '/create-user', {
                body: {
                    username,
                    email,
                },
            })
        } catch (err) {
            console.log(err)
        } finally {
            setIsButtonDisabled(false)
        }
    }
As you can see, our API will be called adminActions and the route we'll call is /create-user.
With our frontend complete, let's get started creating our backend.
Adding Authentication
Before now, the only way to see what our application looked like was to remove the withAuthenticator calls. Let's fix that by adding auth from Amplify. Additionally, we'll create an admin group.
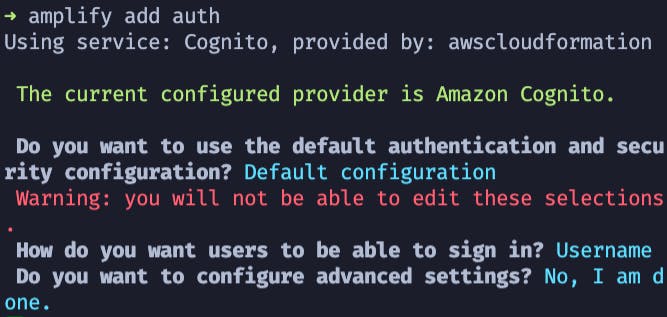
In your terminal, run the following command:
amplify add auth
Once there, follow the prompts to accept the default settings with no advanced options.
With our authentication setup, we can now update it to add our user groups:
amplify update auth
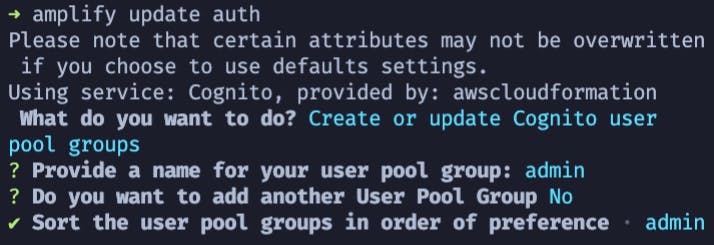
🗒️ Be sure to name your group
admin
And just like that we now have authentication set up in our app!
Let's create a new user so that we're able to navigate throughout our application!
To push up our authentication resources, run the following command:
amplify push
After verifying that there is both an auth resource and an auth group resource, hit enter and wait for the deployment to finish.

Once done, we are ready to create a user--but keep in mind that we removed that ability.
remove the { hideSignUp: true } option in the ProtectedUser.js file. We'll use this route to create our user.
Once removed, run the following command in your terminal to start your application:
npm start
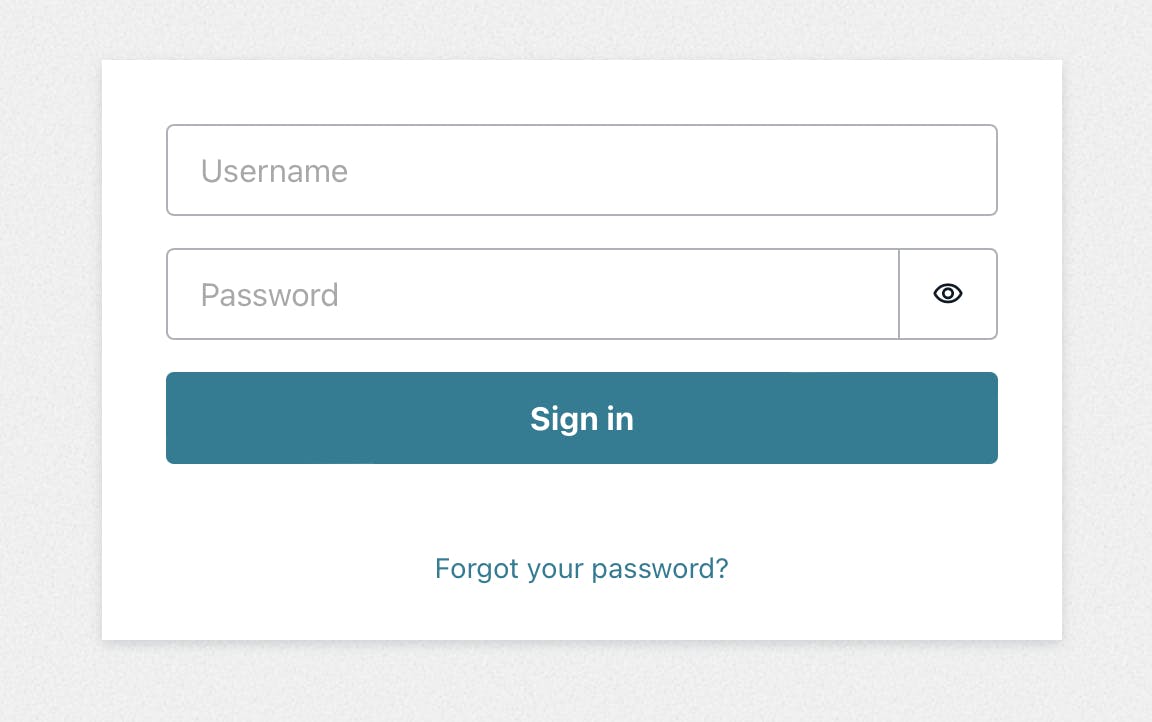
Once the application starts, click the My Account nav link and you should see the following tab to create a user:
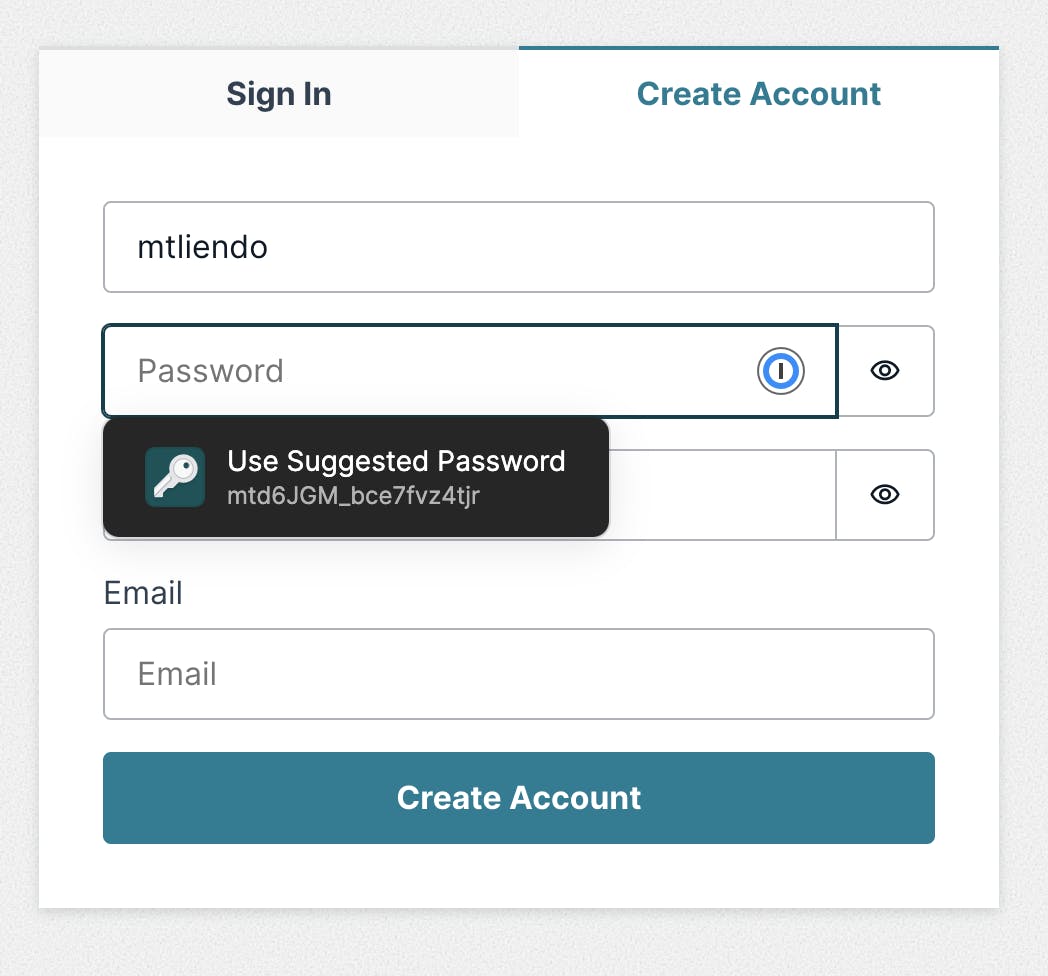
Go ahead and fill out the form details, and when prompted, enter the code that was sent to your email.
Once logged in, you should be able to view all of the user details printed out on the page.
Notice that you can navigate to the My Account section, but we can't access the Admin tab. Let's fix that by putting the user in the auth group.
In your terminal, run the following command
amplify console auth
When prompted, select "User Pool" to be taken to our Cognito User Pool in the AWS Console.

From here, we'll do two things. First, copy the ARN to your clipboard. We'll need that in a bit.
Second, navigate to the Groups tab.
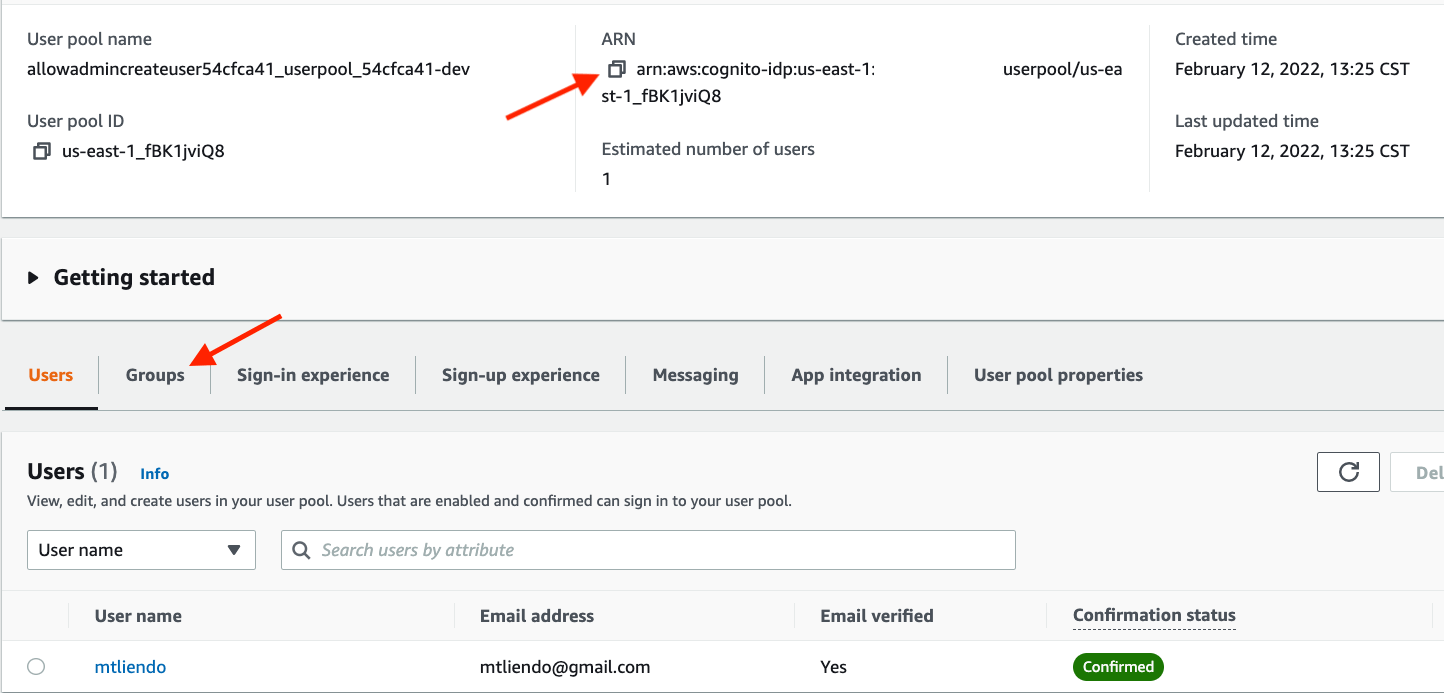
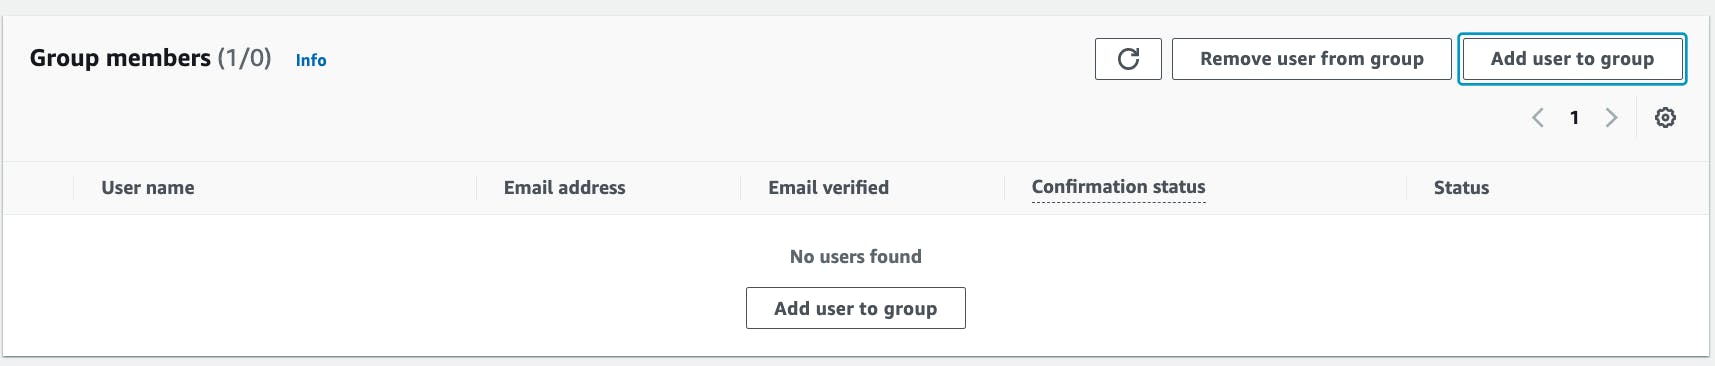
From this tab, take note that our admin group is created. Select that group and move the user we just created into it.
That's it! 🎉 We now have an admin user. Back in our application, log out, then log back in so that our changes take effect. Once logged in, you should be able to view the Admin page.
With authentication setup and our user in the right group, let's continue adding our API!
Creating a REST API
Our API will consist of two parts: The API itself, and the Lambda function that will be called when the route is hit. The Amplify CLI will walk us through both.
Run the following command in your terminal:
amplify add api
When prompted, select the following options:
- Friendly Name: adminActions
- Path: /create-user
- Function name: adminAPIFunc
- runtime: NodeJS
- template: Serverless ExpressJS function
When prompted to configure advanced settings, select Yes and select the following:
- Access other resources: Yes
- Selected categories: auth
- Auth has two resources, which one?: adminonlyauth
- select the operations you want to permit: create
From there, it'll now take us into the function flow and we can select the following options for our Lambda. Feel free to decline all of the configuration options.
When done, select the option to edit the local lambda function now.
When we granted our Lambda function access to our auth resource (specifically, our Cognito Userpool), Amplify created an environment variable for us to reference it.
Let's make use of that by pasting in the following code:
/* Amplify Params - DO NOT EDIT
    ENV
    REGION

  yours will be different 👇🏽 Make sure it matches below.
    AUTH_ADMINACCESSTWITCHEEA62CDD_USERPOOLID
Amplify Params - DO NOT EDIT */

const express = require('express')
const bodyParser = require('body-parser')
const awsServerlessExpressMiddleware = require('aws-serverless-express/middleware')
const { CognitoIdentityServiceProvider } = require('aws-sdk')
const cognitoIdentityServiceProvider = new CognitoIdentityServiceProvider()

//yours will be different 👇🏽 Make sure it matches above.
const userPoolId = process.env.AUTH_ADMINACCESSTWITCHEEA62CDD_USERPOOLID

// declare a new express app
const app = express()
app.use(bodyParser.json())
app.use(awsServerlessExpressMiddleware.eventContext())

// Enable CORS for all methods
app.use(function (req, res, next) {
    res.header('Access-Control-Allow-Origin', '*')
    res.header('Access-Control-Allow-Headers', '*')
    next()
})

app.post('/create-user', async function (req, res) {
    // Add your code here
    const { email, username } = req.body

    try {
        await cognitoIdentityServiceProvider
            .adminCreateUser({
                UserPoolId: userPoolId,
                Username: username,
                DesiredDeliveryMediums: ['EMAIL'],
                UserAttributes: [
                    {
                        Name: 'email',
                        Value: email,
                    },
                ],
            })
            .promise()
    } catch (e) {
        console.log(e)
    }
    res.json({ success: 'post call succeed!' })
})

app.listen(3000, function () {
    console.log('App started')
})

module.exports = app
If you've used ExpressJS before, you should feel right at home. If not, we're creating a POST route called create-user. This route use the AWS SDK to call the .adminCreateUser API by taking in the email and username that we pass from the frontend.
🗒️ Remember to make sure the userpoolId is your userpoolID and not mine.
Our terminal is still waiting for us to press enter. When asked if you'd like to restrict API access, select yes.
Didn't I already access to just
create? Good eye! Earlier, we gave our function the ability to only performcreatecalls, essentially what can it call. However, we want to restrict also who can call it. In this case, onlyadminusers.
Select Individual Groups. The options here, correspond to HTTP methods. Since we're _POST_ing data, we'll select create.
Select N when asked if you'd like to add another path.
For the last time, run the following command to push up our resources:
amplify push
Once done, to the /admin route, enter a new username and email (they both have to be different from the current user), and make sure you get the email for the temporary password.
As a last step, if you haven't already, add back the { hideSignUp: true } in ProtectedUser.js!
Final Thoughts
Congrats! This was truly an ask by the community and I hope you all found this use-case helpful!
We explored a lot of what Amplify has to offer in this example--on both the frontend and backend. If you enjoy solutions like this definitely let me know in the comments, or on Twitter @mtliendo!