

AWS CDK for Frontend Developers: Amazon S3 and CloudFront

If there was ever a service that intimidated me when first learning AWS, it was Amazon Simple Storage Service (S3). This is a service where you can upload a virtually unlimited amount of data into an S3 bucket and each item can be as large as 5 terabytes in size.
However, it's also where I heard the horror stories of big bills due to random file uploads, assets being taken due to misconfigured permission and other aspects that scared me to be very happy to either pay for some 3rd-party service or settle with their limitations.
Reflecting on it now, it was never S3 keeping me away from using it, but my lack of knowledge about roles and policies in AWS, as well as CORS.
So in this post, not only will we see firsthand how simple creating an S3 bucket with a CDN is, but we'll discuss the security as well.
By the end of this chapter, I hope you'll be more confident and better prepared to work with permissions in your own applications by having a strong grasp on how they apply in our Trip Logger app.
Great Power
An Introduction to Amazon S3
As mentioned before, Amazon S3 is a storage service capable of storing practically any type of data. This could be PDF, CSV, images, JSON, or anything else.
🗒️ S3 is not a database
When you need to perform database operations like querying, sorting, and filtering data, it's not efficient to store that data in S3. S3 is designed to store and retrieve objects, like files, and accessing data in S3 requires downloading the entire object
In our Trip Logger application, we'll implement both reading and writing data into our S3 bucket. For reading, the viewer doesn't have to be logged in.
For writing into our bucket, the user will have to be authenticated.
Understanding S3 access levels
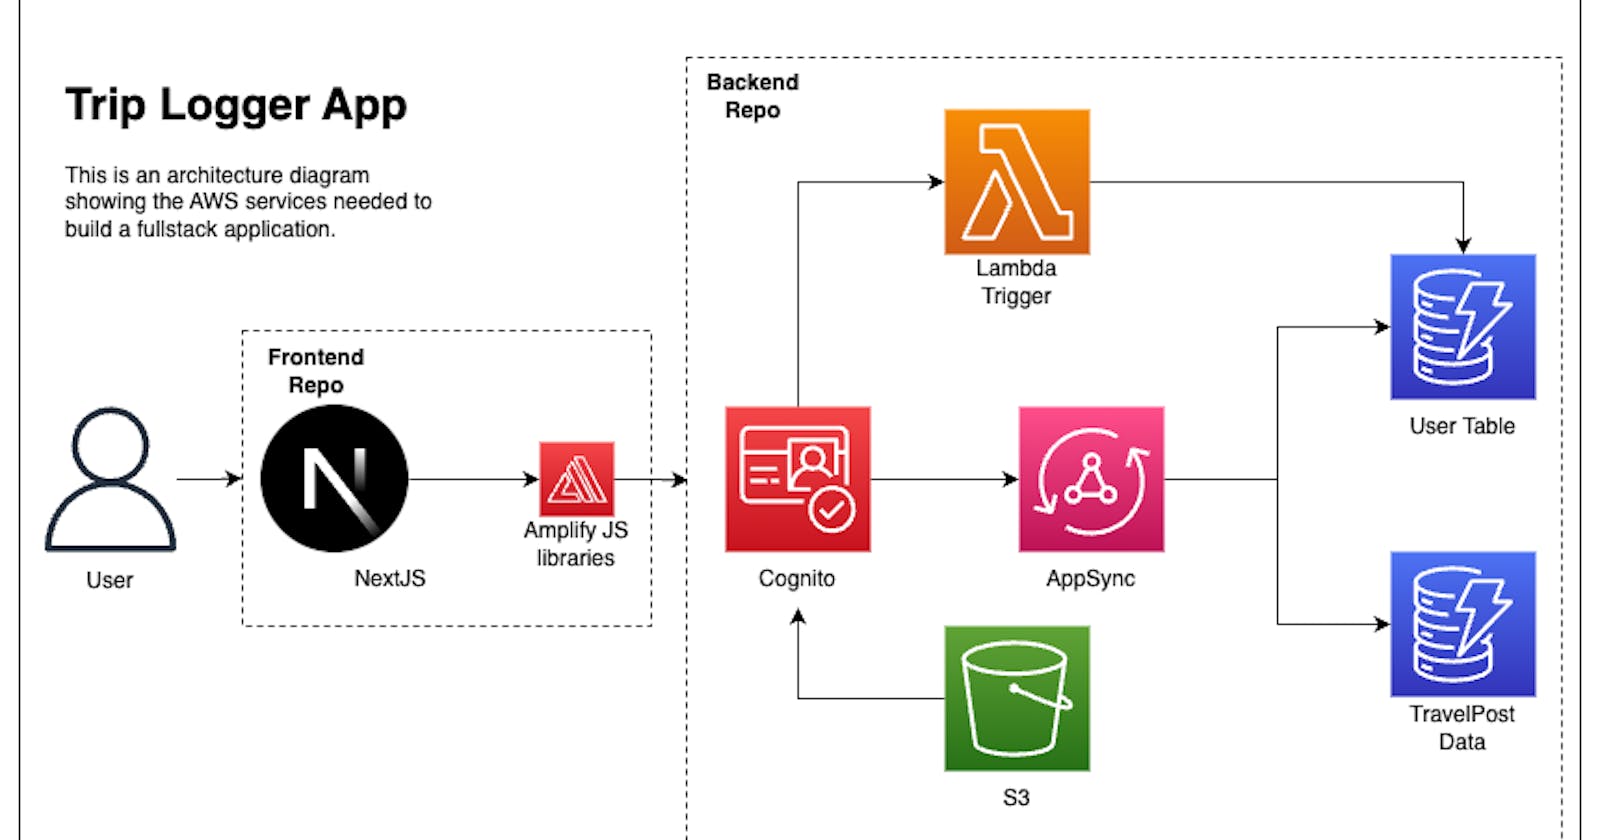
It's important to note, as seen in our architecture diagram below, that when it comes specifically to our S3 bucket, all requests are going through Cognito even if they aren't signed in. To understand this, we have to think about what it means to be unauthenticated.
When it comes to items stored in an S3 bucket, there are 3 essential states to consider:
Anonymous Access: Users who view our files on a different domain than our application.
Guest Access: Users who view our files on our domain, but have not authenticated.
Authenticated Access: Users who have signed into our application.
Using an e-commerce application as an example, guest access would be provided when a customer visits our site. They should have the ability to read public files without having to authenticate. However, the store owner may be able to log into the site and create, read, update, and delete products based on availability.
In addition, when a customer decides to purchase items, they may be taken away from our site, to a payment processor like Stripe. Stripe will need to read our product images from their domain instead of our own. This is an example of anonymous access.
With those concepts in place, let's create our first S3 bucket.
Creating a Simple S3 Bucket
Create a new file called lib/s3/tripPics.ts and paste in the following:
import { envNameContext } from './../../cdk.context.d'
import { Construct } from 'constructs'
import * as s3 from 'aws-cdk-lib/aws-s3'

type CreateTripPicsBucketProps = {
    appName: string
    env: envNameContext
}

export function createTripPicsBucket(
    scope: Construct,
    props: CreateTripPicsBucketProps
) {
    const fileStorageBucket = new s3.Bucket(
        scope,
        `${props.appName}-${props.env}-bucket`,
        {}
    )

    return fileStorageBucket
}
Skipping over the concepts we've already gone over, you'll see that the L2 construct for creating an S3 bucket simply takes in scope, an ID as the required props. When it comes to the configuration object, it doesn't require any so it's an empty object.
🗒️ Worth noting is there is a
bucketNamefield that we can pass in. However, it is best practice to let CloudFormation (via the CDK) generate this name for you.This is due to S3 bucket names needing to be globally unique.
In our lib/backend-trip-post-stack.ts file, call out createTripPicsBucket function by pasting in the following underneath our database references:
const tripPicsBucket = createTripPicsBucket(this, {
    appName: context.appName,
    env: context.environment,
})
That's it! You've now created an S3 bucket. While this is great, for us to make any use of it in our application, we'll have to apply some permissions to it.
Great Responsibility
S3 Bucket Permissions
"With great power, comes great responsibility."
- Uncle Ben🕷️
So far in our Trip Logger application, we had a brief exposure to policies when we gave our Lambda function permission to write data to our User table. However, for our bucket, it's important to understand the permissions we're setting and not rely on those methods.
To accomplish that, let's first talk about a friend we all know and love:
CORS
Cross-origin-resource-sharing (CORS) is the bane of many frontend developers.
By default, a server can talk to another server. However, a browser can only talk to a server if that server has allowed specific methods and headers saying it's ok to do so.
As frontend developers, we know this--and yet, I still run into this issue to this day.
With regards to our S3 bucket, it lives on an AWS server somewhere. We would like to read, update, and delete images from that bucket from our browser. To do that, we have to enable CORS on our bucket.
Fortunately, our empty config object on our bucket has a cors property that we can add. Back in our lib/s3/tripPics.ts file, paste in the following:
export function createTripPicsBucket(
    scope: Construct,
    props: CreateTripPicsBucketProps
) {
    const fileStorageBucket = new s3.Bucket(
        scope,
        `${props.appName}-${props.env}-bucket`,
        {
            // the new part
            cors: [
                {
                    allowedMethods: [
                        s3.HttpMethods.GET,
                        s3.HttpMethods.POST,
                        s3.HttpMethods.PUT,
                        s3.HttpMethods.DELETE,
                    ],
                    allowedOrigins: props.allowedOrigins,
                    allowedHeaders: ['*'],
                    exposedHeaders: [
                        'x-amz-server-side-encryption',
                        'x-amz-request-id',
                        'x-amz-id-2',
                        'ETag',
                    ],
                },
            ],
        }
    )

    return fileStorageBucket
}
allowedMethods: A list of predefined HTTP methods. It's important to note, this is just saying what's possible to do from the browser. The actual user authorization permission will be handled later.allowedOrigins: An array of domains that can perform the aboveallowedmethods.allowedHeaders: An array containing headers that the frontend can pass to the S3. By specifying*, we are allowing all headers to be passed.exposedHeaders: The headers S3 sends to the client.
While not important to understand, simply for those curious, here's a bit on what the exposed header values relate to:
x-amz-server-side-encryption: Whether the object in S3 is stored using server-side encryption, and if so, which encryption algorithm was usedx-amz-request-id: A unique identifier for the request made to S3, which can be used for troubleshooting purposesx-amz-id-2: A string that identifies the Amazon S3 bucket that processed the requestETag: A unique identifier for the version of the object stored in S3, which can be used for caching purposes and to determine if the object has been modified
🗒️ I'll admit, I cheated a bit here. I know that we'll be using the AWS Amplify JS libraries for S3 image handling on our frontend, and they have a section dedicated to supplying the CORS configuration.
The allowedOrigins field is handled by props because the origin will change depending on if we are on our develop environment, or production.
To include that field in our props, ensure the cdk.context.d.ts file has:
s3AllowedOrigins: [string]
Likewise, in the environments array, add the following to the object:
"s3AllowedOrigins": ["http://localhost:3000"],
By now, TypeScript should be complaining in our stack that the props are missing. Update the relevant files to contain the needed props and values.
Understanding Roles and Policies
A crucial part of working with AWS is understanding roles and permissions. These are managed in an AWS service called IAM, as such, you'll often hear "IAM Role" or "IAM Policy".
While this is worthy of its own series, the simple explanation is this:
A policy in AWS is a rule that says who can do what. "Who" in this context can be an AWS user or another AWS service.
A role is a set of policies that describe who the user will become if that role is applied to them.
A common metaphor is that a role is a hat. If you put on a construction hat, you inherit all of the authority of a construction worker. If you take the hat off and put on a captain's hat, you now have full authority to perform all the duties of a captain.
🗒️ The subtle, but important, concept here is that only one hat can be put on at a time. 🎩👒⛑️
Granting Access to our S3 Bucket Through IAM Policies
The first policy we'll create is a common one: allowing read access to our bucket.
In our lib/s3/tripPics.ts file, past the following before the return statement:
const allowReadFromBucket = new iam.PolicyStatement({
    effect: iam.Effect.ALLOW,
    principals: [new StarPrincipal()],
    actions: ['s3:GetObject'],
    resources: [`${fileStorageBucket.bucketArn}/public/*`],
})
At the top of the file, also include the following imports:
import * as iam from 'aws-cdk-lib/aws-iam'
import { StarPrincipal } from 'aws-cdk-lib/aws-iam'
As you can see there is an L2 construct for easily creating IAM policies. The StarPrincipal used to say "anyone" in an policy.
In plain speak, this policy reads as, "Allow anyone to get an object from an S3 bucket--specifically, any object from the public folder of the fileStorageBucket."
🗒️ I purposely put the policy keys in this order so that it read like that. Because it's just a JavaScript object, the order doesn't actually matter, but I find it helps when first learning.
Worth talking about is the fileStorageBucket.bucketArn line. Every AWS service has a unique identifier known as an Amazon Resource Name (ARN). In our case, we appended the /public/* part to further scope down access to a folder and not the entire bucket.
Now that we have the policy to read from our bucket, let's add another for signed-in users:
// Let signed in users CRUD on a bucket
const canReadUpdateDeleteFromPublicDirectory = new iam.PolicyStatement({
    effect: iam.Effect.ALLOW,
    actions: ['s3:PutObject', 's3:GetObject', 's3:DeleteObject'],
    resources: [`${fileStorageBucket.bucketArn}/public/*`],
})
As you can see, it's similar to the first one, but has more permission allowed. Additionally, we removed the IAM principal since in the next section we'll promote this policy to a "managed policy".
Adding IAM Policies to IAM Roles
Think back, or look up, at our architecture diagram. Then try to answer the following question: We are creating policies that allow access to our S3 bucket, but for who?
Remember when I said the "who" can be a user or an AWS service?
We are providing access to our Amazon Cognito identity pool.
Just under our previous policy, paste in the following:
new iam.ManagedPolicy(
    scope,
    'SignedInUserManagedPolicy',
    {
        description:
            'Allow access to s3 bucket by signed in users.',
        statements: [canReadUpdateDeleteFromPublicDirectory],
        roles: [props.authenticatedRole],
    }
)
AWS comes with a set of policies. When you first created your first AWS user, you likely used one: AWSAdminstratorFullAccess
The distinction is small, but what's important to note is that most AWS services will let you give them a regular policy as we defined earlier, but some require an AWS-managed policy and this is how we create one. Not only does it accept an array of policies, but it also accepts an array of roles for us to apply.
In our case, this role is the authenticated state of our Cognito identity pool. That's to say when a user makes a request, for one of our services, as part of the request, they will pass information about their current auth state (via a header). If they are authenticated, then this role will be invoked.
To pass the role from our identity pool, first, update the CreateTripPicsBucketProps in this file so it's expected:
type CreateTripPicsBucketProps = {
    appName: string
    env: envNameContext
    allowedOrigins: [string]
    authenticatedRole: iam.IRole
}
Next, in our lib/backend-trip-post.stack.ts file, simply pass the role from the identity pool to the bucket as such:
const tripPicsBucket = createTripPicsBucket(this, {
    appName: context.appName,
    env: context.environment,
    allowedOrigins: context.s3AllowedOrigins,
    authenticatedRole: cognitoAuth.identityPool.authenticatedRole,
})
Hopefully, it's starting to make sense at this point that much like frontend applications, the right level of abstraction and file organization can greatly pay off when it comes to passing values around!
Improving Content Delivery with Amazon CloudFront
You may be wondering why we didn't also create a managed policy for the unauthenticated role provided by our Cognito identity pool.
The reason is that we're not going to allow direct access to our S3 bucket at all.
The first policy we created was simply to get us comfortable working with policies. We won't actually be using it and instead will have our users access images from a content delivery network (CDN).
Getting started with a Content Delivery Network (CDN)
When we request a file from S3, that image has to be retrieved from an AWS server and is then loaded into our browser. Now, browsers may opt to do some caching, but it's only for your personal benefit. If your neighbor wants to see that same image, they would have to make that full network trip as well, even though you already brought the image next door.
A CDN solves that by caching the image at the nearest AWS network location near you. Now, when your neighbor requests that image you've cached it closer to you, so they get a faster response time.
An added benefit is that we don't need to allow public read access to our bucket since our CDN will be sitting between our bucket and our users.
To create our CDN, in the lib/s3/tripPics.ts file, add the following imports:
import * as awsCloudfront from 'aws-cdk-lib/aws-cloudfront'
import { S3Origin } from 'aws-cdk-lib/aws-cloudfront-origins'
Next, replace the IAM policy that just allowed Get:Object access with the following:
const fileStorageBucketCFDistribution = new awsCloudfront.Distribution(
    scope,
    `${props.appName}-${props.env}-CDN`,
    {
        defaultBehavior: {
            origin: new S3Origin(fileStorageBucket, { originPath: '/public' }),
            cachePolicy: awsCloudfront.CachePolicy.CACHING_OPTIMIZED,
            allowedMethods: awsCloudfront.AllowedMethods.ALLOW_GET_HEAD,
            cachedMethods: awsCloudfront.AllowedMethods.ALLOW_GET_HEAD,
            viewerProtocolPolicy:
                awsCloudfront.ViewerProtocolPolicy.REDIRECT_TO_HTTPS,
        },
    }
)
In addition to setting caching methods and redirecting HTTPS, the important part here is:
The L2 CloudFront construct makes this really simple
The line
origin: new S3Origin(fileStorageBucket, { originPath: '/public' })
When our CloudFront distribution deploys, it'll generate a URL for us. This will directly map to our S3 bucket. However, we only want to map to the /public folder.
By setting the originPath, a request to my-cdn.com/image.jpg will now forward to our S3 bucket: my-s3-bucket/public/image.jpg.
Lastly, because we are introducing two new services that will be used by our frontend, let's make sure to return them both.
Update the return statement to the following:
return { fileStorageBucket, fileStorageBucketCFDistribution }
🗒️ A note on pricing
For S3 pricing, after the 1-year free tier period, the cost of storing your first 50 terabytes of data in the us-east-1 region is $0.023 per GB. There are also data retrieval costs at $0.0004/1000 GET requests and $0.005/1000 PUT or DELETE requests.
For Amazon CloudFront pricing, their always-free tier includes the following:
1 TB of data transfer out per month
10,000,000 HTTP or HTTPS Requests per month
2,000,000 CloudFront Function invocations per month
Free SSL certificates
No limitations, all features available
Conclusion
In this post, we created an Amazon S3 bucket and an Amazon CloudFront distribution. My hope is what came across in this chapter is that creating an S3 bucket and a CDN took a relatively small amount of code and that the real focus was understanding policies and roles.
IAM configurations take time and practice. Fortunately, we'll continue to touch on them throughout this series. However, with what we created today, you now have the tools to create your own buckets with many best practices in mind.
In the next chapter, we'll bring our backend services together by creating a modern, full-managed, API that is not only completely serverless, but also completely functionless.
Until then, happy coding!
🦦


