

AWS CDK for Frontend Developers: Building Modern APIs with AWS AppSync

AWS AppSync is a fully-managed GraphQL API service and the last service that we'll add to this backend stack. Due to it being an API, it'll read and write data to DynamoDB, authorize requests with Cognito, and can even perform custom logic with Lambda.
At this point in the series, we should have a solid grasp on using various L2 constructs, passing arguments to them, and even a bit of knowledge with both setting permissions in policies and adding them to roles.
In this chapter, we'll expose ourselves to AppSync, both in terms of how it relates to GraphQL, but also as a service in the AWS ecosystem. By the end of this chapter, you'll have the tools in place to develop your next API with AppSync while understanding how it can best integrate as part of your backend architecture.
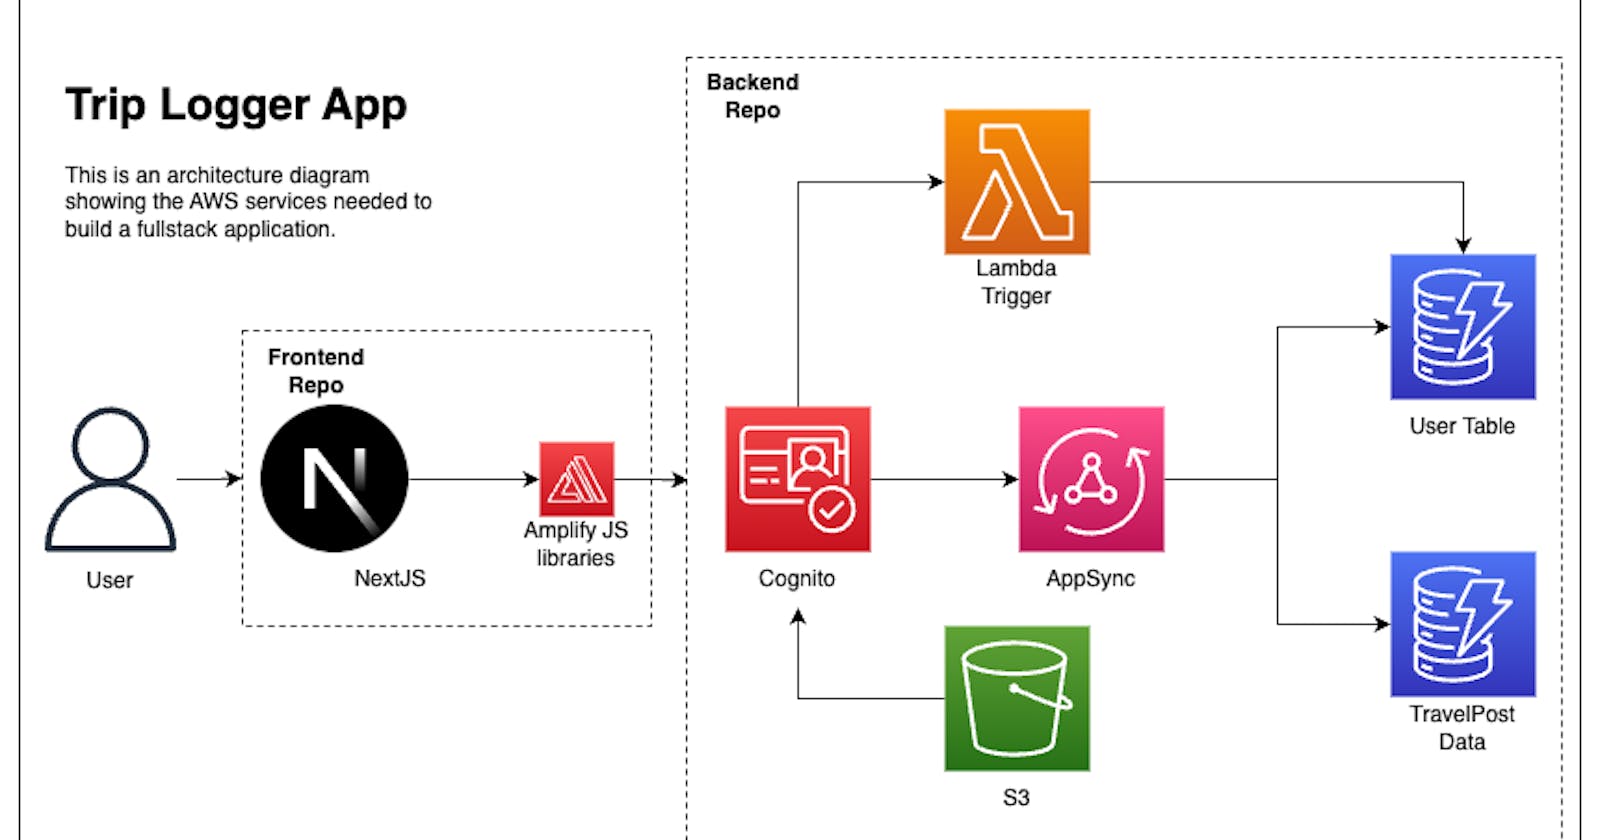
From the perspective of our Trip Logger application, this will complete the backend services in this stack!
AppSync is a powerful service, and if this is your first experience with it, be ready because it's going to change how you think about API development.
AWS AppSync
AppSync can be split up into two conceptual parts.
The GraphQL part: This includes features that are common to anyone building a GraphQL API
The fully-managed on AWS part: These are the parts that make it different from other GraphQL APIs.
Let's start by first talking about what GraphQL is and the benefits it gives to indie creators, and SaaS developers.
GraphQL in a Nutshell
While there are complete books, courses and such on GraphQL, I'll outline the 3 main parts to working with GraphQL on the backend:
GraphQL Schema
A schema is a contract for your API. It's made up of Queries, Mutations and Subscriptions. So instead of the traditional get,put,update and delete routes in REST, with GraphQL you use a Query to fetch data, a Mutation to update data (including deleting it), and a Subscription to listen for updates.
An example schema would look like the following:

🗒️ The general flow for defining an operation on a type is:
name(arguments): returnTypeAlso, note that as opposed to TypeScript, values are optional by default in GraphQL. To mark a value as non-null (aka required), add a
!.
In terms of supported scalar types, GraphQL supports String, Int, Boolean , ID, and Float. In case you're wondering, ID is a string, but it's marking it as being unique.
Data Sources
The second concept of GraphQL is a data source. Nothing too fancy about this. A data source is simply where you are going to get your data from. This can be a database, a JSON file, a public API etc.
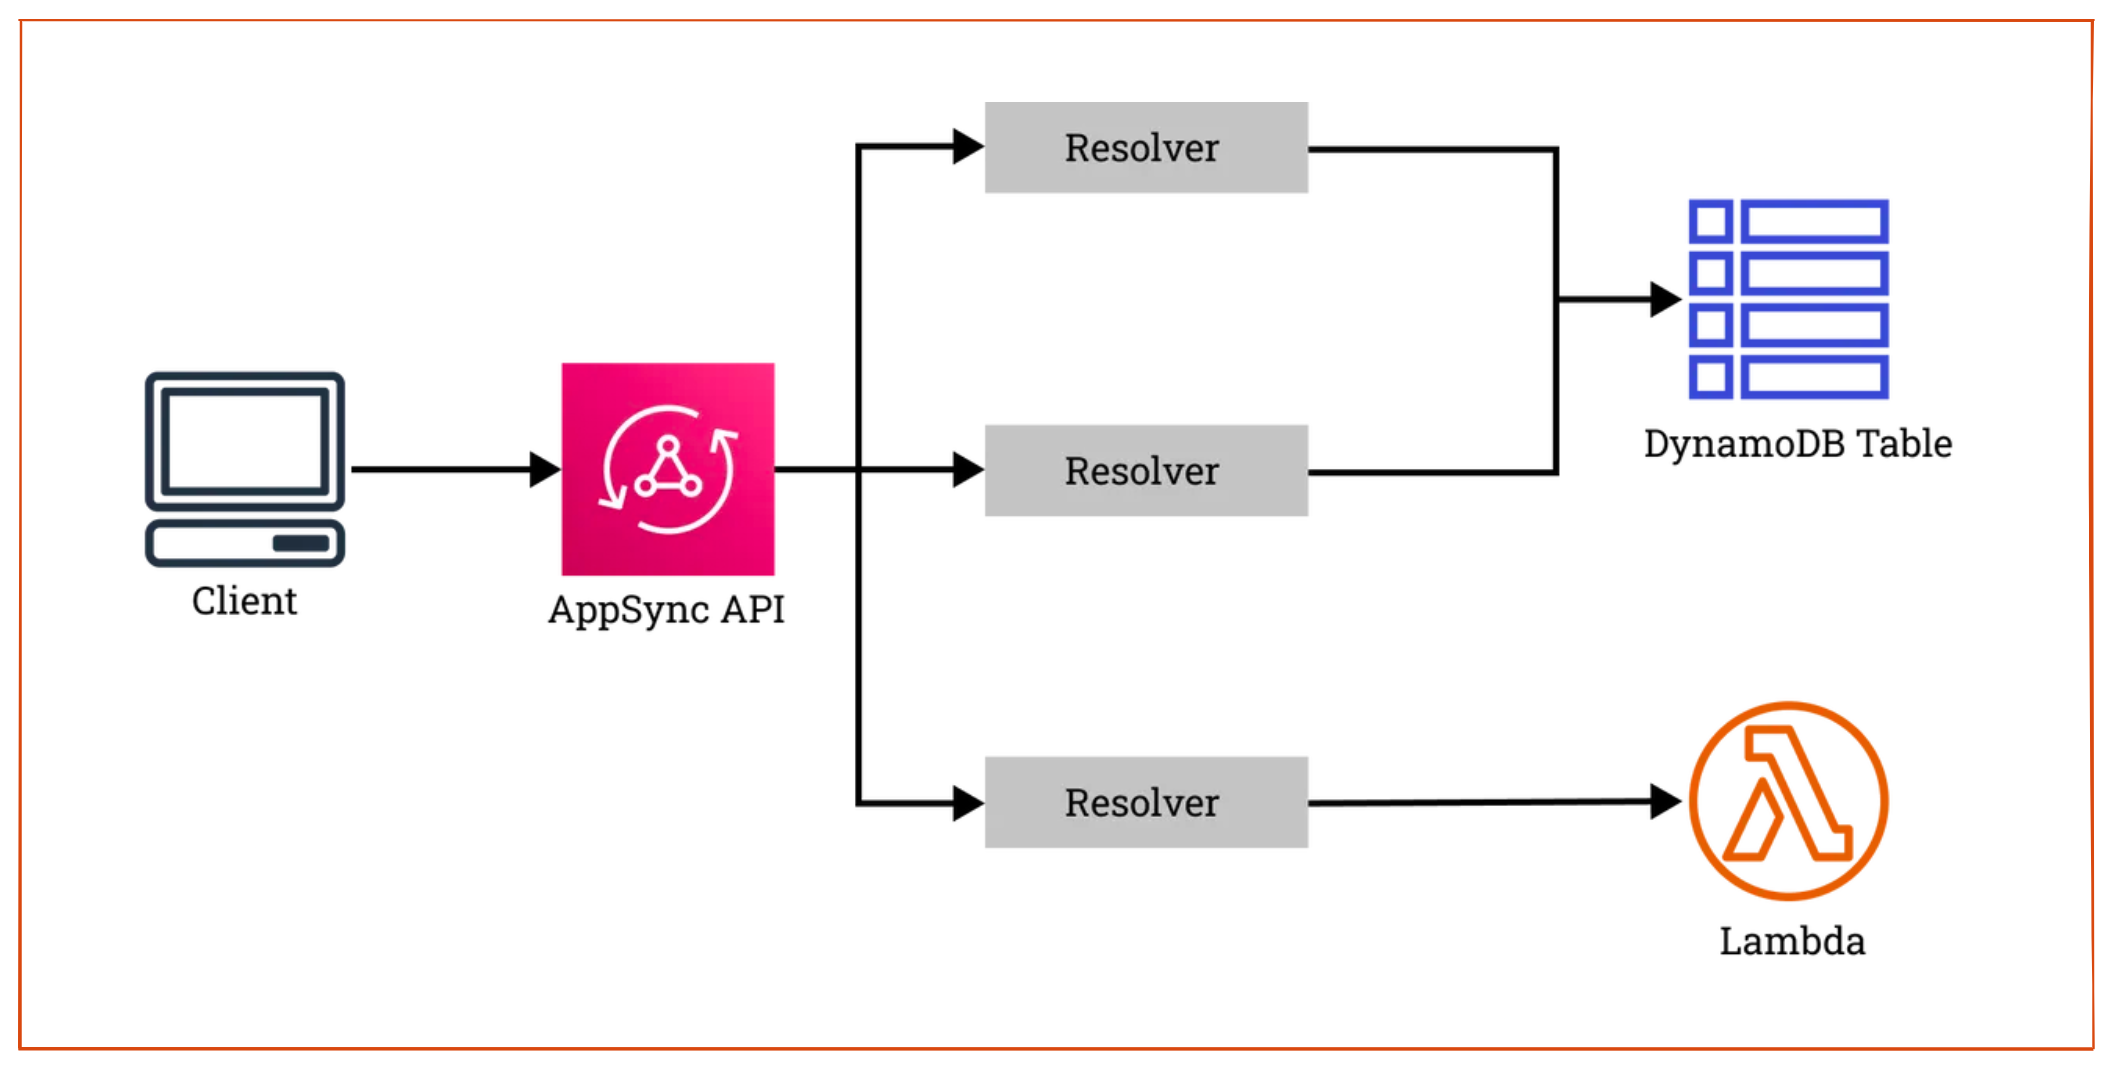
Resolvers
If a schema defines the data, and data sources are where the data lives, then a resolver sits in the middle and describes how to get that data. However, as opposed to a RESTful API, there aren't multiple routes to manage. GraphQL does this all through a single HTTP endpoint.
This is typically done in a GraphQL server. However, it can also be done in a Lambda function. The point here is that these are functions that are aware of the incoming request and can perform some logic based on the Query or Mutation operation.
As a frontend developer, this is similar in spirit to a reducer in libraries like Redux where there is a central hub that manages the state when actions are dispatched.

This is the appeal of GraphQL. When client applications ask for data, they don't need to know how the data is fetched, or where it comes from. Take the following schema for example.

When the frontend calls the getSocialRep query operation, they don't need to know that this is going to call the APIs for GitHub, Instagram, and Twitter. All they have to do is use a single endpoint to describe the data they need, and the resolvers connect to the various data sources to fulfill their request.
GraphQL on AWS
The problem with running GraphQL in a server is that you are paying for the server even when no one is using it and servers need to have their capacity scaled up and down manually based on usage.
To solve that, a lot of folks run GraphQL in a Lambda function. This solves both scaling and price. However, Lambda functions have their own limitations when it comes to cold starts, and need to manage memory capacity.
AWS AppSync is a fully-managed, fully-serverless solution for both scenarios. Because it's on AWS, it natively integrates with Cognito and DynamoDB. In addition, it automatically comes with subscription support by generating a WebSocket endpoint.
I've written and recorded a bunch of content on AppSync--even before joining the team, however, if wanting a quick start video on building a fullstack app with it, I created one that uses a great getting-started framework known as AWS Amplify.
With tens of thousands of customers, and billions of operations every single day, if you've ever had Taco Bell delivered to you, watched a show on HBO Max, saw stats on a live Ferrari F1 race, or purchased a ticket from Ticketmaster, then you've already interacted with AppSync.
How to Create an AppSync API in the CDK
Now that we talked about the pieces of a GraphQL API, let's put them to use.
Creating an AppSync schema
The schema serves as our contract so it's common to start here first.
To start, in lib/api/graphql create a file called schema.graphql and paste in the following:
# lib/api/graphql/schema.graphql
type Query {
    getTrip(id: ID!): Trip @aws_cognito_user_pools @aws_iam
    listTrips: [Trip]! @aws_cognito_user_pools @aws_iam
    getUser(id: ID!): User @aws_cognito_user_pools
}

type Mutation {
    createTrip(input: TripCreateInput!): Trip @aws_cognito_user_pools
    updateTrip(input: TripUpdateInput!): Trip @aws_cognito_user_pools
    deleteTrip(id: ID!): Trip @aws_cognito_user_pools
}

type Subscription {
    onTripCreate: Trip @aws_subscribe(mutations: ["createTrip"])
}
As mentioned earlier. We start things off by defining the operations we'd like to have.
However, there are three new things here: @aws_cognito_user_pools , @aws_iam , and @aws_subscribe .
These are known in GraphQL as directives and generally speaking, they are used to add special functionality to an operation. This is similar to higher-ordered functions in React.
In the case of these directives specifically, here is the breakdown of what each directive means in plain speak:
@aws_cognito_user_pools: This operation can only be called if the person calling it is in a Cognito userpool (aka, if they're signed in).aws_iam: This operation can only be called if the person or AWS service, has a policy applied to their role that allows them to do so.@aws_subscribe: Listens for a change to the provided mutations and sends back the return type,Tripin this case, via a WebSocket when that happens.
You'll notice on the operations, the return type is often trip (or an array of trips with [trip]) and some operations take in an input. Let's define those as well.
Add the following to our schema:
type Trip @aws_cognito_user_pools @aws_iam {
    id: ID!
    createdAt: AWSDateTime!
    updatedAt: AWSDateTime!
    title: String!
    description: String!
    imgKey: String!
}

type User @aws_cognito_user_pools {
    id: ID!
    createdAt: AWSDateTime! # 2023-02-16T16:07:14.189Z
    updatedAt: AWSDateTime!
    username: String!
    email: AWSEmail!
}

# No "id" is required because we will create one automatically.
input TripCreateInput {
    title: String!
    description: String!
    imgKey: String!
}

input TripUpdateInput {
    id: ID!
    title: String!
    description: String!
    imgKey: String!
}
We again use directives on our Trip type to effectively say, "You have to be authenticated in a user pool or have a policy applied to receive this return type."
🗒️
AWSDateTimeis a custom scalar offered by AppSync. It's aStringtype, but AppSync will automatically check to make sure it's a ISO formatted date (2023-02-16T16:07:14.189Z)The full set of AppSync scalars can be found in the AppSync docs.
🗒️ Now is a good time to review our
postConfirmationfunction. Notice how the data we store in the database overlap with what we have in for aUser.
Creating an AppSync API
Now that we have an idea of what will be needed, let's call our yet-to-be-created AppSync API and give it the needed props.
In the lib/backend-trip-post-stack.ts file, paste in the following under our cognitoAuth function:
// import {createAppSyncTripAPI} from './api/appsync.ts'
const tripAPI = createAppSyncTripAPI(this, {
    appName: context.appName,
    env: context.environment,
    unauthenticatedRole: cognitoAuth.identityPool.unauthenticatedRole,
    userpool: cognitoAuth.userPool,
    travelDB,
    userDB,
})
As seen from the directives in our schema, access to our API can be provided via a user pool, or some policy on their role. To account for that, we are passing in our user pool, and our unauthenticatedRole from our Cognito identity pool.
Also, because we know our travelDB table and userDB table are what we will be performing operations against, we provided those as well.
🗒️ This again shows the power of the CDK.
Through the use of TypeScript, we simply pass constructs around just like in any other TypeScript application.
Initializing the L2 AppSync Construct
To use the AppSync L2 construct, create a file called /lib/api/appsync.ts and paste in the following:
import { envNameContext } from './../../cdk.context.d'
import { Construct } from 'constructs'
import * as awsAppsync from 'aws-cdk-lib/aws-appsync'
import * as path from 'path'
import { UserPool } from 'aws-cdk-lib/aws-cognito'
import { Table } from 'aws-cdk-lib/aws-dynamodb'
import { IRole } from 'aws-cdk-lib/aws-iam'

type AppSyncAPIProps = {
    appName: string
    env: envNameContext
    unauthenticatedRole: IRole
    userpool: UserPool
    travelDB: Table
    userDB: Table
}

export function createAppSyncTripAPI(scope: Construct, props: AppSyncAPIProps) {
    const api = new awsAppsync.GraphqlApi(scope, 'TripAPI', {
        name: `${props.appName}-${props.env}-TripAPI`,
        schema: awsAppsync.SchemaFile.fromAsset(
            path.join(__dirname, './graphql/schema.graphql')
        ),
        authorizationConfig: {
            defaultAuthorization: {
                authorizationType: awsAppsync.AuthorizationType.USER_POOL,
                userPoolConfig: {
                    userPool: props.userpool,
                },
            },
            additionalAuthorizationModes: [
                { authorizationType: awsAppsync.AuthorizationType.IAM },
            ],
        },
        logConfig: {
            fieldLogLevel: awsAppsync.FieldLogLevel.ALL,
        },
    })

    api.grantQuery(props.unauthenticatedRole, 'getTrip', 'listTrips')

    return api
}
Skipping past the imports and the types, we'll look at the main parts of the construct's config object:
schema: Here we load in theschema.graphqlwe created earlier.authorizationConfig: This section configures the API's authorization settings. It specifies that the default authorization type isUSER_POOL, meaning it uses AWS Cognito User Pools for authentication. Additionally, it accepts additional authorization modes. In our case, we're specifyingIAMauthorization type as an alternative mode, passing in the IAM role from our Cognito identity pool.logConfig: This section enables logging for the API, with the field log level set toALL. This means all resolvers' logs will be captured, including errors, information, and field-level data. When we start testing our API on the frontend, we'll see how to view these logs.
When we created our API we allowed users/services with the correct IAM permissions access. To update those roles so that they indeed have access to certain operations, we use the helper method grantQuery and pass in the role, and the queries we'd like that role to have access to.
With intellisense, it's possible to see the other operations as well:

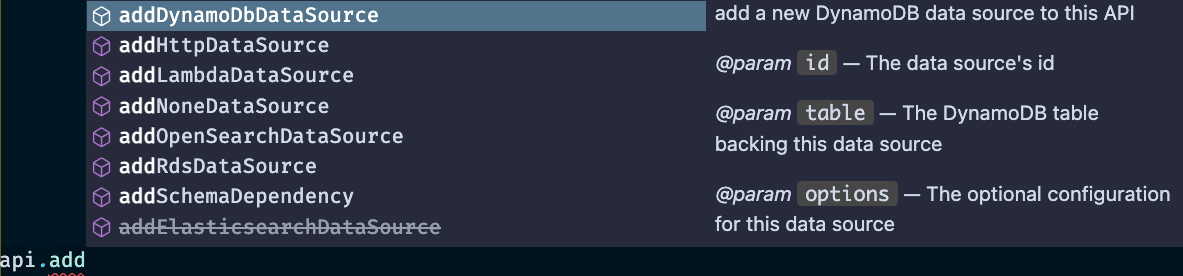
Adding a Data Source to an AppSync API
We passed in our travelDB and userDB because that is where our Trip and User information is persisted. To add those as data sources to our API, add the following just before our return statement:
const TripDataSource = api.addDynamoDbDataSource(
  `${props.appName}-${props.env}-TripDataSource`,
  props.travelDB
)
const UserDataSource = api.addDynamoDbDataSource(
  `${props.appName}-${props.env}-UserDataSource`,
  props.userDB
)
It's worth taking some time to explore the other types of data sources that AppSync provides. This flexibility is part of the attraction to why AppSync is so widely recommended when building modern fullstack applications.
Creating AppSync Functions
Perhaps one of the most compelling reasons to use AppSync is how it handles resolvers.
In AppSync, your resolver logic is put into a pipeline. This pipeline consists of small operations (known as functions) that perform one piece of logic.
🗒️ We'll be talking about AppSync "functions" in this section quite a bit. It's important to know that these are not the same as Lambda functions.
Yes--these functions will be in JavaScript
Yes-- they will look like Lambda functions.
But they're not. In AppSync, a Lambda function is a data source, just like a DynamoDB table. An AppSync function is simply a step in a resolver, similar to promise-chaining with
.then
If the idea of a pipeline resolver sounds fuzzy, check out this blog post I wrote that talks more about it.
To instill this concept, let's create our first AppSync function. Just under where we created our data source, add the following:
const createTripFunction = new awsAppsync.AppsyncFunction(
  scope,
  'createTripFunction',
  {
    name: 'createTripFunction',
    api,
    dataSource: TripDataSource,
    runtime: awsAppsync.FunctionRuntime.JS_1_0_0,
    code: awsAppsync.Code.fromAsset(
      path.join(__dirname, 'graphql/functions/Mutation.createTrip.js')
    ),
  }
)
Here we're creating an AppSync function that will be used for creating a Trip. This function is tied to the data source we created above. The function itself can be written in JavaScript or an older language known as VTL.
New applications shouldn't be using VTL and should opt for JavaScript, especially because the team will be releasing TypeScript support soon🤫
For a whirlwind tour of why this is a big deal, checkout the video below.
The code argument is where we'll write our AppSync logic.
Just to show how reproducible it is to create an AppSync function, let's create a function for getting Trip data from the table. Under our previous function, paste in the following:
const getTripFunction = new awsAppsync.AppsyncFunction(
  scope,
  'getTripFunction',
  {
    name: 'getTripFunction',
    api,
    dataSource: TripDataSource,
    runtime: awsAppsync.FunctionRuntime.JS_1_0_0,
    code: awsAppsync.Code.fromAsset(
      path.join(__dirname, 'graphql/functions/Query.getTrip.js')
    ),
  }
)
Feel free to create the code for thegetUserFunction, updateTripFunction, deleteTripFunction, and the listTripsFunction since they all follow the same format but have changed file paths and appropriate datasources.
Creating AppSync Pipeline Resolvers
As mentioned a couple of times now, a pipeline resolver is what gets triggered when a user makes a request to our API. So when we create our resolver, we have to tell what type and field to listen for.
To accomplish that, just beneath our AppSync functions, paste the following:
new awsAppsync.Resolver(scope, 'createTripPipelineResolver', {
  api,
  typeName: 'Mutation',
  fieldName: 'createTrip',
  code: awsAppsync.Code.fromAsset(
    path.join(__dirname, 'graphql/functions/passThrough.js')
  ),
  runtime: awsAppsync.FunctionRuntime.JS_1_0_0,
  pipelineConfig: [createTripFunction],
})
Recall a pipeline has a special before and after step. The before step allows us to perform logic (such as calculate values based on the arguments), while the after step allows us to perform additional formatting before returning the response to the user. We won't do either of those in this series, so I'm creating one JavaScript file that we'll reuse across all of our resolvers.
This pipeline resolver maps to our Mutation.createTrip operation and will call createTripFunction.
🗒️ In case you're wondering why the
pipelineConfigaccepts an array of functions, consider a scenario where we are creating an order fromStripe.The first function would be to get the Stripe secret, if that was successful, then it would pass the secret to another function that would call the Stripe API.
Not only does this separate concerns, but it allows us to reuse the
fetchStripeSecretfunction in other pipelines.
As before, once the steps are realized on how to create one resolver, creating another one becomes trivial. Let's create a resolver for the Query.getTrip operation by pasting in the following beneath the previous one:
new awsAppsync.Resolver(scope, 'getTripPipelineResolver', {
  api,
  typeName: 'Query',
  fieldName: 'getTrip',
  code: awsAppsync.Code.fromAsset(
    path.join(__dirname, 'graphql/functions/passThrough.js')
   ),
  runtime: awsAppsync.FunctionRuntime.JS_1_0_0,
  pipelineConfig: [getTripFunction],
})
Due to the steps being so similar, create the resolvers for the Query.getUser, Mutation.deleteTrip, Mutation.updateTrip, and the Query.listTrips operations. Make sure they each reference their respective pipelineConfig function.
🗒️ While it's important to remember we are defining our infrastructure, as opposed to creating an application, associating resolvers with functions can be a bit verbose.
For that reason, the AppSync team is looking into ways to condense the process of creating a resolver with only one function.
Defining AppSync Pipeline functions
In this and the next section, we're going to write the logic for all of our resolvers. This is one of the areas that sets AppSync apart from other GraphQL providers the most and why it's such a compelling reason to build a modern API with AppSync.
PassThrough Pipeline
Before talking about the functions, let's see an example.
In lib/api/graphql/functions create a file called passThrough.js and paste in the following:
// The before step.
// This runs before ALL the AppSync functions in this pipeline.
export function request(ctx) {
    console.log(ctx.args)
    ctx.stash.someValue = 42
    return {}
}

// The after step.
// This runs after ALL the AppSync functions in this pipeline.
export function response(ctx) {
    return ctx.prev.result
}
The above function is the before and after state in our pipeline. Notice how the request takes in an object that contains the context of the request. It also stores a value on the stash object called someValue. This allows functions further in pipeline to pull this value, without the value having to be passed down each through each function. Whatever the next function in line is, has to receive something. So we send an empty object.
The response also takes in its own context value and in this case returns the ctx.prev.result, which is whatever the previous function sent to it.
🗒️ What may clear things up is knowing that the
requestandresponsefunctions get transpiled by AppSync into VTL mapping templates. In VTL there is a request and response template.This is why the
requestandresponsefunctions above can't be named anything else, and why they can't use features in JavaScript likefetch, orfs.Going forward, I'll refer to the
requestandresponsefunctions as "mapping templates" or "templates" to make that point clear.
createTrip Function
// lib/api/graphql/functions/Mutation.createTrip.js
import { util } from '@aws-appsync/utils'
export function request(ctx) {
    let id = util.autoId()
    let values = ctx.args.input

    return {
        operation: 'PutItem',
        key: util.dynamodb.toMapValues({ id }),
        attributeValues: util.dynamodb.toMapValues({
            __typename: 'Trip',
            createdAt: util.time.nowISO8601(),
            updatedAt: util.time.nowISO8601(),
            ...values,
        }),
    }
}
export function response(ctx) {
    return ctx.result
}
Based on our schema, we know the arguments that are optional and which ones are required. Since we know that, we use one of the built-in util methods to create a random id and capture the arguments that we were passed as input.
From there, we call the PutItem operation to create store an item in our table. AppSync knows which table we're working with because we assigned it as our data source.
🗒️ The
@aws-appsync/utilslibrary is preinstalled by the AppSync runtime so it's not necessary to install, however, it's nice to get the intellisense when developing.To add the run library, run the following from the root of your project:
npm i @aws-appsync/utils
In the response template, we take the data that we receive from the DynamoDB (the newly created object in our Database, and forward it to our next step--the after step in our pipeline.
That's the complete flow of how data moves through our application.
For the next functions, I'll share a link to the docs, and point out any areas worth mentioning, but they will largely consist of the code for the mapping templates themselves.
deleteTrip Function
// lib/api/graphql/functions/Mutation.deleteTrip.js
import { util } from '@aws-appsync/utils'

export function request(ctx) {
    return {
        operation: 'DeleteItem',
        key: util.dynamodb.toMapValues({ id: ctx.args.id }),
    }
}

export function response(ctx) {
    return ctx.result
}
updateTrip Function
Note that both the updateTrip and createTrip both use the PutItem operation. The difference is that when creating a Trip there is no id to pass in since it's created automatically.
// lib/api/graphql/functions/Mutation.updateTrip.js
import { util } from '@aws-appsync/utils'
export function request(ctx) {
    let { id, ...values } = ctx.args.input

    return {
        operation: 'PutItem',
        key: util.dynamodb.toMapValues({ id }),
        attributeValues: util.dynamodb.toMapValues({
            __typename: 'Trip',
            updatedAt: util.time.nowISO8601(),
            ...values,
        }),
    }
}

export function response(ctx) {
    return ctx.result
}
getTrip Function
// lib/api/graphql/functions/Query.getTrip.js
import { util } from '@aws-appsync/utils'

export function request(ctx) {
    return {
        operation: 'GetItem',
        key: util.dynamodb.toMapValues({ id: ctx.args.id }),
    }
}

export function response(ctx) {
    return ctx.result
}
listTrips Function
While not shown in this example, with the scan operation it's possible to perform token-based pagination.
// lib/api/graphql/functions/Query.listTrips.js
export function request(ctx) {
    return  {
        operation: 'Scan',
    }
}

export function response(ctx) {
    const response = ctx.result.items

    return response
}
getUser Function
// lib/api/graphql/functions/Query.getUser.js
import { util } from '@aws-appsync/utils'

export function request(ctx) {
    return {
        operation: 'GetItem',
        key: util.dynamodb.toMapValues({ id: ctx.args.id }),
    }
}

export function response(ctx) {
    return ctx.result
}
A Bit of Honesty
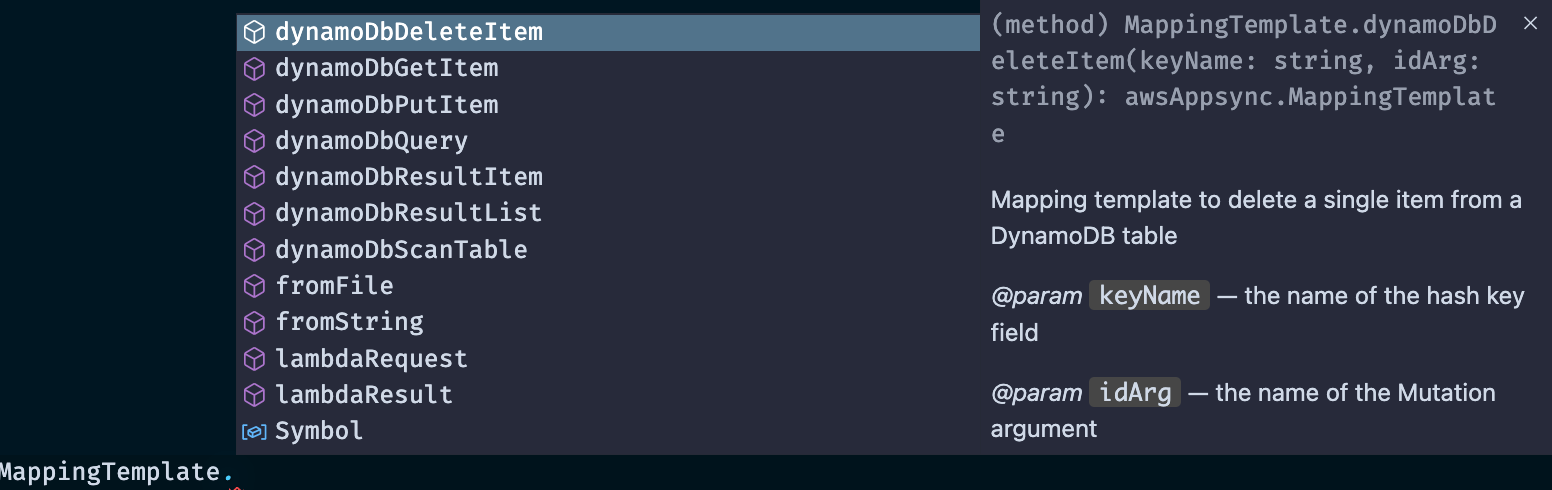
I'll be upfront because I know some of you like to poke around. Currently, each AppSync function does take a requestMappingTemplate and a responseMappingTemplate key. Further, the AppSync construct does have a MappingTemplate property that has full DynamoDB support for CRUD operations:
However, while those methods may be nice convenience APIs in the beginning. I wanted to show that writing JavaScript files, while verbose, is more valuable due to learning about how things are mapped under the hood.
🗒️ I would much rather have you refactor to something simpler and know how it works, than try to scale up and not understand it.
Conclusion
In this chapter, we dove deep into building out AppSync APIs. Not only did we cover schemas, directives, resolvers and data sources, but we also set up create, read, update, delete, and list functionality (with support for WebSockets) for an API in a ready-to-deploy, ready-to-modify way!
That's no small feat!
We also talked about AppSync functions and how they fit as pieces in a pipeline.
This was the last piece to this stack. In the next chapter, we'll talk all about deployment!
Until then, Happy Coding
🦦


