

The AWS CDK Guide to Authentication and Authorization for Frontend Developers

When it comes to learning AWS, it's important to keep in mind that what sets your product apart from the rest is all of the pieces that are different. The parts that are true for any app are what AWS creates services for. In AWS land, this is known as undifferentiated heavy lifting.
Your customers don't care that you have a fancy homegrown solution for hashing and salting passwords. They just want a safe and secure way to log into your app. Not only is signing up for a service common but the complete handling of the user flow is also expected.
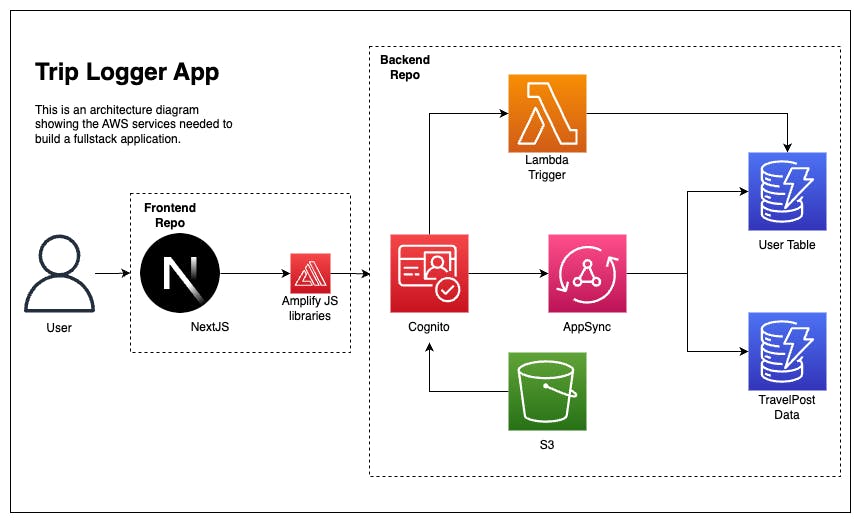
So far, in our application, we have two DynamoDB tables and a Lambda function. These are both examples of services that do one thing really well. However, some services offer multiple services under their name. Amazon Cognito is such a service.
Cognito is comprised of three main services: a user pool, identity pool, and a user pool client.
Let's discuss each of those to see what they provide.
Authentication
Frontend developers use authentication to provide credentials that identify who they are. This is often done by providing an email and password, or by signing in with a social provider. Popular solutions like Auth0 and Auth.js are commonly used in the frontend/indie hacker community for their ease of use and developer experience.
When working with AWS services, the preferred solution is a Cognito userpool. This service is a directory or pool of users that contains information about the users in your application. It offers a complete sign-up experience, including sign up, sign in, sign out, password recovery, and more. It also allows for simple integration with Google and Facebook log-ins. The Amplify JavaScript libraries further simplify the authentication experience.
When a user signs up for an application using Cognito, a unique ID is generated for them, along with their email and username. While custom attributes can be added, they are generally expected to remain unchanged. This is because that information is stored in the JSON Web Token (JWT) provided by Cognito. To avoid users having to log out and log in to update their information, it's best to store user data in a User table.
🗒️ The combination of Cognito -> Lambda -> DynamoDB is a common approach in both the serverless community and the SaaS community due to its flexibility, scalability, and robustness.
Creating a Cognito Userpool with the AWS CDK
In our Trip Logger CDK project, create a following in the lib/cognito/auth.ts.
import { Construct } from 'constructs'
import * as awsCognito from 'aws-cdk-lib/aws-cognito'
import { NodejsFunction } from 'aws-cdk-lib/aws-lambda-nodejs'
import { envNameContext } from '../../cdk.context'

type CreateTravelUserpool = {
    appName: string
    env: envNameContext
    addUserPostConfirmation: NodejsFunction
}
export function createTravelUserpool(
    scope: Construct,
    props: CreateTravelUserpool
) {
// the L2 Construct for a userpool
const userPool = new awsCognito.UserPool(scope, `${props.appName}-${props.env}-userpool`, {
  userPoolName: `${props.appName}-${props.env}-userpool`,
  selfSignUpEnabled: true,
  accountRecovery: awsCognito.AccountRecovery.EMAIL_ONLY,
  userVerification: {
    emailStyle: awsCognito.VerificationEmailStyle.CODE,
  },
  standardAttributes: {
    email: {
      required: true,
      mutable: true,
    },
  },
})
    return { userPool }
}
At this point in the series, I'll skip over the types and the function and instead focus on the L2 Cognito construct itself. From there we can discuss the following properties of our userpool:
userPoolName: The name of the user pool. This is a required field.selfSignUpEnabled: A boolean value that indicates whether users can sign themselves up for the user pool.lambdaTriggers:An object that allows us to hook into various lifecycles of a user authentication process and invoke a lambda function in response.postConfirmation: A lifecycle event that is triggered after a user confirms their account registration.accountRecovery: Determines the account recovery method. In this case,EMAIL_ONLYis specified, which means that users can recover their accounts using only their email addresses.userVerification: An object that specifies the type of user verification. In this case,emailStyleis set toawsCognito.VerificationEmailStyle.CODE, which means that verification codes will be sent to users via email.standardAttributes: An object that specifies the standard attributes for the user pool. In this case, only theemailattribute is set withrequiredandmutableproperties.required: When set totrue, then theemailattribute is required, and users must provide a value for this attribute during sign-up.mutable: Determines whether theemailattribute can be updated by the user.
Creating a Cognito Web Client with the AWS CDK
Our userpool is just that--a place where we store users. Cognito doesn't know (or care) how our users get there and we have to tell it. To do that, we use the L2 Cognito UserPoolClient to create a web client and pass it to our userpool.
Replace the return {userpool} code above with the following:
const userPoolClient = new awsCognito.UserPoolClient(
    scope,
    `${props.appName}-${props.env}-userpoolClient`,
    { userPool }
)
return {userpool, userPoolClient}
Authorization
If authentication is a bouncer at a nightclub that checks your ID before getting in, then authorization is the V.I.P. access lounge that only certain people can get into.
That's to say, authentication is who you are, while authorization is what you are allowed to do.
Amazon Cognito handles authorization via identity pools.
When it comes to authorization, we're not just talking about the users that have authenticated with our application. This also applies to how unauthenticated users interact with our app, and by extension, AWS services.
This will make more sense in the next section where we add image support to our application with AWS S3.
Creating a Cognito Identity Pool with the AWS CDK
For a service feature so powerful, actually creating an identity pool is a bit lackluster.
For the last time, replace the return statement in our function with the following:
const identityPool = new IdentityPool(
  scope,
  `${props.appName}-${props.env}-identityPool`,
  {
    identityPoolName: `${props.appName}-${props.env}IdentityPool`,
    allowUnauthenticatedIdentities: true,
    authenticationProviders: {
      userPools: [
        new UserPoolAuthenticationProvider({
          userPool: userPool,
          userPoolClient: userPoolClient,
        }),
      ],
    },
  }
)
Aside from giving it a name, and passing in our userpool and client, the only thing to call out is that we explicitly tell our identity pool to allow unauthenticated users to access our AWS services. What those users can do is still fully up to us, but the ability to even attempt access is now provided.
However, you should notice at this point that TypeScript is unhappy. Specifically, it can't find the IdentityPool and UserPoolAuthenticationProvider constructs.
This is because these L2 constructs are currently in alpha and haven't been merged into the main library yet.
🗒️ As a word of caution, be careful when using alpha constructs as they can have breaking changes. I'm opting to use them in this series because well...I work at AWS and may or may not have knowledge that these specific features are fine to use for our purposes.
To install the alpha package, run the following command:
npm i @aws-cdk/aws-cognito-identitypool-alpha
Updating our stack with Cognito
As was the same in previous chapters, we'll invoke our createTravelUserpool function by passing in the appName , envand the addUserPostConfirmation props. This should be done just beneath the Lambda function we created in the previous chapter, but before our database (no reason in particular, I just like to keep related services together).
// created in previous chapter
const addUserFunc = new NodejsFunction(this, 'addUserFunc', {
    functionName: `${context.appName}-${context.environment}-addUserFunc`,
    runtime: Runtime.NODEJS_16_X,
    handler: 'handler',
    entry: path.join(__dirname, `./functions/addUser/main.ts`)
})

// import this function and call it with the appropriate props
const cognitoAuth = createTravelUserpool(this, {
    appName: context.appName,
    env: context.environment,
    addUserPostConfirmation: addUserFunc,
})

// ...databases we created in the previous chapter
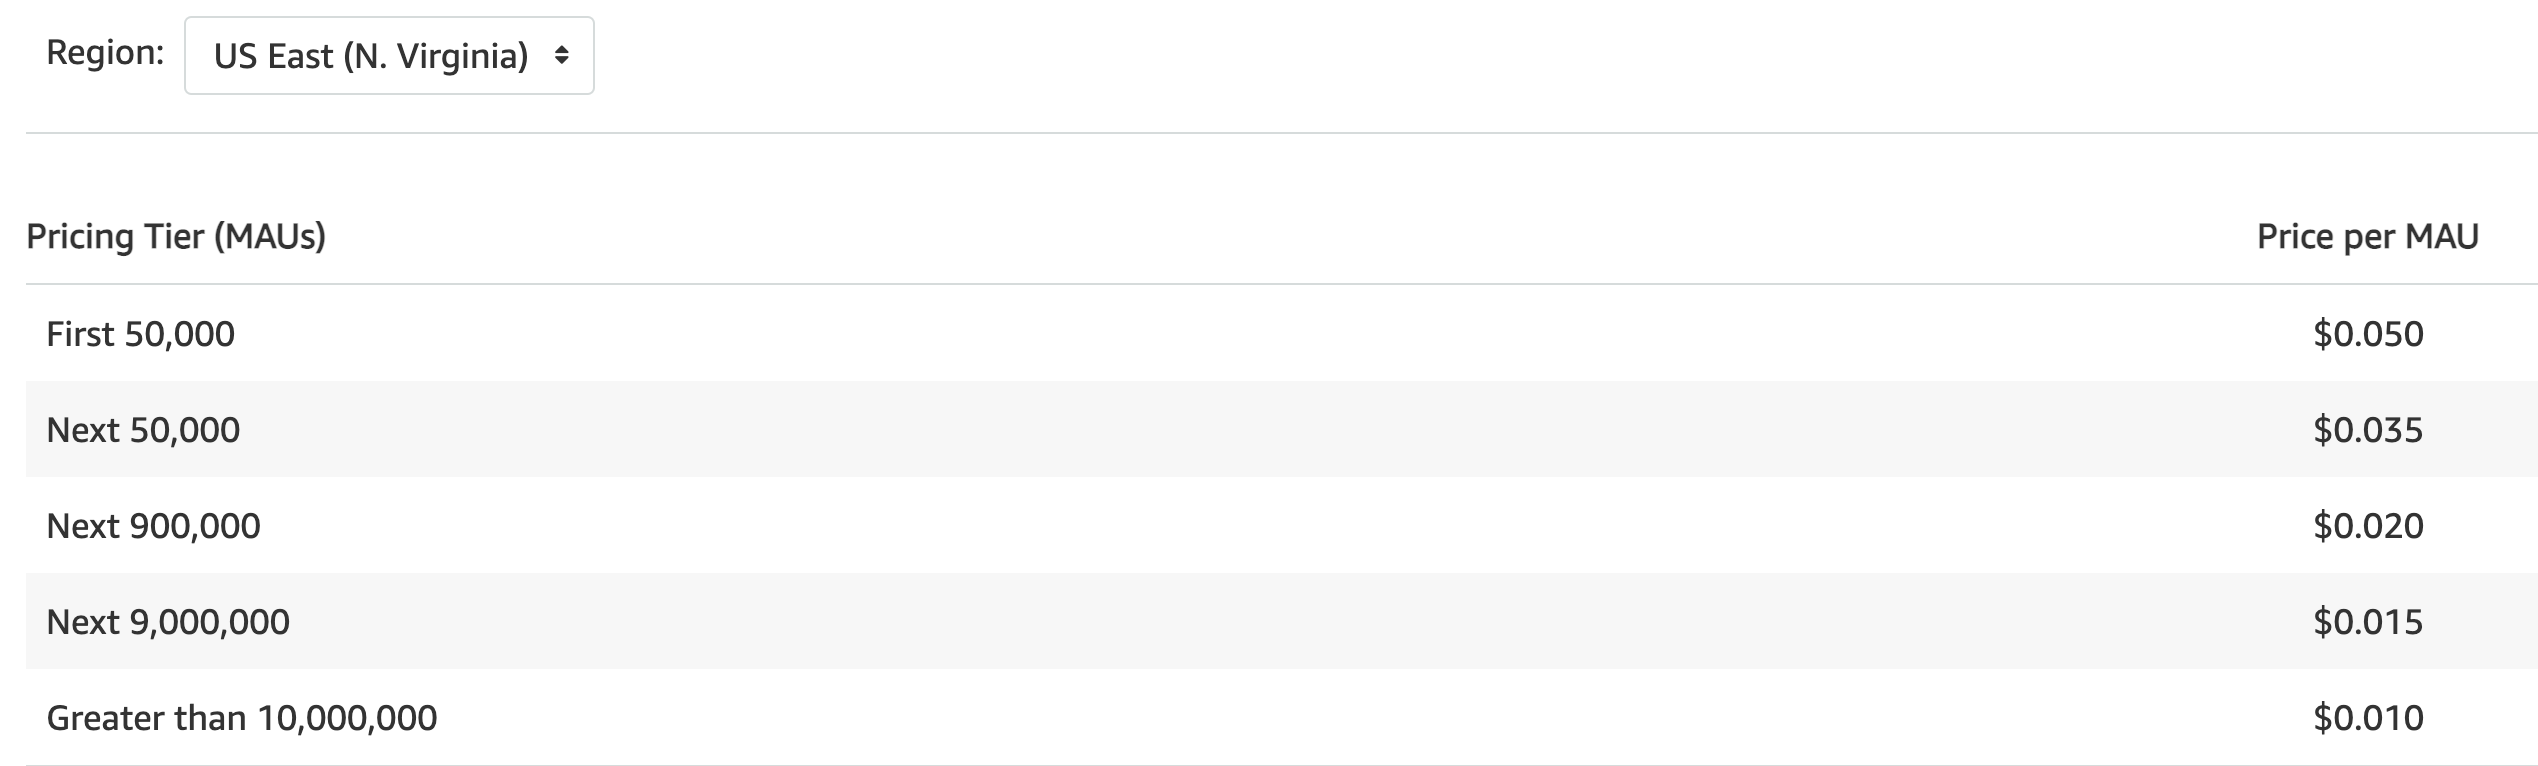
🗒️ A note on pricing:
Amazon Cognito has one of the most generous pricing tiers of any fully managed auth provider. Every account is allowed 50,000 monthly active users as part of the free tier and this extends past the first 12 months of an account being created.
Beyond that, each user has a cost of $0.05. While this may seem pricy, my take is that if you have over 50k MAU's signed up using your app and you haven't figured out a way to monetize that, come see me. We have bigger things to talk about 😜
Conclusion
In this post, we talked about authentication and authorization as they relate to both Amazon Cognito, and our Trip Logger application. Additionally, we added our Lambda function as a postConfirmation trigger. This enables us to display profile information to our users in a way where it can be updated without them having to log in and out.
Due to Cognito being made up of child services, it's hard to explain how little fun it is to perform what we accomplished by clicking through the AWS console. Even today, it would trip me up. This is truly one of the best areas to showcase the power of the AWS CDK and infrastructure-as-code in general.
In the next post, we'll talk about asset storage with one of the very first services that AWS came out with Amazon S3.
Until then, happy Coding!
🦦


