


Photo by Wade Allen on Unsplash
The in-depth guide to selling digital products with AWS Amplify and Stripe
also featured: Lambda Function URLs, use-shopping-cart, Nodemailer, and more!


Table of contents
- Project overview
- Backend scaffolding with the Amplify CLI
- Adding Storage
- Adding Lambda Functions
- Adding our API
- Pushing up our resources to AWS
- Configuring our frontend (part 1)
- Scaffolding out Application in the AWS Console
- Access and Configure Stripe
- Configuring our backend Lambda functions
- Configuring our frontend (part 2)
- Conclusion
Project overview
There was once a time when building your own eCommerce solution seemed like a daunting and complex task. In truth it is. However, amazing services like Shopify and Big Commerce offer a robust selling experience for a monthly fee.
AWS Amplify offers a fair middle ground that takes away the complexities of building a storefront at a fraction of the cost. An added benefit is that the developer has complete control and ownership of the site's design and feature set.
In this post, we'll explore what it takes to get an online store setup when using the Amplify CLI, its libraries, and Stripe. This solution will act as a great starter project for those working with clients or wanting to quickly sell their own digital goods.
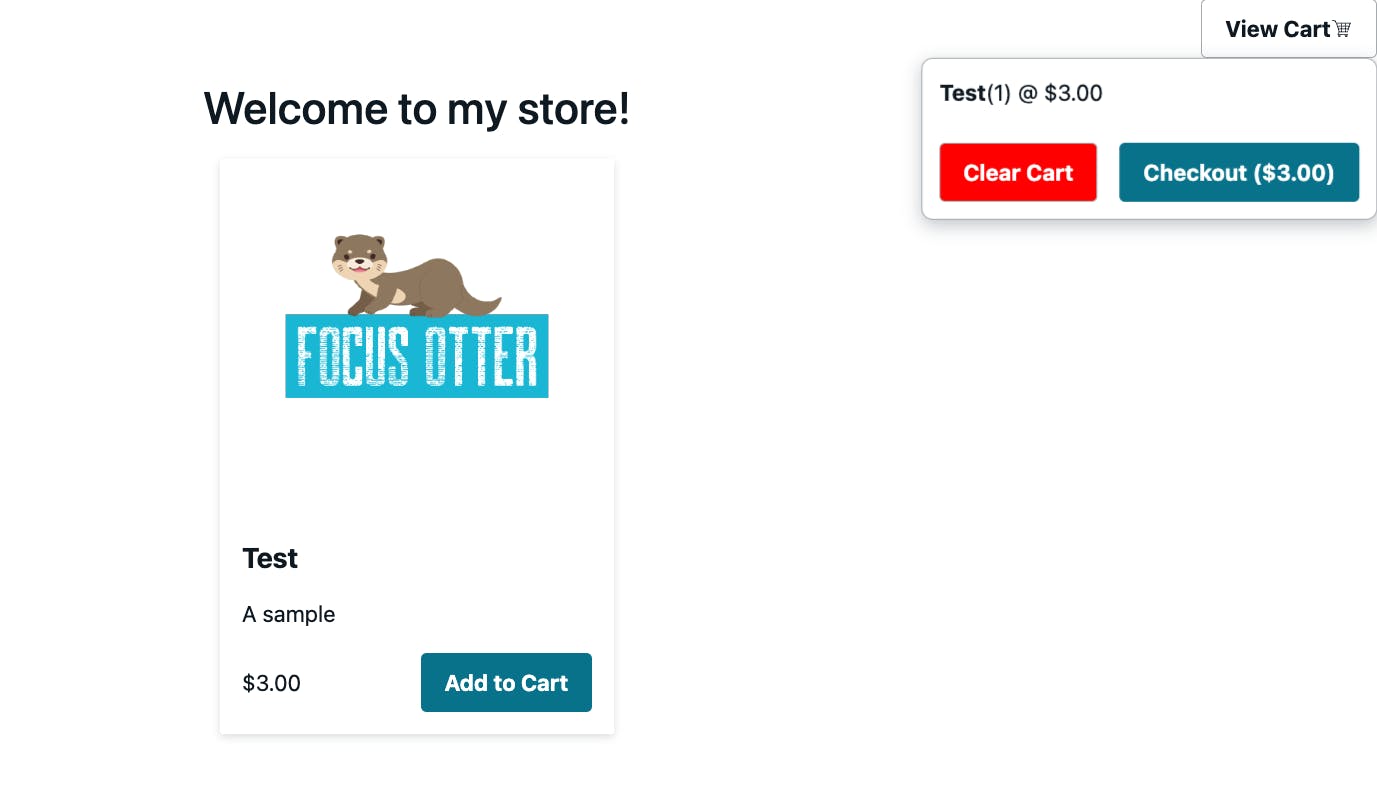
This sample app will have a home page that allows guests to add an item to their cart and get redirected to Stripe's hosted checkout to securely pay for their item(s).
In addition, this project will have an admin page that will allow admin users to sign in to our application. Once signed in, they will be able to create products for their store.
The starter repo we'll be using makes use of NextJS and contains the UI already built out using Amplify's React primitives. We'll start with the assumption that you have already cloned this repo and ran npm install to install the relevant packages.
However, if you're wanting to learn how you can leverage those primitives for your own applications or extend this one, I have a full video walkthrough that showcases them.
Backend scaffolding with the Amplify CLI
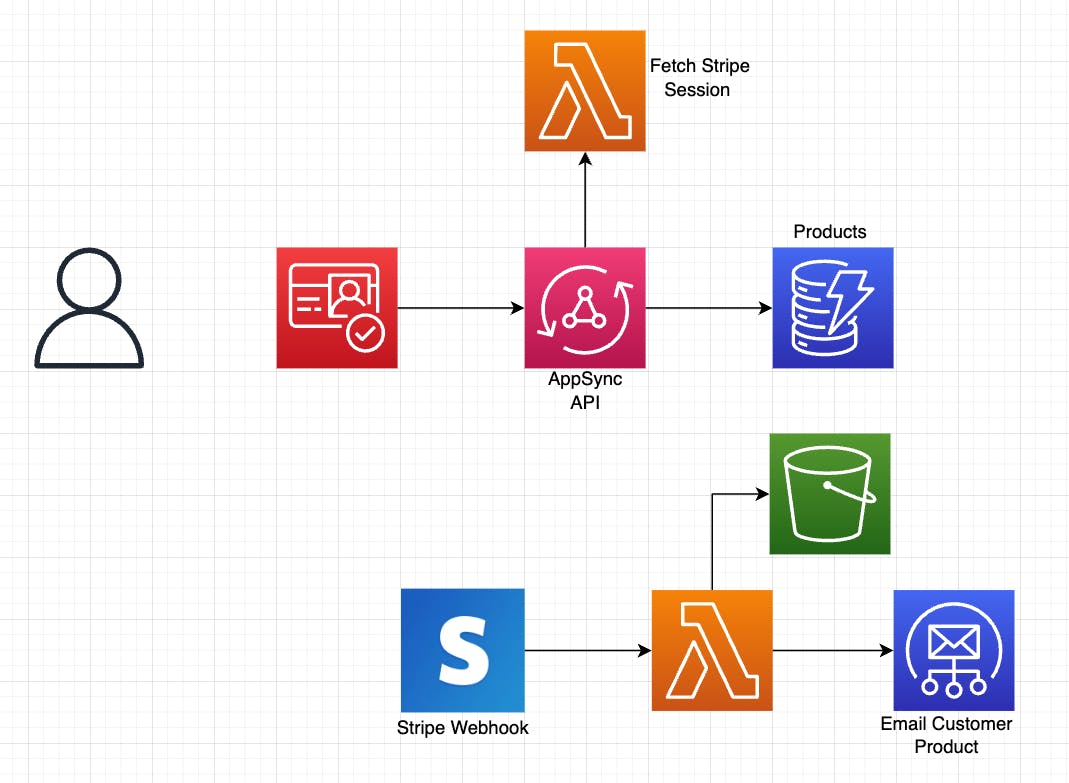
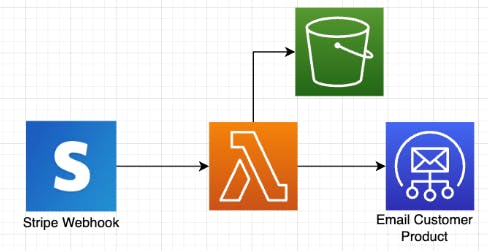
This application will be completely serverless and make use of several AWS services. The breakdown of which services we'll use is as follows:
Amazon Cognito: Used to authenticate our users. Additionally, users can be scoped/grouped to allow for various access patterns.
AWS AppSync: A managed GraphQL API. When used with Amplify, it can automatically create a database and connection points via our schema. link to video
AWS Lambda: Serverless Compute/Cloud function. We'll create two in our application. One for AppSync to connect to an external service, and a standalone function that listens to events from Stripe. link to post
Amazon DynamoDB: A NoSQL database. This will store information about the products that our admin users create.
Amazon S3: A cloud storage solution. In our case, we'll store 2 types of content: images to display for a product, and digital files that can be used. link to post
Amazon SES: Used to send email, we'll configure this service in the console and make use of it in our Lambda function.
Stripe: Gone are the days of building out our own payment system. Stripe is a 3rd-party service that will allow us to securely and compliantly handle online payments.
When mapped out, our architecture will resemble the below diagram
As far as actually creating these services, we'll leverage the Amplify CLI to provision, set up permissions, and scaffold.
I'll be using
v8.0.2of the Amplify CLI. To install, run the following:
npm install -g @aws-amplify/cli
Initializing our project
With our starter project cloned and our dependencies installed, let's initialize our project so that it is connected to AWS.
Run the following command:
amplify init
This will prompt a series of questions. Select the following options:
| prompt | response | notes |
| Enter a name for the project | [enter] | The default name is fine |
| Initialize the project with the above configuration? | N | |
| Environment name | [enter] | |
| Default editor | Visual Studio Code | Feel free to select your code editor if listed |
| Type of app | JavaScript | |
| What JavaScript Framework | React | We're using NextJS specifically |
| Source Directory Path | [enter] | This defaults to src. Select . if you prefer otherwise. |
| Distribution Directory Path | .next | The default is for create-react-app. NextJS uses .next |
| Build Command | [enter] | |
| Start Command | [enter] | Locally, we use npm run dev, but in prod we use npm start |
| Select the authentication method | AWS Profile | Select the profile you have setup |
🗒️ Using a table to display the CLI options is new for me. I usually add an image of my output. If you prefer this format, I'd appreciate it if you let me know in the comments!
Adding authentication
Now that our application has been initialized, we can begin adding authentication.
Typically when doing so, we can accept the defaults and move on. However, in our case, we'll explore some of the advanced to allow limited to access to guest users, and broader access to users in an admin group.
To get started, run the following command in your terminal and select the following prompts:
amplify add auth
| prompt | response | notes |
| Use the default auth and security configuration? | Manual configuration | This has quite a few steps but offers the most flexibility |
| Select the authN/authZ services you want to use: | Signup/signin, connected with AWS IAM | In almost all applications, this will be your default |
| Provide a friendly name | [enter] | This is the name that will show up in our code editor |
| Enter a name for your identity pool | [enter] | Amazon Cognito has 2 parts: User Pools (users) and Identity Pools (permissions). |
| Allow unauthenticated logins? | Yes | Selecting 'Yes' means users that don't login at all will have some level of access. |
| Enable 3rd party auth providers | No | Useful for allowing social-signups like Facebook and Google |
| Enter a Userpool name | [enter] | Users that signup for our app will get grouped here |
| How do you want users to sign in? | Username | |
| Add User Pool Groups? | Yes | Down the road, we may want customers to sign in also. So we'll create an admin group to distinguish the two |
| Provide a name for your group | admin | |
| Add another group? | N | After pressing [enter], press it again for the sort option |
| Add admin queries API | N | Selecting [yes] would allow us to have a signed in user that can control other user's acces |
| Enable Multifactor auth (MFA) | Off | First-time sign in's will need to enter a code, but after that, their username and password is fine. |
| Email based registration | Enabled | The options here are to either have the access code sent to the user's email or phone |
| 🚨 For the rest of the options: | if y/n select n otherwise, press enter |
Just like that--by simply answering a few questions, we setup our backend authentication service: Amazon Cognito 🔥
Adding Storage
As mentioned earlier, because we are selling digital products, we'll need to store two types of files: images of our products, and the actual file (ebook, PDF, etc) that will get emailed to them.
Fortunately, as we've seen by now, the Amplify CLI can handle not just creating the Amazon S3 service, but also assigning the permissions as well.
Run the following command and go through the prompts as mentioned below:
amplify add storage
| prompt | response | notes |
| Select one of the below services | Content (Images, audio, video, etc) | "Storage" can mean files (S3) or data items (DynamoDB) |
| Provide a friendly name | productImages | |
| Provide a bucket name | productkit | This must be globally unique, though Amplify will handle adding on a random number for us |
| Restrict Access by? | Both | Guest users will read certain files, but Admin Group members can perform full CRUD |
| Who should have access? | Auth and guest users | Note that "guest" doesn't mean fully public, it means "people on my site that haven't signed in" |
| Authenticated user access | press spacebar to select read | "Any signed in user can view files" |
| Guest user access | press spacebar to select read | "Any user on my site that isn't signed in can view my files" |
| Select groups: | press spacebar to select admin | |
| Admin user access | press spacebar on all options | "If you are in the admin group, you have full access to the files" |
| Enable Lambda Trigger? | N | Useful if wanting to say "when an image is uploaded, resize it", but we won't do that here. |
Adding Lambda Functions
Take a moment to look at the architecture diagram above. Note that this application will need two Lambda functions: One that will be called by our API (we'll create that next), and another that Stripe will use as a webhook.
Let's continue with our flow by running the following command and answering the prompts:
amplify add function
| prompt | response | notes |
| Select which capability: | Lambda Function | |
| Provide a name | fetchStripeSessionURL | We'll end up using this name in our code soon |
| Choose a runtime | NodeJS | |
| Select a function template | Hello World | We'll use the most basic type, but as you can see, we have some nice templates! |
| Configure advanced settings? | N | We'll come back to this one later on |
| Edit the function now? | N | We'll add the actual code in another section |
🚨 This creates the function needed for our API. To create the function needed for our Stripe webhook go through the same steps but change the function name to
stripeWebhooks
Adding our API
Amplify allows for two types of API's: GraphQL API's with AppSync, or REST API's with API Gateway.
If wanting to get up to speed on AppSync, I have a full video walkthrough on how it works with Amplify
Otherwise, let's add our last service!
amplify add api
| prompt | response | notes |
| Select from one of the services | GraphQL | |
| Select a setting to edit: | Authorization modes | We'll allow varying access for signed in users, and guest users |
| Choose a default auth type | Amazon Cognito | This will be for admin users. |
| Configure additional auth types | y | |
| Choose additional auth types | IAM | Recall, for Cognito we allowed "unauthenticated access". This is how we allow public access for our API with Cognito |
| Here is the GraphQL API that we will create | continue | |
| Choose a schema template | Blank Schema | It actually doesn't matter what we select since we'll be providing our own schema |
| Edit the schema now | yes |
🗒️ In case only the
schema.graphqlfile opened up, go ahead and open up the full project in your editor and navigate toamplify/backend/api/amplifystripestarter/schema.graphql
Replace the contents of this file with the following:
type Product
    @model # automatically create a dynamoDB table for this type
    @auth(
        rules: [
            { allow: groups, groups: ["admin"] } # uses cognito to allow CRUD access
            { allow: public, provider: iam, operations: [read] } # guests can read only
        ]
    ) {
    id: ID!
    name: String!
    description: String!
    price: Int! # price is in cents (lowest currency value)
    currency: CURRENCY_ENUM!
    image: AWSURL # A valid URL string
    product_data: MetaData!
}

type MetaData {
    metadata: ProductData!
}
type ProductData {
    productFileKey: String! # S3 protected "folder" key
}

enum CURRENCY_ENUM {
    USD
}

# create an additional Query that takes in stringified JSON and returns a string
# This can only be called by guest users of our application
# When called, it will call the fetchStripeSessionURL Lambda function

type Query {
    fetchCheckoutURL(input: AWSJSON): String
        @auth(rules: [{ allow: public, provider: iam }])
        @function(name: "fetchStripeSessionURL-${env}")
}
The schema is commented with
#so that various bits can be better understood. Also, our function has-${env}added so that it can easily support multiple amplify environments.
Pushing up our resources to AWS
Now that we have our backend configured locally (though there are bits we'll revisit), we can push this up to AWS so that they services are created in the cloud.
Run the following command in the terminal:
amplify push
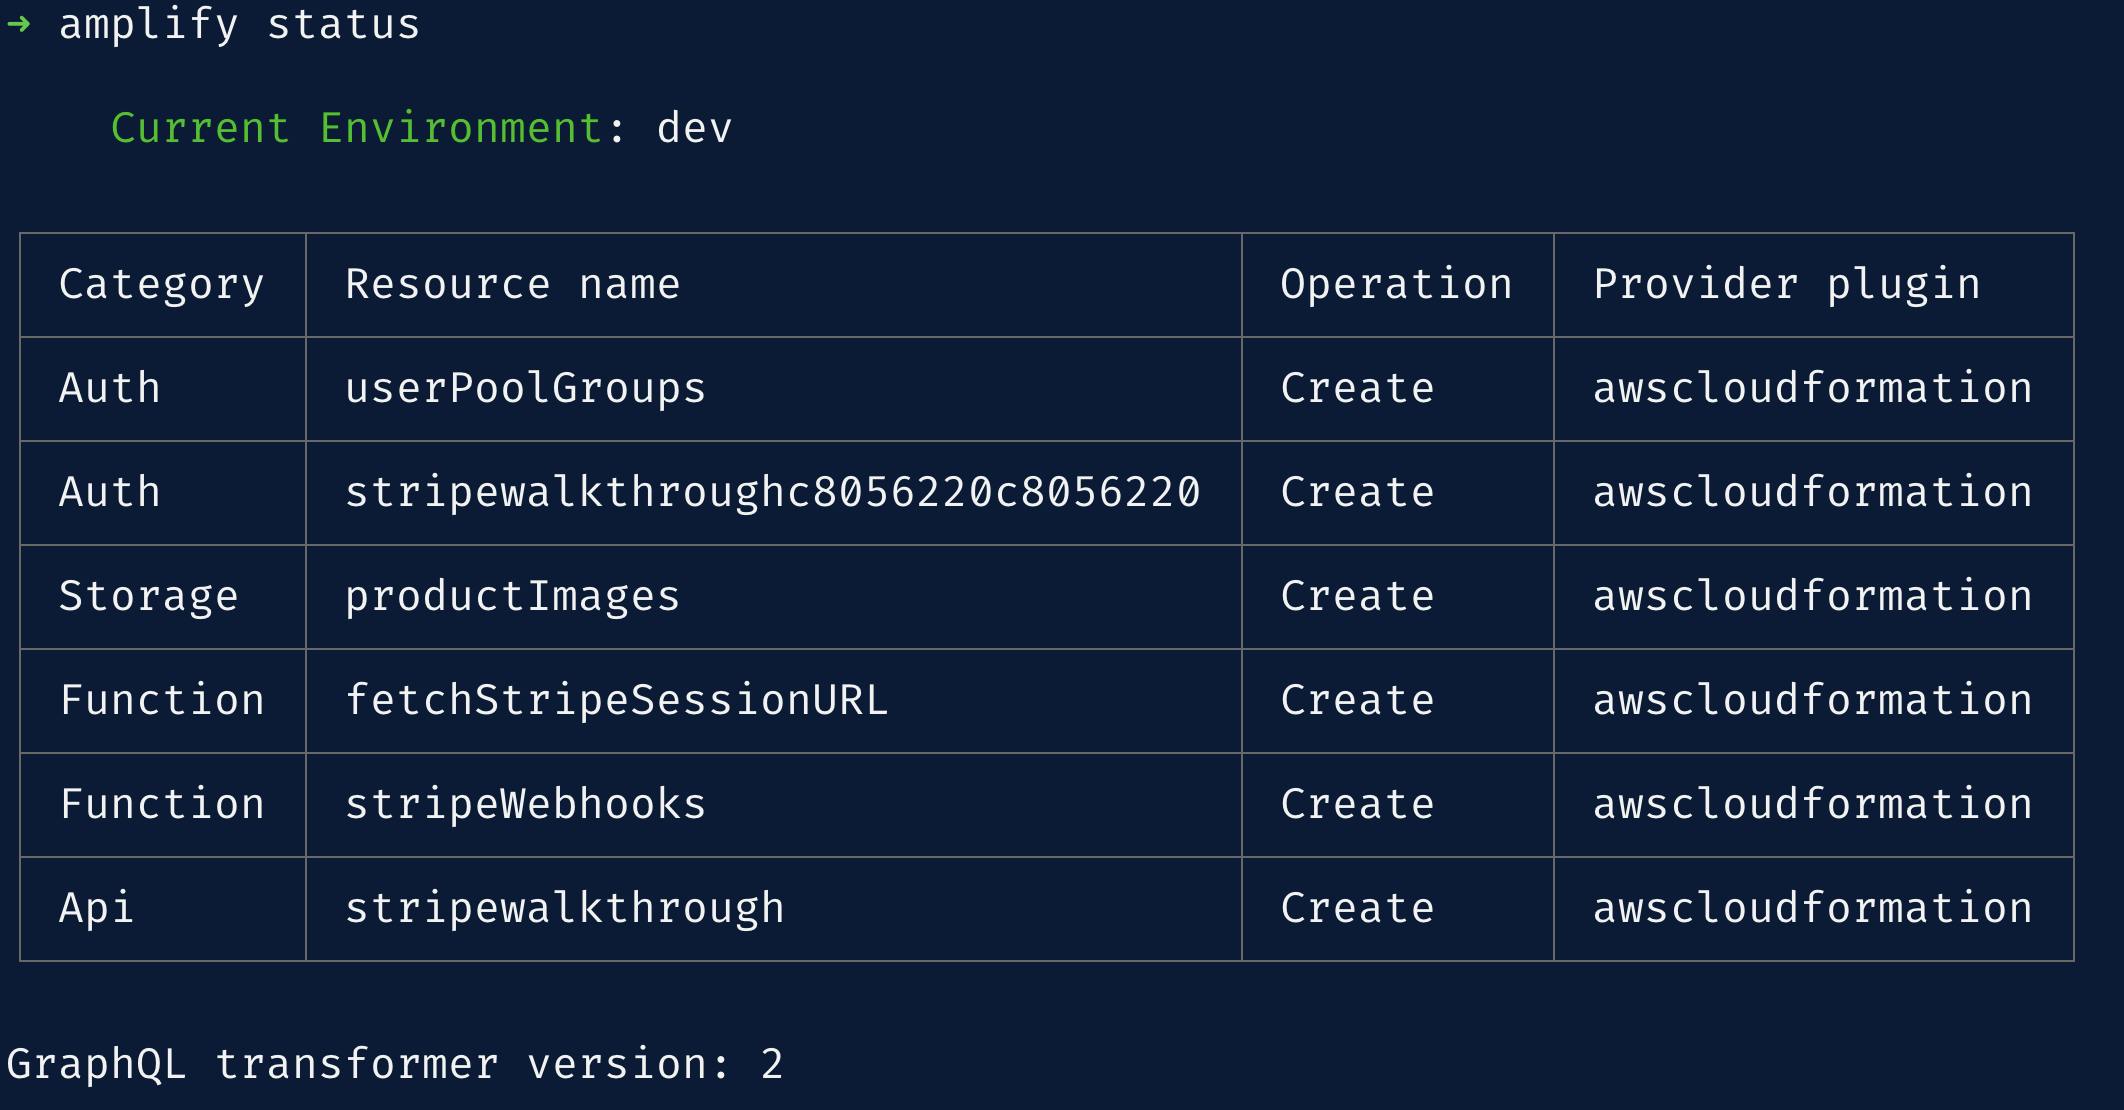
A table will get generated that shows the categories we've enabled as well as other information. It should look similar to the below screenshot.
The CLI will ask for some additional data for our API. Answer the prompts as such:
| prompt | response | notes |
| Are you sure you want to continue? | Y | |
| Do you want to generate code for your API? | Y | This will automatically create all the CRUD operations so we can interact with our API |
| Choose the code generation language | JavaScript | |
| Enter the file name pattern | [enter] | All the generated code will be saved in this src/grapqhl directory |
| Generate all possible GraphQL operations | Y | We can selectively generate all or some of the operations |
| Enter a maximum depth | 4 | Setting a limit prevents infinite loops. In our API we go Root -> MetaData -> ProductData, so we select a max depth of 4. |
☕ Our application is now deploying our entire stack to the cloud. Now is a good time to stretch and grab a coffee since the first deploy is generally the longest.
Configuring our frontend (part 1)
Assuming that this is a project that we'll create for clients or for ourselves, we'll want to launch it with an authenticated user already in the admin group. So they can create products.
To get started, open the _app.js file. Replace the contents of this file with the following:
import { AmplifyProvider } from '@aws-amplify/ui-react'
import '@aws-amplify/ui-react/styles.css'
import { Amplify } from 'aws-amplify'
import { CartProvider } from 'use-shopping-cart'
import config from '../src/aws-exports'
import '../styles/globals.css'

Amplify.configure(config)
const STRIPE_PUBLISHABLE_KEY = process.env.NEXT_PUBLIC_STRIPE_PUBLISHABLE_KEY

function MyApp({ Component, pageProps }) {
    return (
        <AmplifyProvider>
            <CartProvider cartMode="checkout-session" stripe={STRIPE_PUBLISHABLE_KEY}>
                <Component {...pageProps} />
            </CartProvider>
        </AmplifyProvider>
    )
}

export default MyApp
Not much has changed, but a few mentionable callouts:
- We bring in our
aws-exports.jsfile, which contains our secrets to configure Amplify - We bring in an environment variable from our
.local.envfile and pass it to use-shopping-cart's<CartProvider/>component. We'll grab the actual value needed shortly.
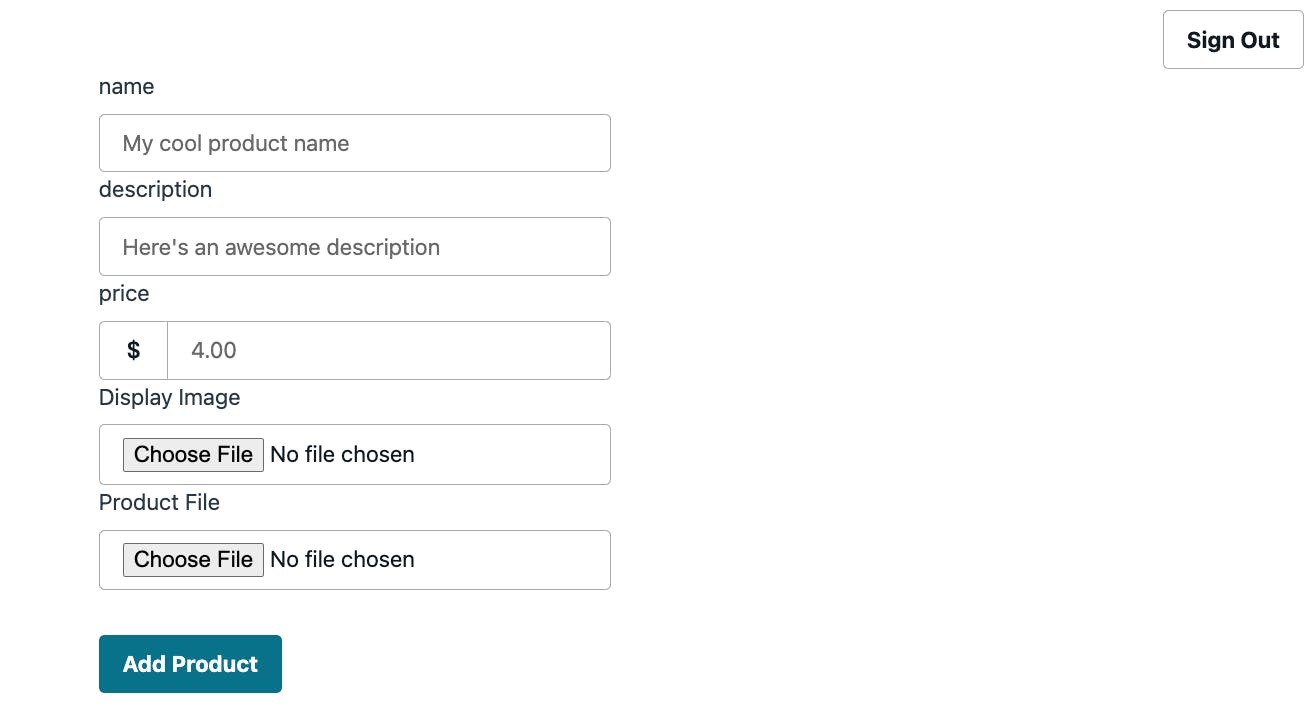
With our application configured, open the pages/admin/products.js file.
If you run the app now, this route would display a form as shown in the screenshot above. However, this page needs to be protected so that authenticated users can access it.
To do so, simply change the export from
export default CreateProductsPage
to
export default withAuthenticator(CreateProductsPage)
🗒️ Technically, this should only be for
adminusers. But since we don't have a concept ofcustomergroups yet, this is fine. I'll show later how to grab the group of the user in case you'd like to protect further.
Now run the project by running npm run dev in the terminal. Visit the app in the browser, navigate to /admin/products and you should be greeted with the following signup screen:
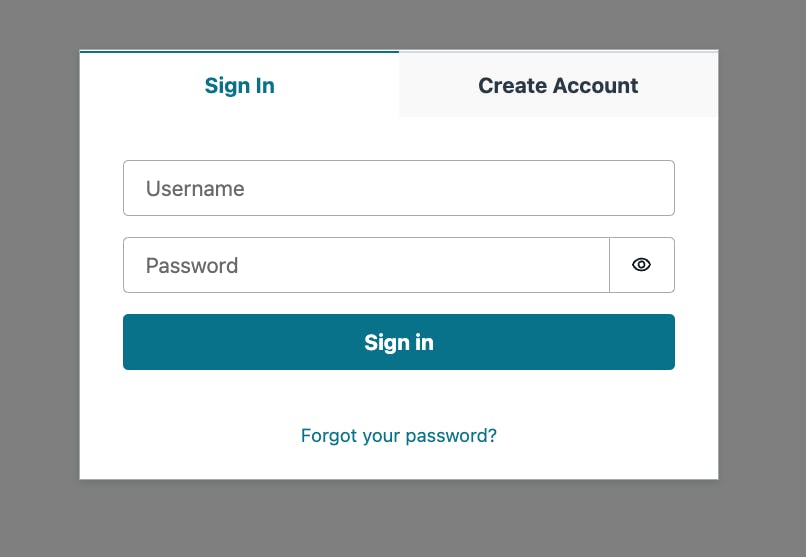
Click the "Create Account" tab and follow the steps to add your user.
When your user is created, you should be navigated back to the products form.
🔥 We probably don't want folks signing up to our app anymore. Update the
exportin our code to hide that option:export default withAuthenticator(CreateProductsPage, { hideSignUp: true })
Scaffolding out Application in the AWS Console
Now that we have our user created, we have to give them admin permissions. We could use the aws cli to this, but we'll instead simply move them over in the AWS Console.
While we're there, we'll also do a few tasks to our other services as well.
Move a user to a group
In our terminal, run the following command:
amplify console auth
When prompted, this select User Pool.
This will open the AWS Console to our User Pool (assuming you're already signed in).
🗒️ This is simply a shortcut. Signing in to the AWS Console, searching for "Cognito" and selecting your User Pool works just as well.
Once you are viewing your User Pool details, select the "groups" tab in the center of the console.
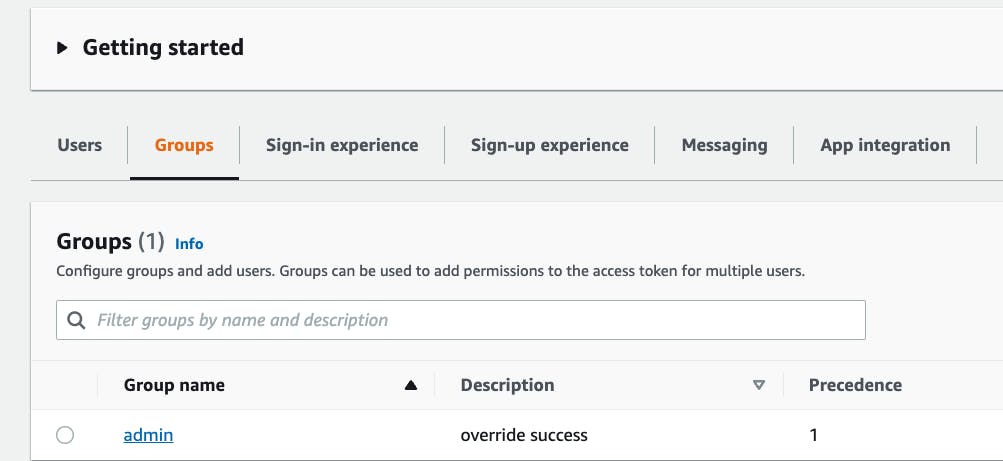
Verify that the admin group we created via the CLI is there and select it.
Next, click the "Add user to group" button and add the user you just created.
🗒️ If you're user is still signed in to the site, click the Sign Out button and sign them back in for them to to recognized as an
adminuser.
Accessing a user's Identity ID
In addition to a product's public image, a product has well...the actual product itself in our S3 bucket!
When a product is created, Amplify will automatically store it under /protected/{IDENTITY_ID}/file.
To get the identity ID, we'll access the our Cognito Identity pool.
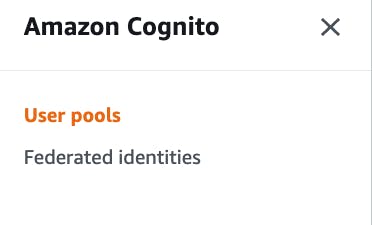
To get to our Identity Pool, select "Federated identities" in the Cognito home page
From there, select the cognito identity pool and select "Identity Browser" on the left.
Copy the Identity ID that's displayed and save it for now. We'll need that later on.

Creating a function URL
Recall that we need a Stripe webhook to call a Lambda function whenever a payment has been submitted.
Traditionally, we would have had to setup a REST API like API Gateway to handle this. Fortunately for us, at the time of this post, Lambda now offers a way to expose a callable endpoint without the need of another service!
We already created the function (stripeWebhooks). Generating a function URL just takes few clicks.
In the AWS Console, use the console search bar to navigate Lambda and find your function.

On the "Configuration" tab, select "Create function URL"
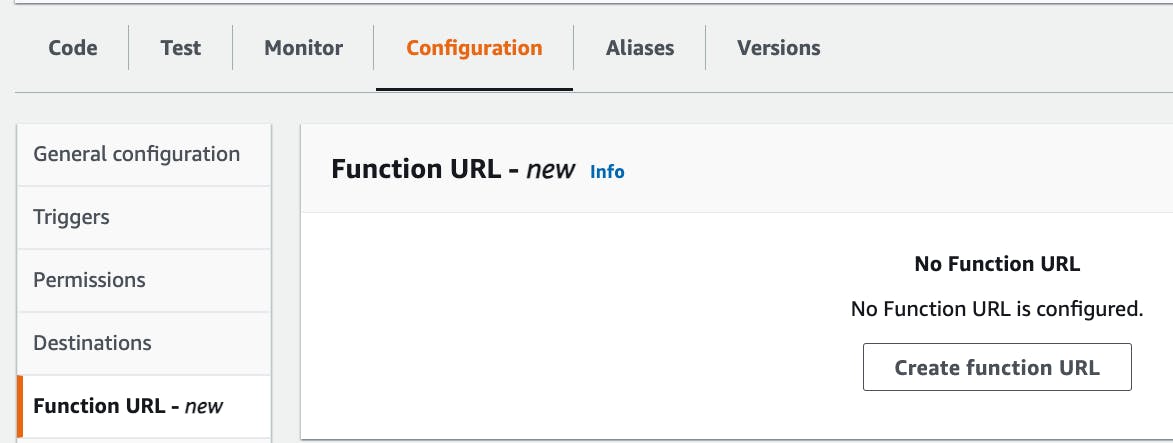
From here, select the authentication type to "NONE" and click save.
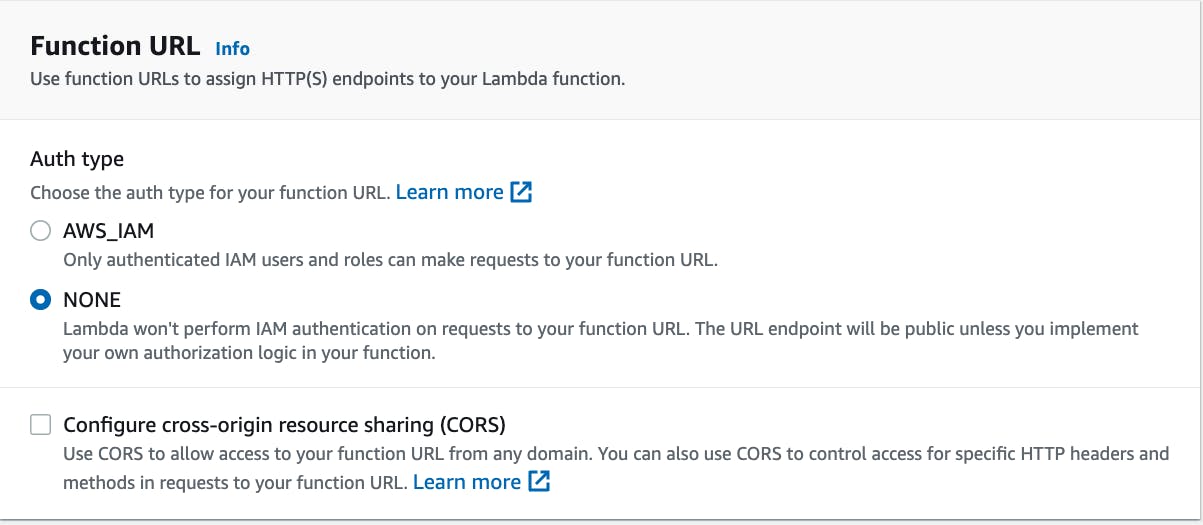
That's it! Save that endpoint somewhere for now, we'll be needing it shortly.
🗒️ Setting the auth type of NONE means anyone can call this function, we'll use Stripe to add a layer of security it.
Enable Stripe to show product images
In our application, we have Guest and Authenticated users. This is so that guest users can view product images in our S3 bucket, and authenticated users (admins) can also update and delete them.
Think of authenticated users as the people living in your home--you know exactly who they are.
Additionally, think of guest users as strangers that knock on your door--you don't know who they are, but you know someone is there.
In our case, we need our S3 product images (and only those) to be public. Otherwise Stripe won't be able to display our product images on their checkout site.
Using our house metaphor, this is because Stripe acts like someone calling our home phone--We know nothing about them, and they don't even have to visit our home to get a hold of us.
Amplify takes security into deep consideration and won't generate a public policy for us. However, we can easily add one ourselves.
Using the console search bar, search for S3, and select your AWS productKit bucket.
Select the "permissions" tab, and under "Bucket policy" select "edit".
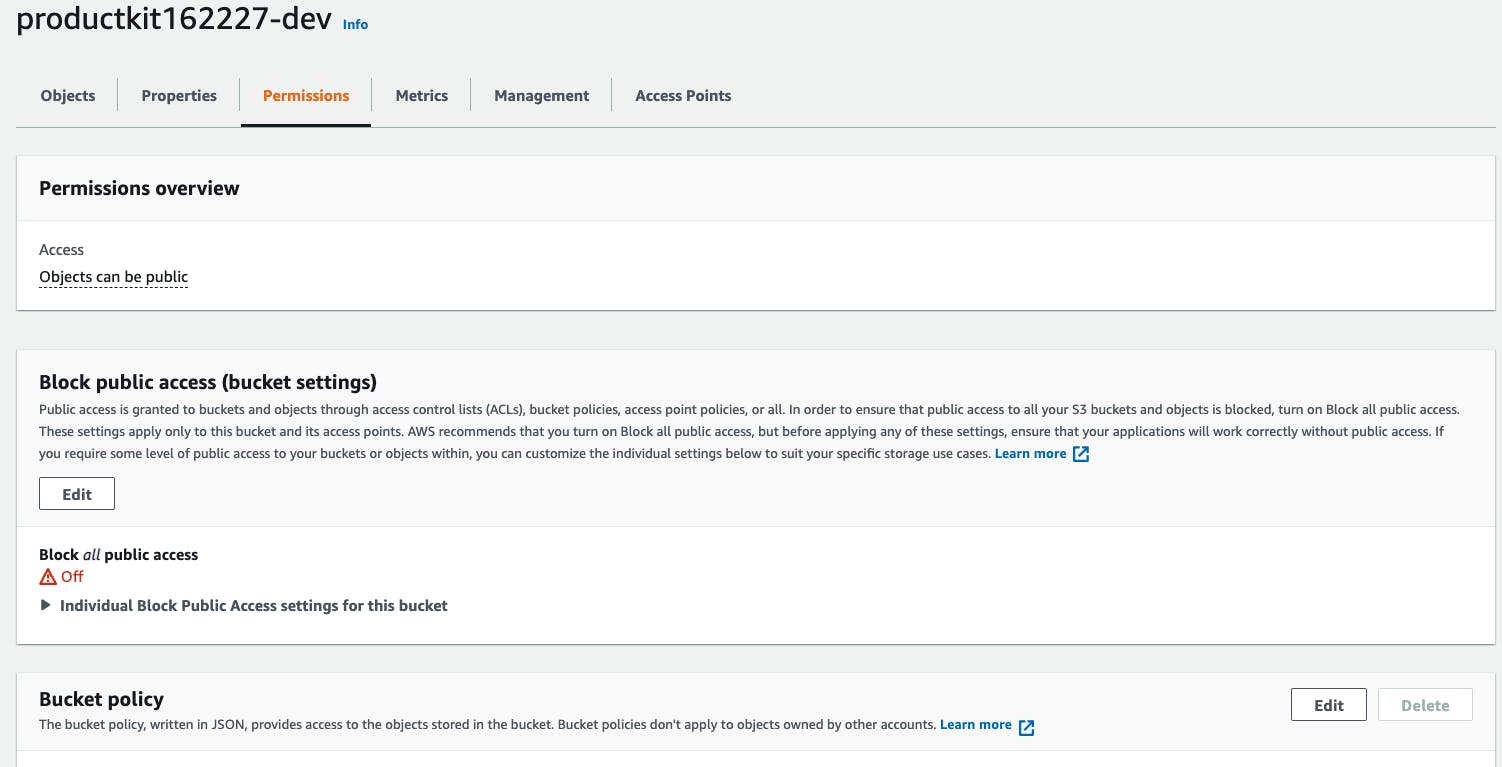
From there, replace the generated snippet with the following:
{
    "Version": "2012-10-17",
    "Statement": [
        {
            "Sid": "Statement1",
            "Principal": "*",
            "Effect": "Allow",
            "Action": ["s3:getObject"],
            "Resource": "YOUR-BUCKET-ARN/public/productimages/*"
        }
    ]
}
(screenshot should use "productimages" instead of "products"
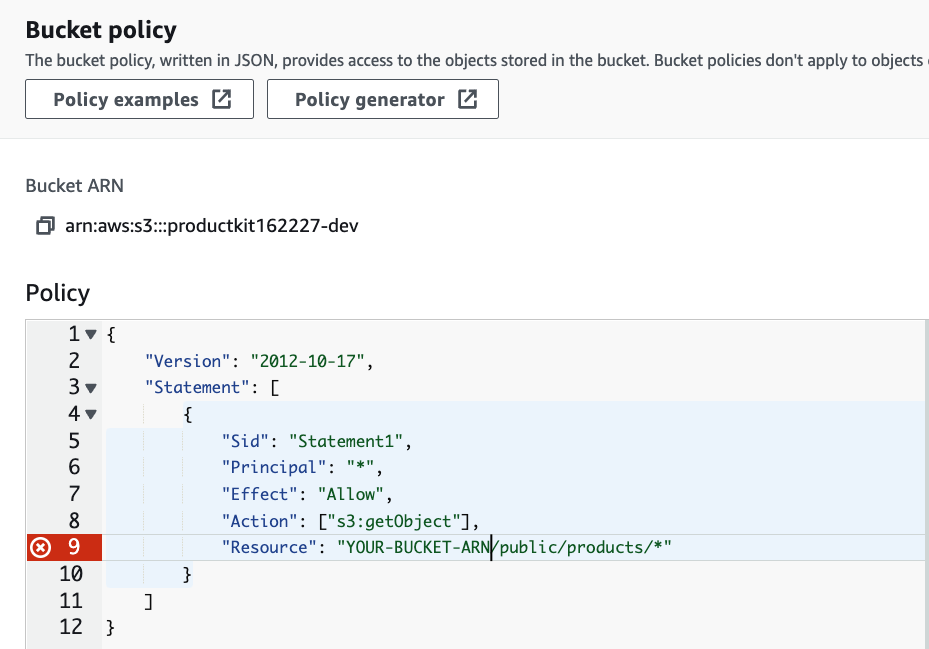
Be sure to grab your bucket ARN (as shown in the screenshot) and replace YOUR-BUCKET-ARN.
🗒️ This policy reads as such: "Allow anyone (
*), to read any item (s3:getObject), from my bucket as long as that item ends in/public/productimages/.
This is great since we don't want the entire bucket to be public (we'll also put the items we're selling in here), but allows Stripe to display our products at checkout.
Optional: Verifying an SES email
🗒️ This section is only if you are in "sandbox mode" of SES (if you're unsure, then you are😉)
The last thing to do while we're in the console is to make sure we have a verified email that we can use to send email's containing the digital product that the customer purchased.
The service to accomplish this is Amazon Simple Email Service (SES). To prevent spam, AWS will put our account in sandbox mode, ensuring we can only send to verified email addresses before moving to production.
Search "SES" in the AWS console and in the "configuration" dropdown select ensure the "verified identities" option is selected.
Click the "Create Identity" button.
On the next page, select "email" then enter the email your test customer will use as shown in the screenshot.
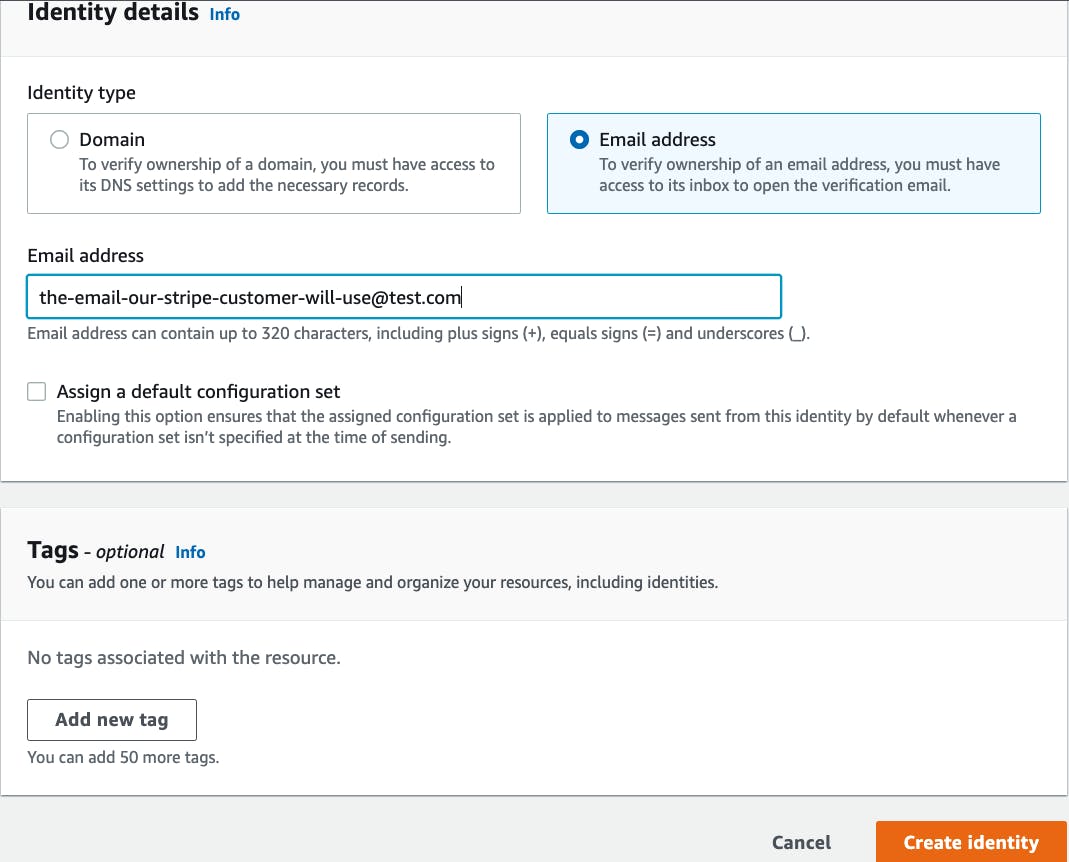
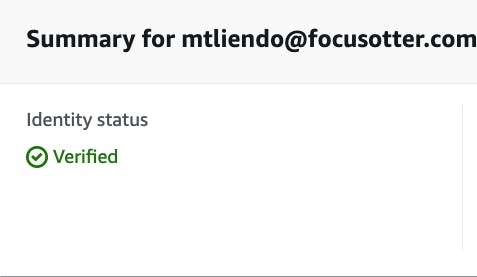
After clicking the "create identity" button at the bottom, an email will be sent to that address to verify.
After clicking the verification link in the email, the customer's email address should now show as verified.
🗒️ As stated, this is only while in the sandbox. Once your project is in production, applying for production access to send to any email is fairly straightforward.
👉🏽 If the email you entered is different from the email for our admin user, then repeat the steps to make sure both are verified.
We're all done in the AWS Console 🙂 Remeber to grab the function URL of our Lamba function. Next we'll use grab and configure some values from our Stripe account before wrapping things up back in our code editor.
Access and Configure Stripe
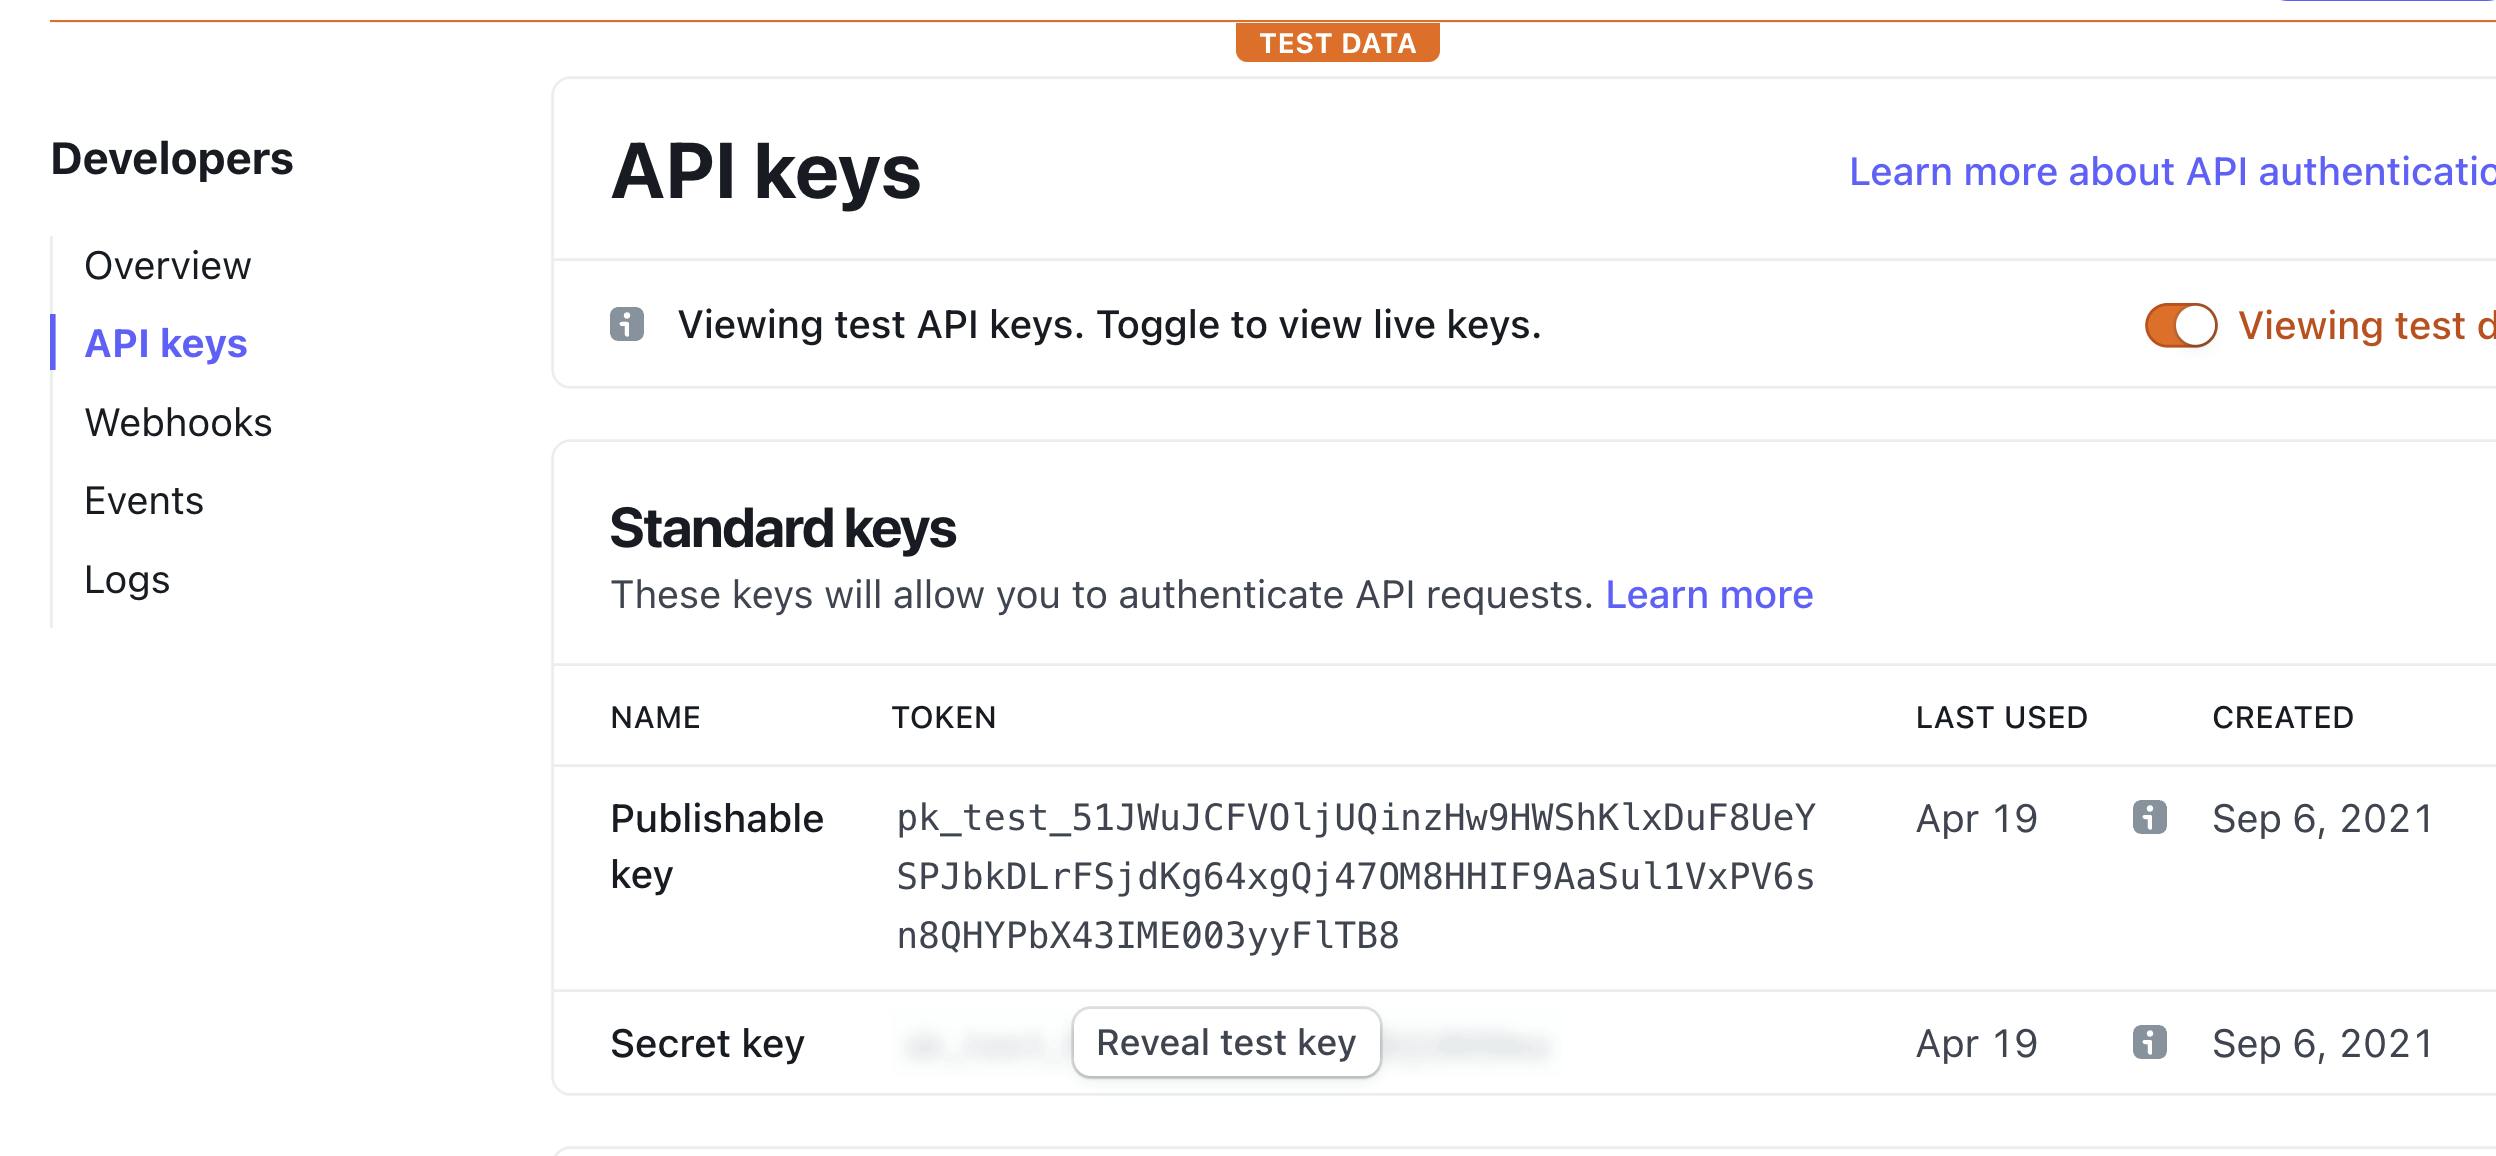
🚨 When accessing your Stripe account, ensure you are using your test account, not your production account.
We'll need to access three API Keys:
- Publishable key: The key we will use on the client to configure Stripe.
- Secret Key: The key needed to grab a secure checkout link. This should never be stored on the client. We will configure our Lambda functions to use this value.
- Signing secret: Recall that our Stripe webhook function is not protected. To prevent unauthorized orders, we'll verify the header Stripe passes against this secret value in our Lambda function.
To access the first two values, visit this link and store the keys in a safe spot for now.
Next, we'll create a Stripe webhook endpoint.
Either click this link to create one, or click the "Webhooks" tab and select "Add endpoint".
All we have to do here is paste in our Lambda function URL and under "Select events to listen to" select the checkout.session.completed event.
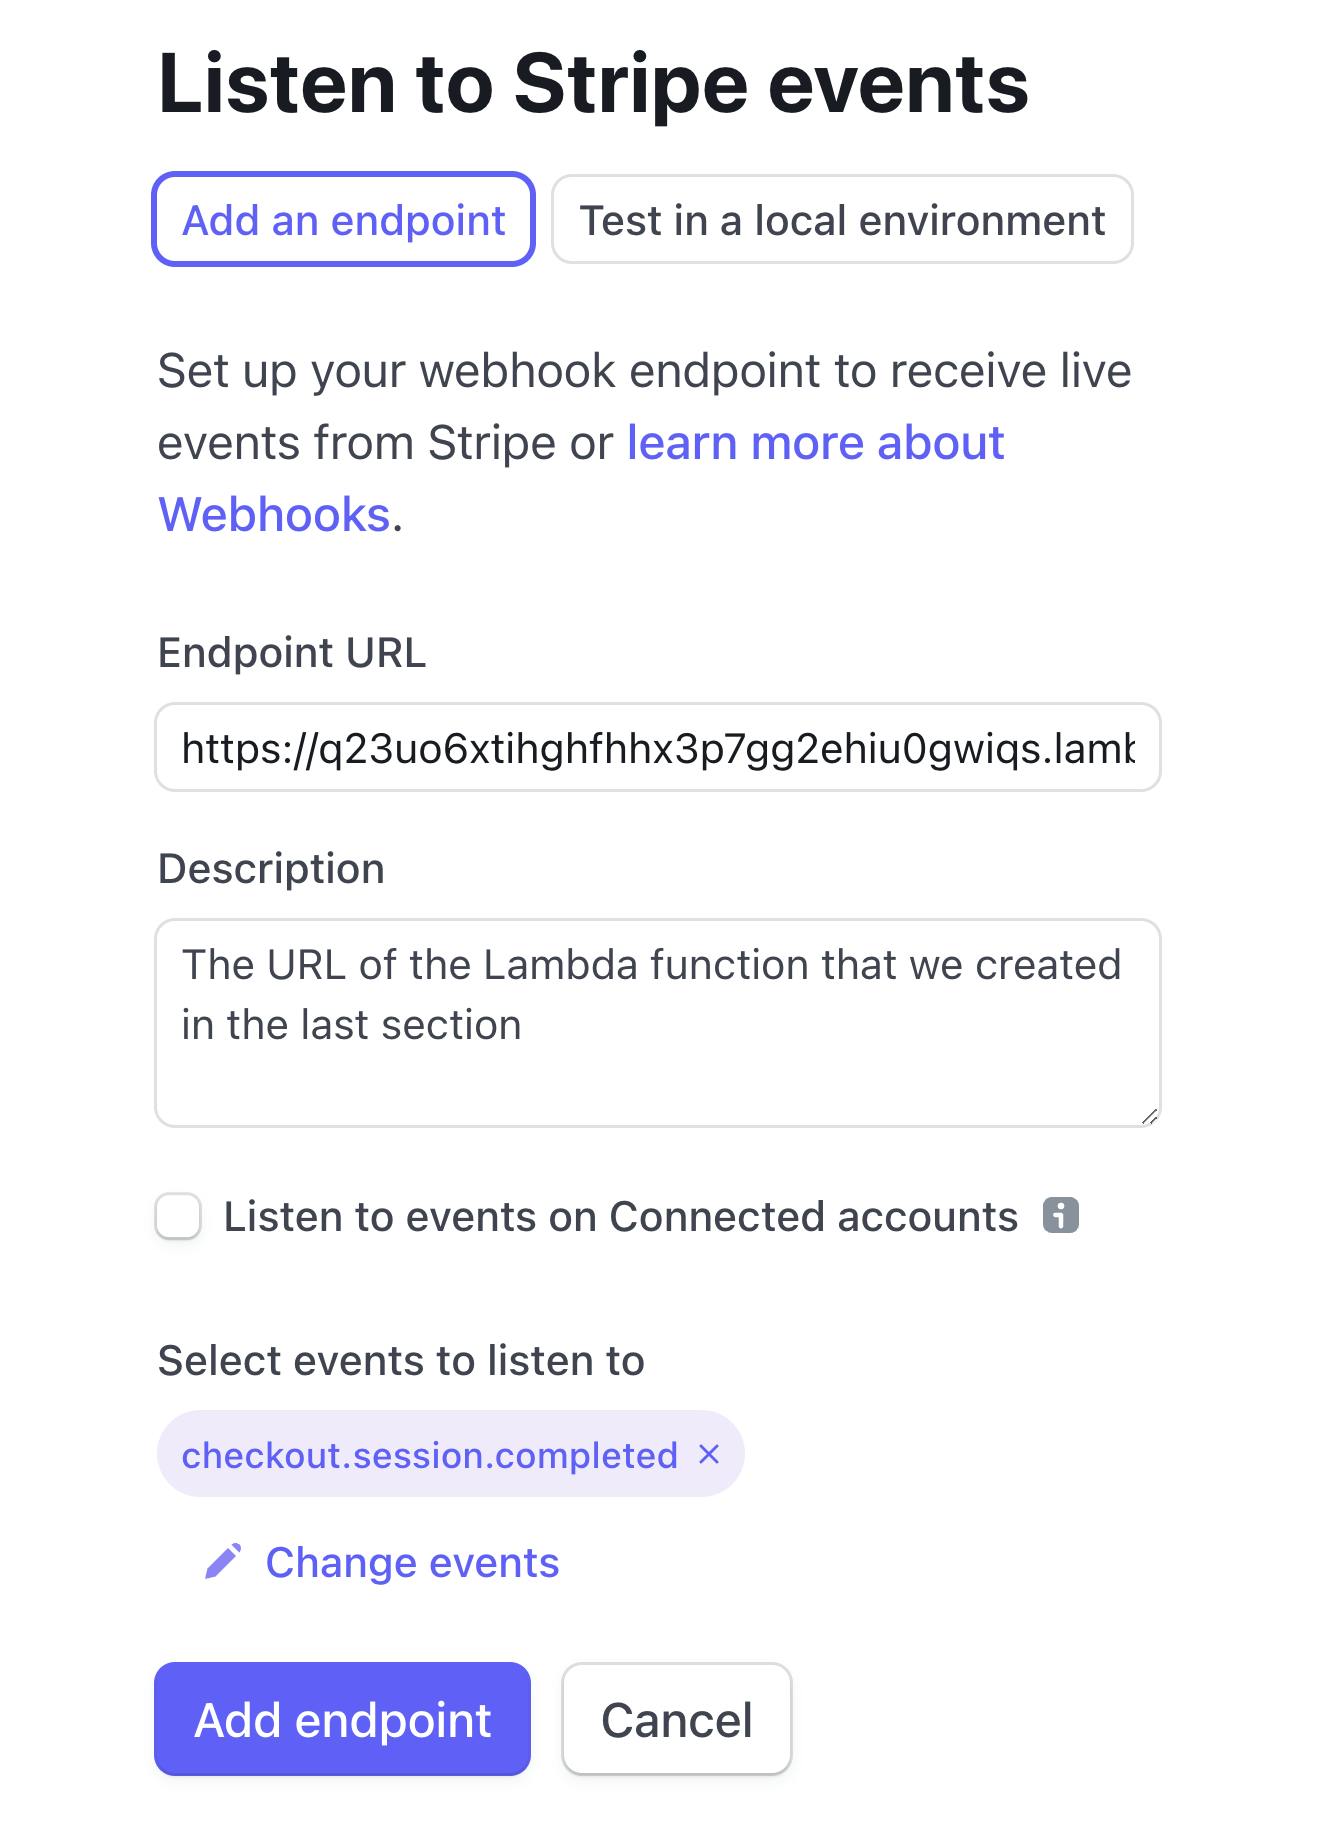
🗒️ The sample code on the right is for ExpressJS apps. Because we are using a Lamb function URL, the code we'll write is similar but simpler.
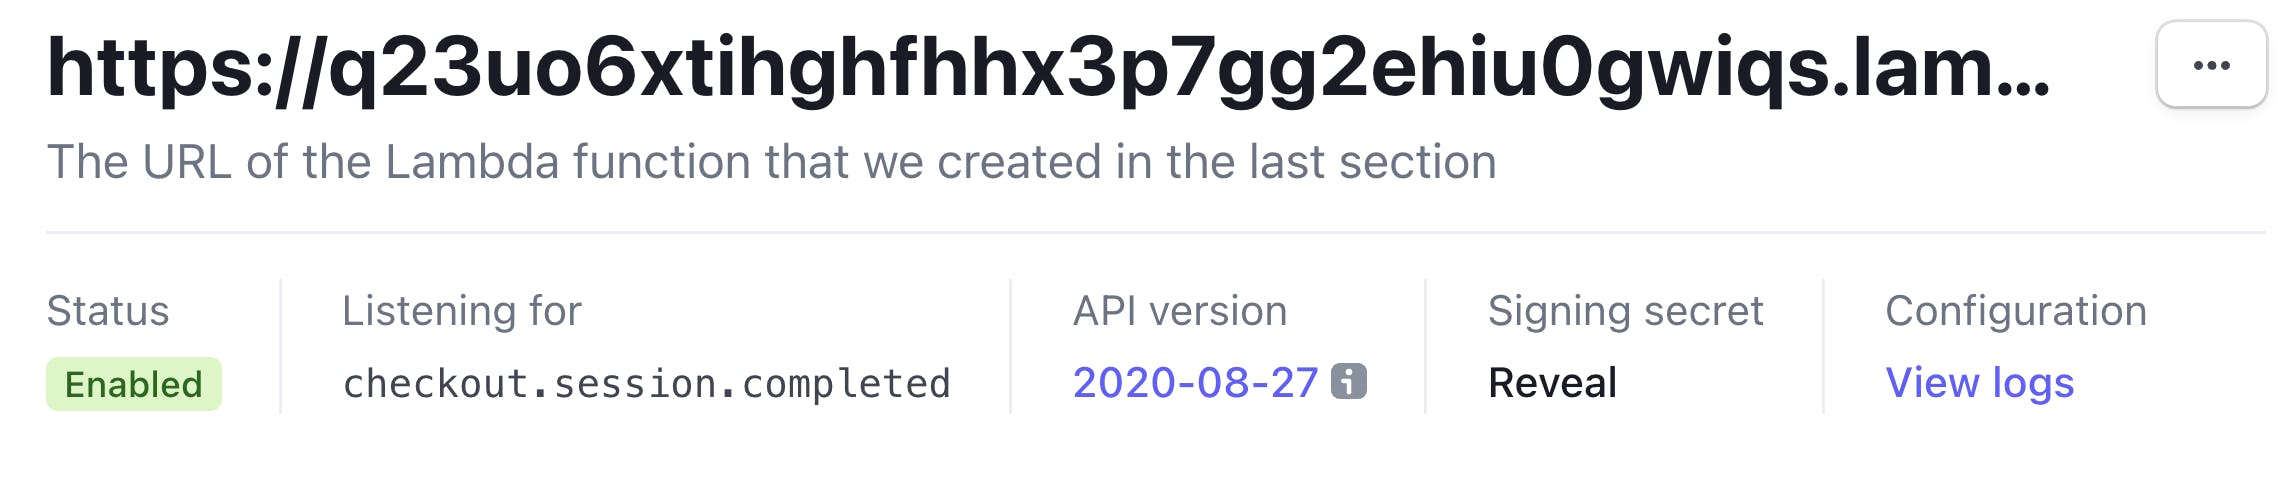
Once the endpoint is added, you'll be taken to the webhook's detail screen.
To grab our last Stripe value, "Reveal" the Signing secret and store that with the other API keys for now.
Configuring our backend Lambda functions
With our services created and configured, all that's left to do is write the actual business logic.
We'll start with our fetchStripeSessionURL function.
Creating a function to create a Stripe checkout session
This function will be sent the customer's shopping cart items. However, because it's possible for a malicious customer to change the price of the items before they're sent to this function, we'll make sure that each product has the correct price before creating a checkout session for the customer.
In addition, Stripe expects image URL's to be passed. Fortunately, we already configured our S3 bucket to allow public access for them.
These requirements imply we'll need access to the following:
- Stripe Secret Key: To create the stripe checkout session
- DynamoDB Product table: To
readthe database and grab the price of the products - An S3 Product URL: We'll create this link ourselves since the public endpoint is always
https://[bucket-name].s3.amazonaws.com/public/productimages/[image-key] - The
stripenpm package to create the session - The
use-shopping-cartnpm package to validate our cart.
The Amplify CLI will help us store the dynamodb table as an environment variable, as well as the stripe secret key as a secret value 🔥
To get started, in our terminal, run the following command:
amplify update function
Select the fetchStripeSessionURL function and choose the following:
- Which setting to update: Resource access permissions
- Categories: storage
- Select the resource: Product:@model(appsync)
- Select the operations: read
- Edit the function now?: N
🔥 Note that Amplify will automatically inject the relevant environment variables for us to use
Next, we'll add the Stripe secret key. Run amplify update function and select the same function.
- Which setting to update: Secret values configuration
- Enter a secret name:
STRIPE_SECRET_KEY - Enter the value: paste in the value and hit enter
- What do you want to do: I'm done.
- Do you want to continue: Y, enter
- Edit the function now?: Y
🔥 Note that Amplify also added the code needed to grab our secret value (under the hood, this is AWS Parameter Store)
const AWS = require('aws-sdk')
const validateCartItems =
    require('use-shopping-cart/utilities').validateCartItems

const Stripe = require('stripe')

exports.handler = async (event) => {
    const { Parameters } = await new AWS.SSM()
        .getParameters({
            Names: ['STRIPE_SECRET_KEY'].map((secretName) => process.env[secretName]),
            WithDecryption: true,
        })
        .promise()

    const stripe = Stripe(Parameters[0].Value)
    const docClient = new AWS.DynamoDB.DocumentClient()
    const cartItems = event.arguments.input

    let fetchedProductData = await docClient
        .scan({
            TableName: process.env.API_STRIPEWALKTHROUGH_PRODUCTTABLE_NAME,
        })
        .promise()

    try {
        let line_items = validateCartItems(fetchedProductData.Items, cartItems)

        const session = await stripe.checkout.sessions.create({
            payment_method_types: ['card'],
            billing_address_collection: 'auto',
            mode: 'payment',
            success_url: 'http://localhost:3000/success',
            cancel_url: 'http://localhost:3000/cancel',
            line_items: line_items,
        })
        return JSON.stringify({ sessionId: session.url })
    } catch (e) {
        console.log('uh oh..', e)
        return 'error, check function logs'
    }
}
🗒️ Be sure to make sure that your environment variables in your code match what is generated in the comments.
As mentioned, this code grabs the submitted products, makes sure they haven't been tampered with, and send that information to Stripe. Afterwards, a session is created and we simply send that to the frontend so they can be redirected.
Before calling this function good, in our terminal, we'll cd into this lambda function's src directory and run the following command:
npm install stripe use-shopping-cart
🗒️ AWS Lambda functions come pre-installed with the
aws-sdkso no need to install it.
Once those packages are installed, cd back to the root of our project.
Updating the Stripe webhook Lambda function
When an order is placed, Stripe will let us know is was completed by calling this function. We'll use this function to send an email to the customer that contains their purchased digital items.
Using the same steps as before, we'll configure our Lambda function with two secrets: our stripe secret key, and our webhook secret.
In addition, this function will need access to our S3 bucket since the digital files aren't public. The caveat here as mentioned earlier, is that Amplify will store the files with a /protected/{identityID}/ prefix. So we'll add the Identity ID of our admin user as an environment variable (not a secret value).
Next, we'll add an environment variable for the admin user's email address so that the email the customer receives shows it's from them (or any other verified email).
To get started, run the following command:
amplify update function
Select the stripeWebhooks function and choose the following:
- Which setting to update: Resource access permissions
- Categories: storage
- Select the resource: productImages
- Select the operations: read
- Edit the function now?: N
Next, we'll add the Stripe secret key. Run amplify update function and select the same function.
- Which setting to update: Secret values configuration
- Enter a secret name:
STRIPE_SECRET_KEY - Ener the value: paste in the value and hit enter
- What do you want to do: Add a secret
- Enter a secret name:
STRIPE_WEBHOOK_SECRET - Enter the value: paste in the value and hit enter
- What do you want to do: I'm done
- Do you want to continue: Y
- Edit the function now?: N
Lastly, we'll add the an environment variable for the Identity ID. Run amplify update function and select the same function.
- Which setting to update: Environment variables configuration
- Enrironment variable name: S3_USER_IDENTITY
- Environment variable value: paste in the value from the identity pool and hit enter
- What do you want to do: I'm done
- Edit the local function now: N
🗒️ Feel free to add the email address of the admin user as an environment variable as well
Before adding the code for the this Lambda, let's add the relevant npm packages. In the terminal cd into the src directory of this lambda function, and run the following command:
npm install stripe nodemailer
With our dependencies installed, in this function's index.js file, add the following code:
const aws = require('aws-sdk')
const Stripe = require('stripe')
const nodemailer = require('nodemailer')

const ses = new aws.SES()
const s3 = new aws.S3()
const transporter = nodemailer.createTransport({
    SES: { ses, aws },
})
const fetchSecret = async (key) => {
    const { Parameters } = await new aws.SSM()
        .getParameters({
            Names: [key].map((secretName) => process.env[secretName]),
            WithDecryption: true,
        })
        .promise()

    return Parameters[0].Value
}

/**
 * @type {import('@types/aws-lambda').APIGatewayProxyHandler}
 */
exports.handler = async (event) => {
    const STRIPE_SECRET = await fetchSecret('STRIPE_SECRET_KEY')
    const STRIPE_WEBHOOK_SECRET = await fetchSecret('STRIPE_WEBHOOK_SECRET')
    const stripe = Stripe(STRIPE_SECRET)
    const sig = event.headers['stripe-signature']

    let stripeEvent

    try {
        stripeEvent = stripe.webhooks.constructEvent(
            event.body,
            sig,
            STRIPE_WEBHOOK_SECRET
        )
    } catch (err) {
        console.log('uh oh', err)
        return { 'problem occurred': err }
    }

    switch (stripeEvent.type) {
        case 'checkout.session.completed':
            const session = stripeEvent.data.object
            const items = await stripe.checkout.sessions.listLineItems(session.id, {
                expand: ['data.price.product'],
            })
            const customerEmail = session.customer_details.email
            const customerName = session.customer_details.name
            const ADMIN_IDENTITY = process.env.S3_USER_IDENTITY
            const RESUME_BUCKET = process.env.STORAGE_PRODUCTIMAGES_BUCKETNAME

            let urls = []
            for (let orderDataItem of items.data) {
                const fileKey = orderDataItem.price.product.metadata.productFileKey

                const bucketParams = {
                    Bucket: RESUME_BUCKET,
                    Key: `protected/${ADMIN_IDENTITY}/${fileKey}`,
                }
                try {
                    const productLinkURL = await s3.getSignedUrlPromise(
                        'getObject',
                        bucketParams
                    )
                    urls.push({
                        link: productLinkURL,
                        name: orderDataItem.price.product.name,
                    })
                } catch (e) {
                    console.log('error getting file', e)
                }
            }

            const mailOptions = {
                from: 'mtliendo@focusotter.com',
                subject: 'Focus Otter Order',
                html: `<p>Thank you ${customerName}!</p> <ul>${urls.map(
                    (u) => `<li>download: <a href=${u.link}>${u.name}</a></li>`
                )}</ul>`,
                to: customerEmail,
            }

            try {
                await transporter.sendMail(mailOptions)
            } catch (e) {
                console.log('error sending email', e)
            }
            break
        // ... handle other event types
        default:
            console.log(`Unhandled event type ${stripeEvent.type}`)
    }
    return 'webhook finished'
}
To recap, this function get information from Stripe when an order occurs. We verify that this public function was called by Stripe, and if so, we also make sure this is for a completed checkout session.
Then we use the Stripe API to get more order details, and grab the file(s) the customer requested from S3.
Lastly, we send the customer an email containing their products.
🗒️ I'm partial to the
nodemailerpackage to wrap SES, but using thesendEmailfunction from SES is just as simple.
Note that we are calling an SES function (via nodemailer) in our Lambda function. To give our Lambda permission to do so, we'll add a custom policy that gives it access.
Just outside of the src directory of our Lambda, there is a custom-policies.json file. In that file, add the following (replace the region with your region if necessary):
[
    {
        "Action": ["ses:SendRawEmail"],
        "Resource": ["arn:aws:ses:us-east-1:*:identity/*"]
    }
]
Our backend is now complete 🎉 Let's sprinkle in the relevant parts on our frontend and test this out in the next section!
🗒️ Be sure to run
amplify pushto push up our changes.
Configuring our frontend (part 2)
First up is a bit of low hanging fruit, is adding the publishable key to the .local.env file.
Replace the value of the NEXT_PUBLIC_STRIPE_PUBLISHABLE_KEY with the publishable key (starting with pk_).
Next, we'll allow our frontend to grab the products when they first visit our site.
In the pages/index.js file, import the following queries that Amplify generated for us when we first deployed our schema:
import { fetchCheckoutURL, listProducts } from '../src/graphql/queries'
Next, update the useEffect function with the following to list our products:
useEffect(() => {
    async function fetchProducts() {
        try {
            const { data } = await API.graphql({
                query: listProducts,
                authMode: 'AWS_IAM',
            })
            const productData = data.listProducts.items
            setProducts(productData)
        } catch (e) {
            console.error(e)
        }
    }

    fetchProducts()
}, [])
When a user is ready to checkout, they'll call our Lambda function that will validate the cart and if all is successful, will send a link to redirect our customer to Stripe's hosted checkout.
Update the handleCheckout function with the following:
const handleCheckout = async (e) => {
    e.preventDefault()
    const { data } = await API.graphql({
        query: fetchCheckoutURL,
        authMode: 'AWS_IAM',
        variables: {
            input: JSON.stringify(cartDetails),
        },
    }).catch((e) => console.log('the returned error', e))

    const { sessionId } = JSON.parse(data.fetchCheckoutURL)

    window.location.href = sessionId
}
Aside from removing the default product in our state, update the <Image/> component in the <ProductList/> component to display the following:
<Image src={product.image} height="250px" />
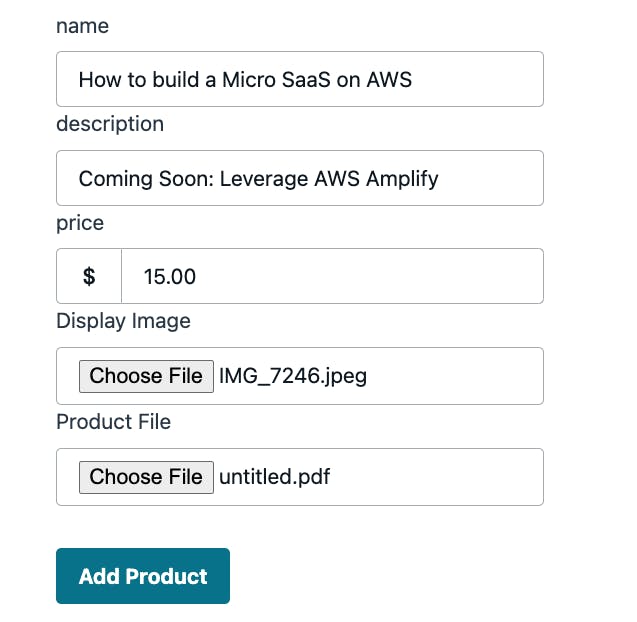
The last file to update is pages/admin/product.js. This file will simply create a product, calling both Storage and API library methods.
To start, import the relevant files and modules:
import { API, Storage } from 'aws-amplify'
import { createProduct } from '../../src/graphql/mutations'
Next, in the handleSubmit function, after the console.log statement, add the following:
const publicResult = await Storage.put(
    `productimages/${displayImage.name}`,
    displayImage,
    { level: 'public', contentType: displayImage.type }
)

const protectedResult = await Storage.put(
    `${productFile.name}`,
    productFile,
    {
        level: 'protected',
        contentType: productFile.type,
    }
)

await API.graphql({
    query: createProduct,
    variables: {
        input: {
            name,
            price: price * 100,
            currency: 'USD',
            product_data: {
                metadata: { productFileKey: protectedResult.key },
            },
            image: `https://YOUR_S3_BUCKET-dev.s3.amazonaws.com/public/productimages/${publicResult.key}`,
            description,
        },
    },
})
The Storage module we bring in from Amplify does all the heavy-lifting of allowing us to upload to S3. Recall that from the CLI we allow admin users to perform all CRUD operations.
The level key that is passed in can be one of 3 values:
- Public: stores files in a
publicdirectory, anyone can read. We also addproductimages/as a nested path. - Protected: stores files in a `protected directory, objects can be read by those with the identity ID of the user who uploaded.
- Private: Most restrictive. Only the user can read/update.
Here, we put the display image of the product in the public directory, and the digital download in the protected directory.
🗒️ It's worth calling out that the idea of a "directory" in S3 is made up. It provides a better mental model, but S3 will simply prefix the name of the file with the relevant level.
The last part of our function is the API call to upload a product. Two parts worth calling out:
By leaving out and
authModekey, we default to using cognito to authenticate instead of IAM since that's what we specified in the CLI.The
imagekey-value pair contains a bucket URL similar to what we constructed in our webhook Lambda. Be sure to replaceYOUR_S3_BUCKETwith your actual bucket name (including the random numbers at the end.
All that's left to do now is test out our project!
Run the project with npm run dev, visit the app in the browser and create a product.
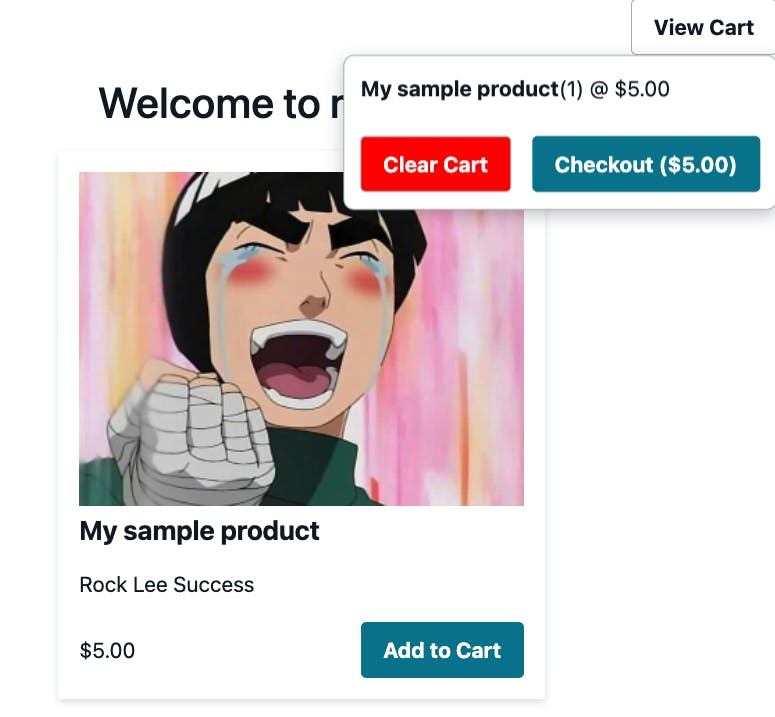
In an incognito tab, open the project and visit the home page. You should now see your product, be able to add it to your cart, and checkout.
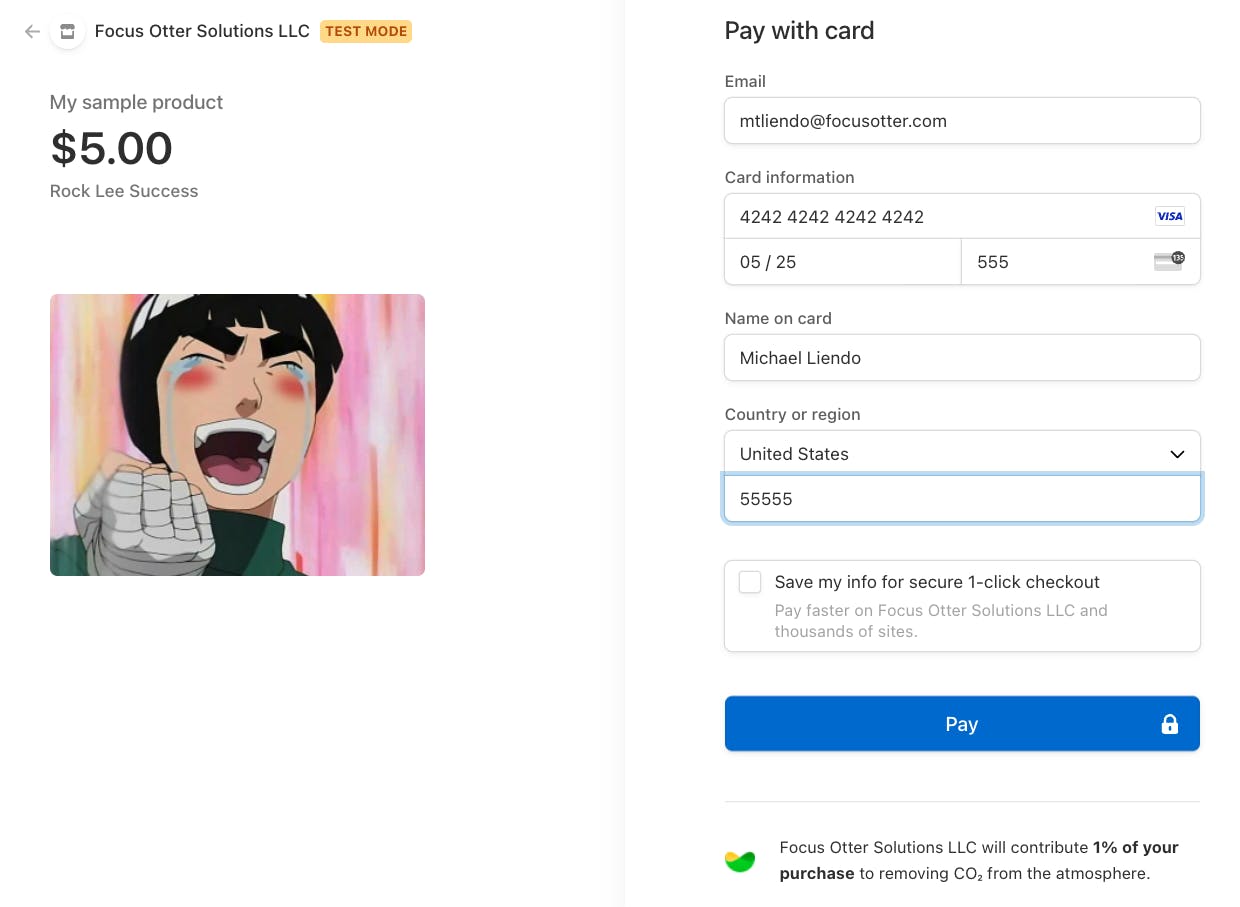
Because we are using test keys, run the for the credit card, enter 4242 repeatedly. For the month, enter any date in the future, and for the 3 digit code enter any number.
Conclusion
After submitting, check your email and ensure that you. candownload the protected file 🎉
Congrats! This project was a ton of fun to build and having it in written form really forced me to make sure I understood the ins-and-outs of all the moving parts.
As you can see, we focused on our business logic and leveraged Amplify for all of the configuration. At this point, adding more features like updating products becomes trivial.
We were able to leverage new features like Lambda URL's and safely tweaked policy parameters without introducing drift.
I would love to hear your thoughts on this project and if you have any questions, feel free to let me know in the comments!