

Intro to Amazon S3

Simple Storage Service, or S3
Whether it’s Dropbox, Google Drive, iCloud, or that folder on your Desktop that has way too much stuff in it (you know the one), the idea of storing data somewhere and being able to access it later on isn’t anything new.
S3, on its surface, can be seem like the services above. However, going deeper it is much more versatile—but more on that in a later post.
To get started, you'll need an AWS account. If you don't have one, I created a video showing how you can sign up.
{% youtube FAfhMXUiLuU %}
With that out of the way, let’s define some terms.
📖 Need to know terms
Bucket: This is a grouping of all the “stuff” you’d like to store. There’s no limit to the amount of stuff you can put in a bucket. Also, even though buckets are created in a specific region of your choosing, the name you decide to give them has to be globally unique.
Object: Notice above how I said a bucket contains “stuff”? Well S3 calls it an object. This an item you’d like to put in a bucket. This can be any type of data: text, JSON, a picture, or video. A single object’s size can be as large as 5 terabytes 😱
🏗️ Creating Your First Bucket
Creating an S3 bucket is fairly straightforward with one small gotcha that we’ll address as we go.
To get started, search for S3 once you’re logged into your AWS account or click this link.
From here, we can follow these steps to create our first bucket:
- Click the orange Create Bucket button on the right side of the page
- Give our bucket a name (remember it has to be globally unique)
- Ensure the region is a location generally close to you
- Uncheck Block all public access
- Of the 4 nested checkboxes, check the first 2 and leave the last 2 unchecked
- In the ⚠️warning area, click the box to acknowledge the bucket being public
- At the bottom of the page, select Create bucket
If all went well, you should be looking at a screen with your bucket listed in it

“What did we do in step 4?”
Great question, glad you asked!
AWS has a concept known as Least Privilege. This means, services should only be able to do exactly what we need them to do, and nothing more.
So when we tell AWS we want a bucket (that can contain anything in it) to be publicly available on the internet, they want to ensure we know what we’re doing to avoid any security issues.
In addition, when it comes to making items public, there are a few ways to do it. Leaving those two boxes unchecked says “we’re going to write a policy (a snippet of JSON) that tells you exactly how I want to make this bucket public.”
If you haven’t already, go ahead and click on your bucket and select the Permissions tab. Down a bit, we’ll come across a section that says Bucket policy. Click the Edit button, then click Policy examples.
On the new tab that opened up, select the Granting read-only permissions to an anonymous user link as shown in the screenshot below

Now copy the JSON snippet and head back to the tab with your S3 bucket. Paste in the JSON and click “Save changes” at the bottom.
🚨 Make sure to replace DOC-EXAMPLE-BUCKET with your bucket name 🚨 Make sure there is a /* at the end of your bucket name
🗒️ Yes, I could’ve just given you a link or the snippet to paste, but knowing where to click in AWS is a skill in itself!
“What does this policy (aka, snippet of JSON) do?”
Excellent question!
Here's a breakdown of what each part is doing
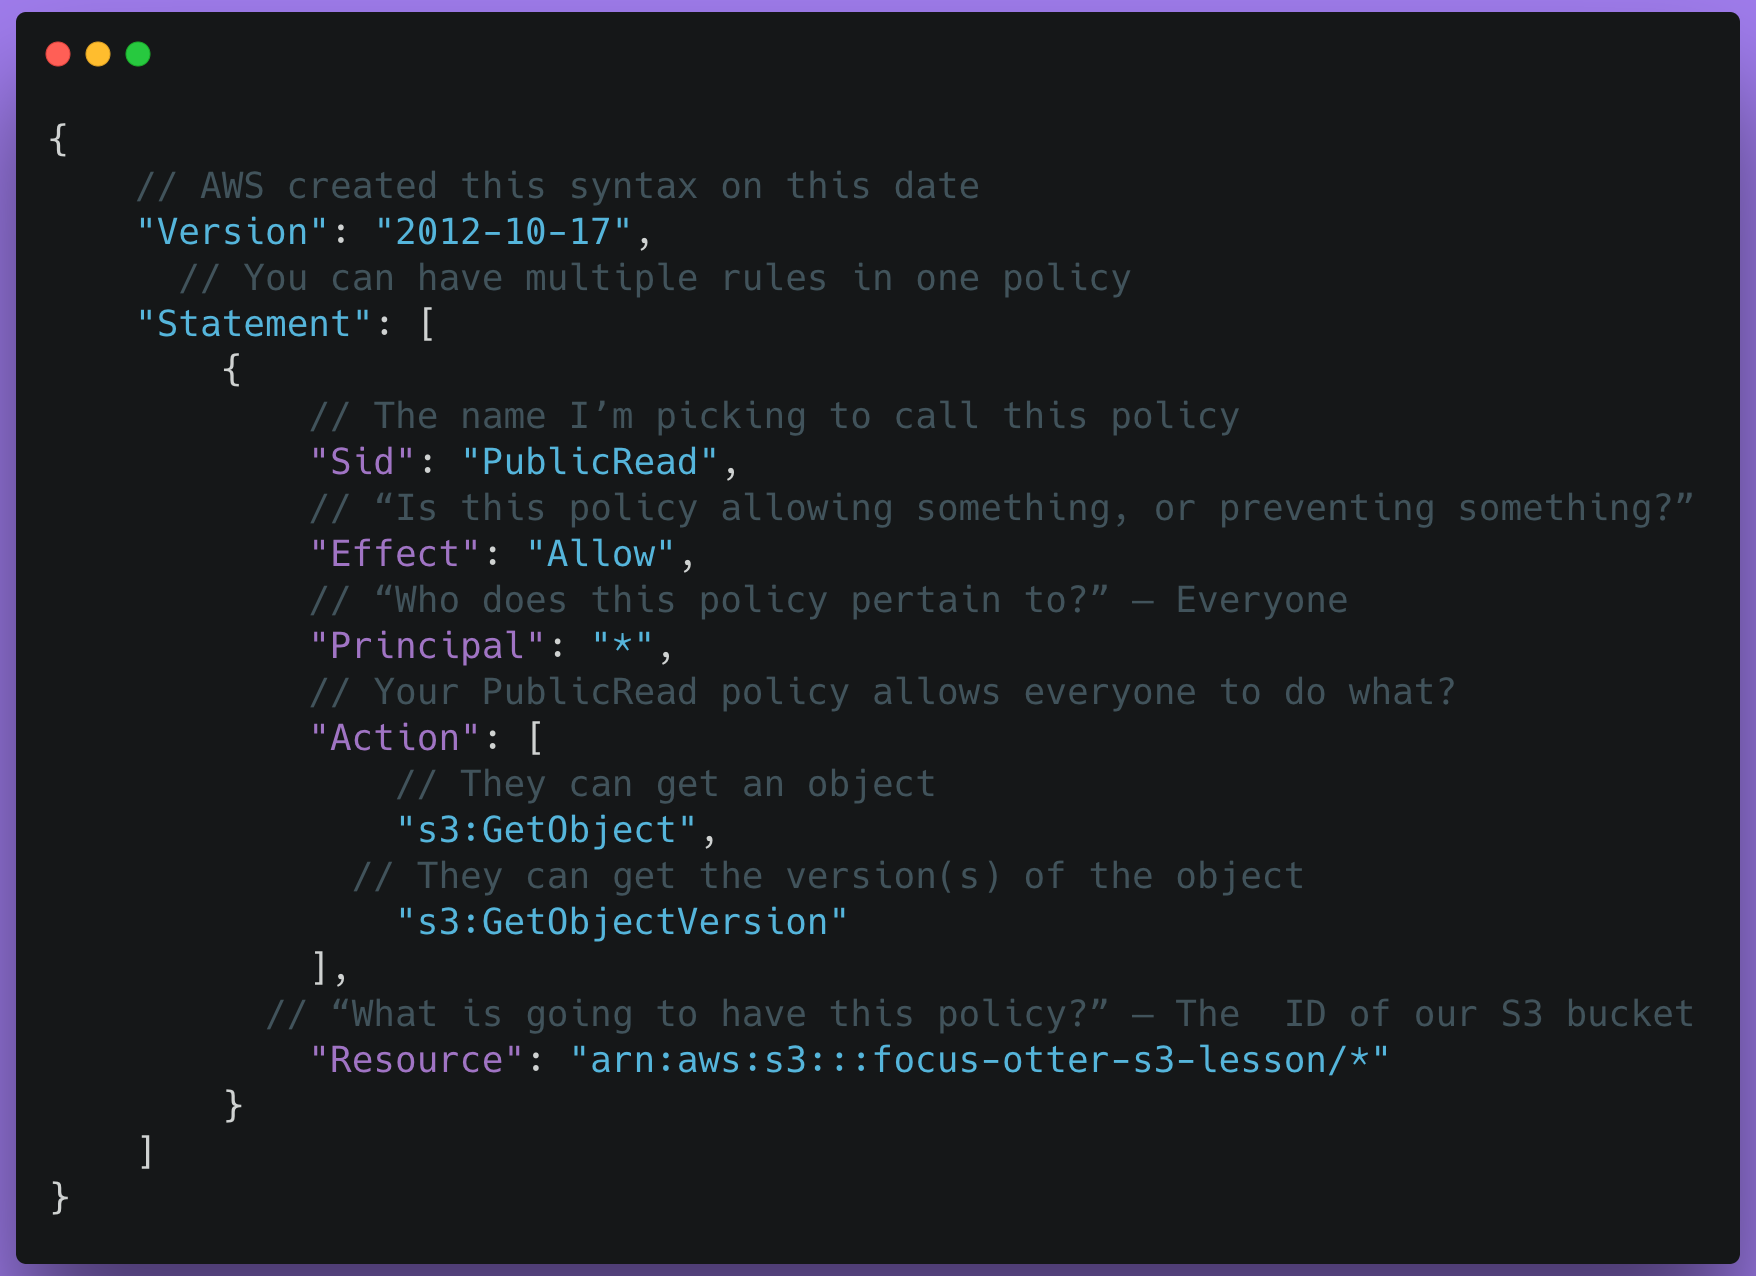
🗒️ Remember when I mentioned Least Privilege? The Action part in our policy should only list what we want our resource to allow.
Back at the top of the page, select the Objects tab and select Upload.
On the next page, feel free to drag in a photo (remember this is public!) and click Upload at the bottom when you’re done. Once you get an “Upload Succeeded” message, click the Close button on the right side of the page.
🎉 Congratulations! You’ve just created a bucket and uploaded an item to it!
To verify, click the photo link, and on the next page, note the Object URL. This is the public link to view your image.
Want to try it out on a webpage? Feel free to head to this Codesandbox and update the link on line 14.
Pricing
In S3 you pay based on 2 factors:
- The amount of data in a bucket
- The requests made to query (get) or change (copy, delete, update) a bucket.
🗒️ The pricing is also specific to whatever region the bucket is in but is similar across most regions.
For example, in the region us-east-1, for an S3 bucket with 1GB of data in it being fetched 1,000 times/month, you would spend $0.02/month.
https://aws.amazon.com/s3/pricing/
Recap
Today we explored Simple Storage Service. We created a bucket of images and displayed them on a webpage. This is only scratching the surface of what S3 can do. In many tutorials and blogs, this is usually where they tell you how to host a static website on S3. However, I'm not going to do that.
The process of hosting static webpages used to be really involved and error-prone due to the number of services needed. With that said, I hope you still use S3 to host your static assets (photos, movies, etc).
AWS released the Amplify Console which greatly simplifies the process of hosting static sites. So I'll leave you with a video on how to use the Amplify Console to deploy a react application to AWS (spoiler alert, it's really easy).
{% youtube ucVK6Z55PZY %}
Thanks for following along, and I look forward to seeing you next time when I talk about one of the most buzzword cloud services out there: AWS Lambda.


