Combining NextJS, AWS Amplify and Stripe to build a catering app (part 1)
Amplify in Production
When prototyping out complex applications that contain lots of moving parts, many developers choose AWS Amplify for both hosting and development. However, as we've seen with many customers already, Amplify is great for production setups as well. While there may be reasons to extend beyond what Amplify provides, in this series of posts, I'll showcase much of Amplify's capabilities by building out a serverless Catering application.
Project Overview
I chose this project because it's practical enough to explore many parts of AWS, yet digestible enough to fit in a short series of posts.
This project will have many moving pieces. To name a few:
- NextJS: Our React framework of choice. We'll use this framework to sell our products.
- Stripe: To handle payment processing and secure compliance, we'll integrate with a 3rd party to do the heavy lifting
- React Native (Expo): A cross-platform mobile app framework. Delivery drivers will need to share their location and interact with our cloud backend.
- AppSync: A managed GraphQL service that has in-built support for web sockets.
- Amazon Location Service: Allows us to setup geofences, maps, track drivers, and send out a notification when a driver is close to a customer's home.
- AWS Amplify): An infrastructure-as-code solution aimed at professional frontend developers. We'll use the Amplify CLI, Amplify libraries, and Amplify hosting in this project.
Architecture Overview
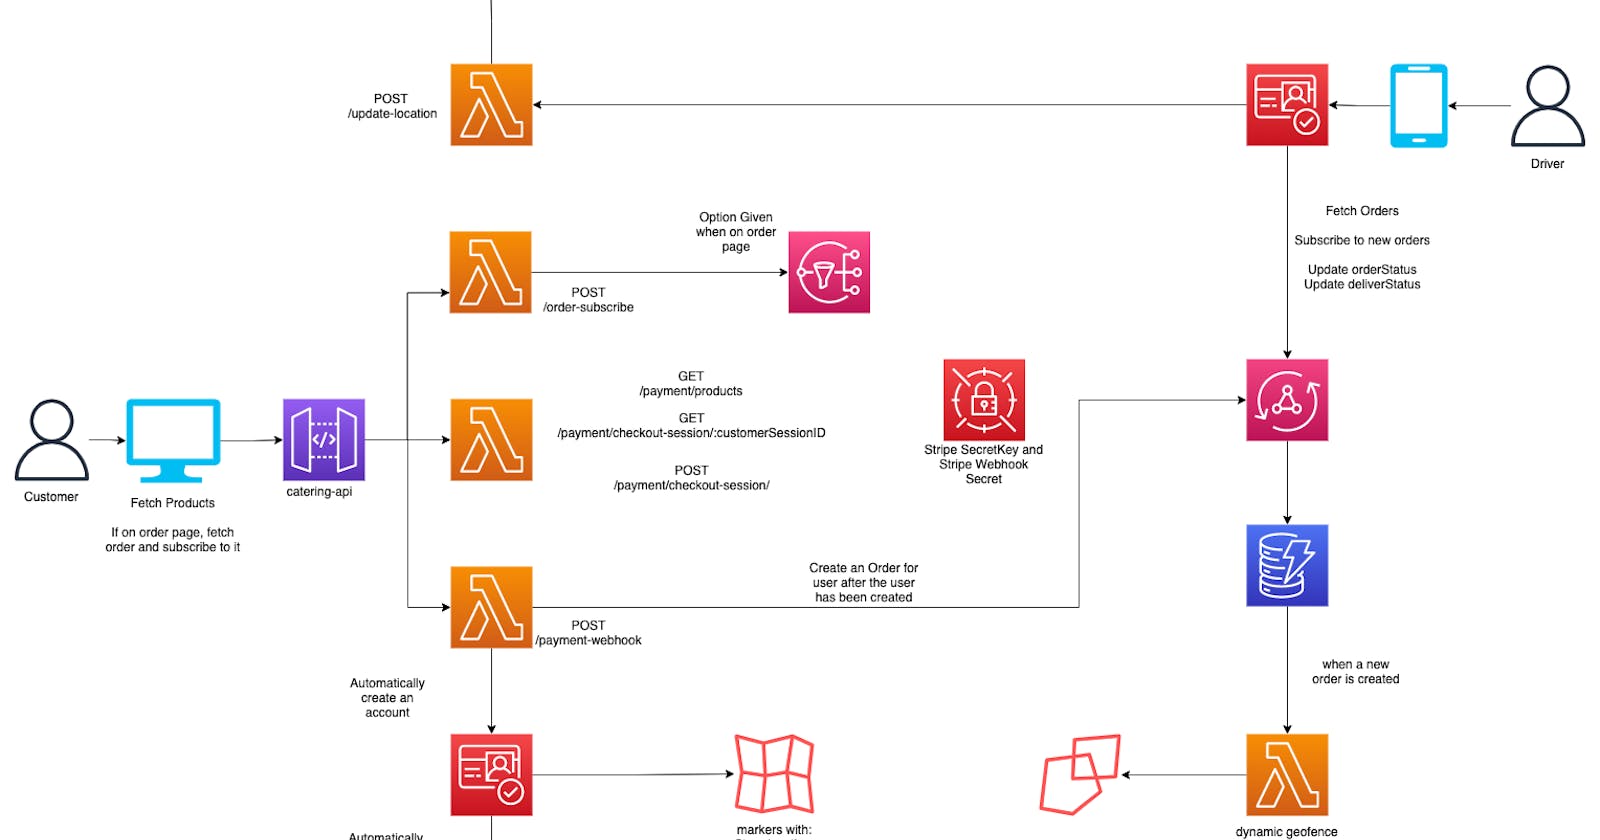
The architecture diagram at the top of this page shows a full flow that we'll create in these first few posts. However, for this particular post, we'll tackle the following subset:
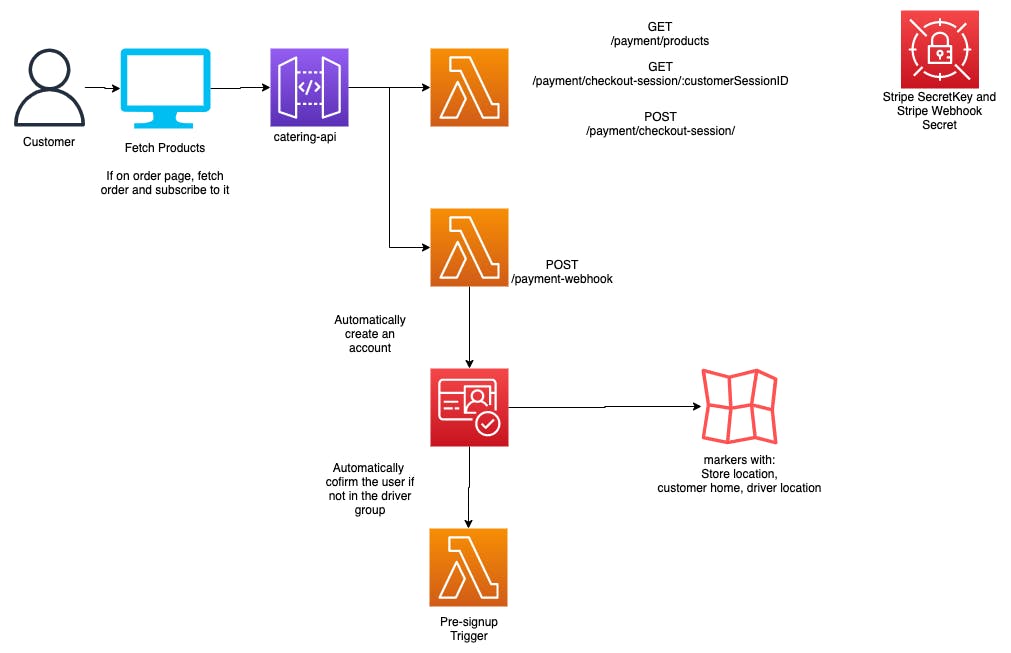
Essentially, when a user visits our app's homepage, we'll fetch the products from our Stripe Dashboard by calling a REST endpoint. When a user clicks on a product, we'll post those details to create a checkout session for the user to pay.
If the payment is successful, we'll trigger a webhook that will let us run some customer logic. In our case, that will be to automatically create a user for our app. That newly created user can then view their order details.
Creating our products
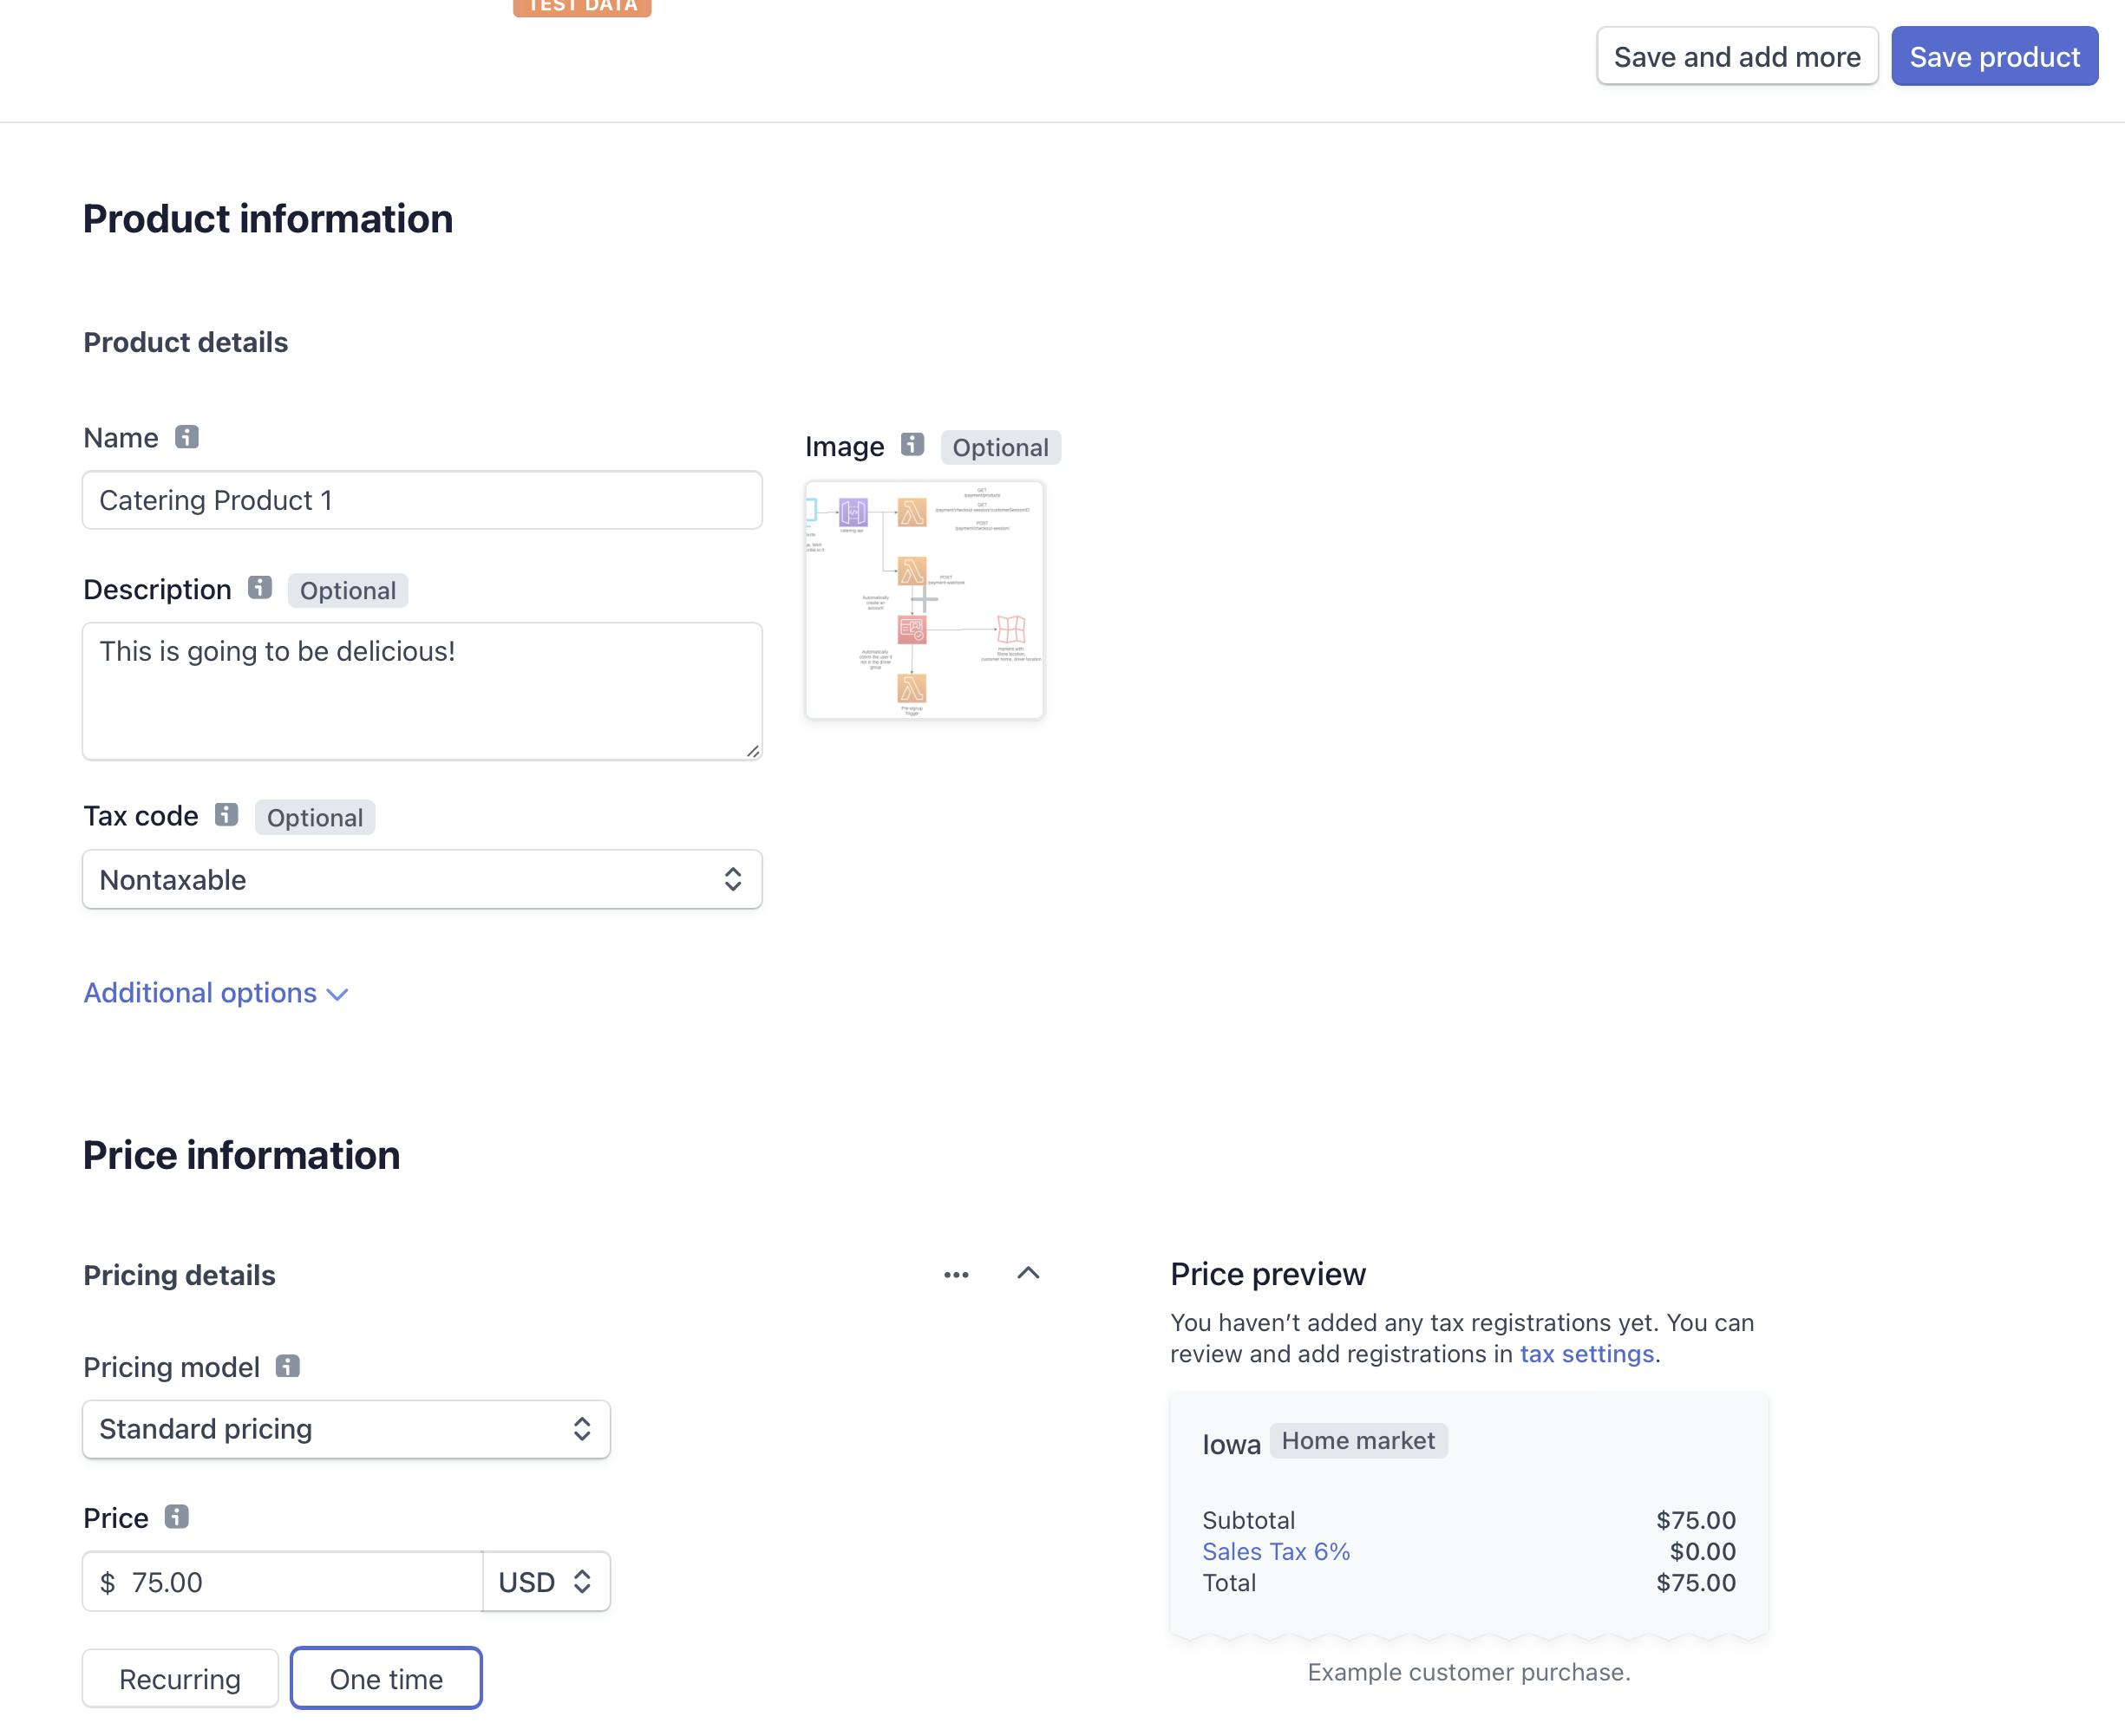
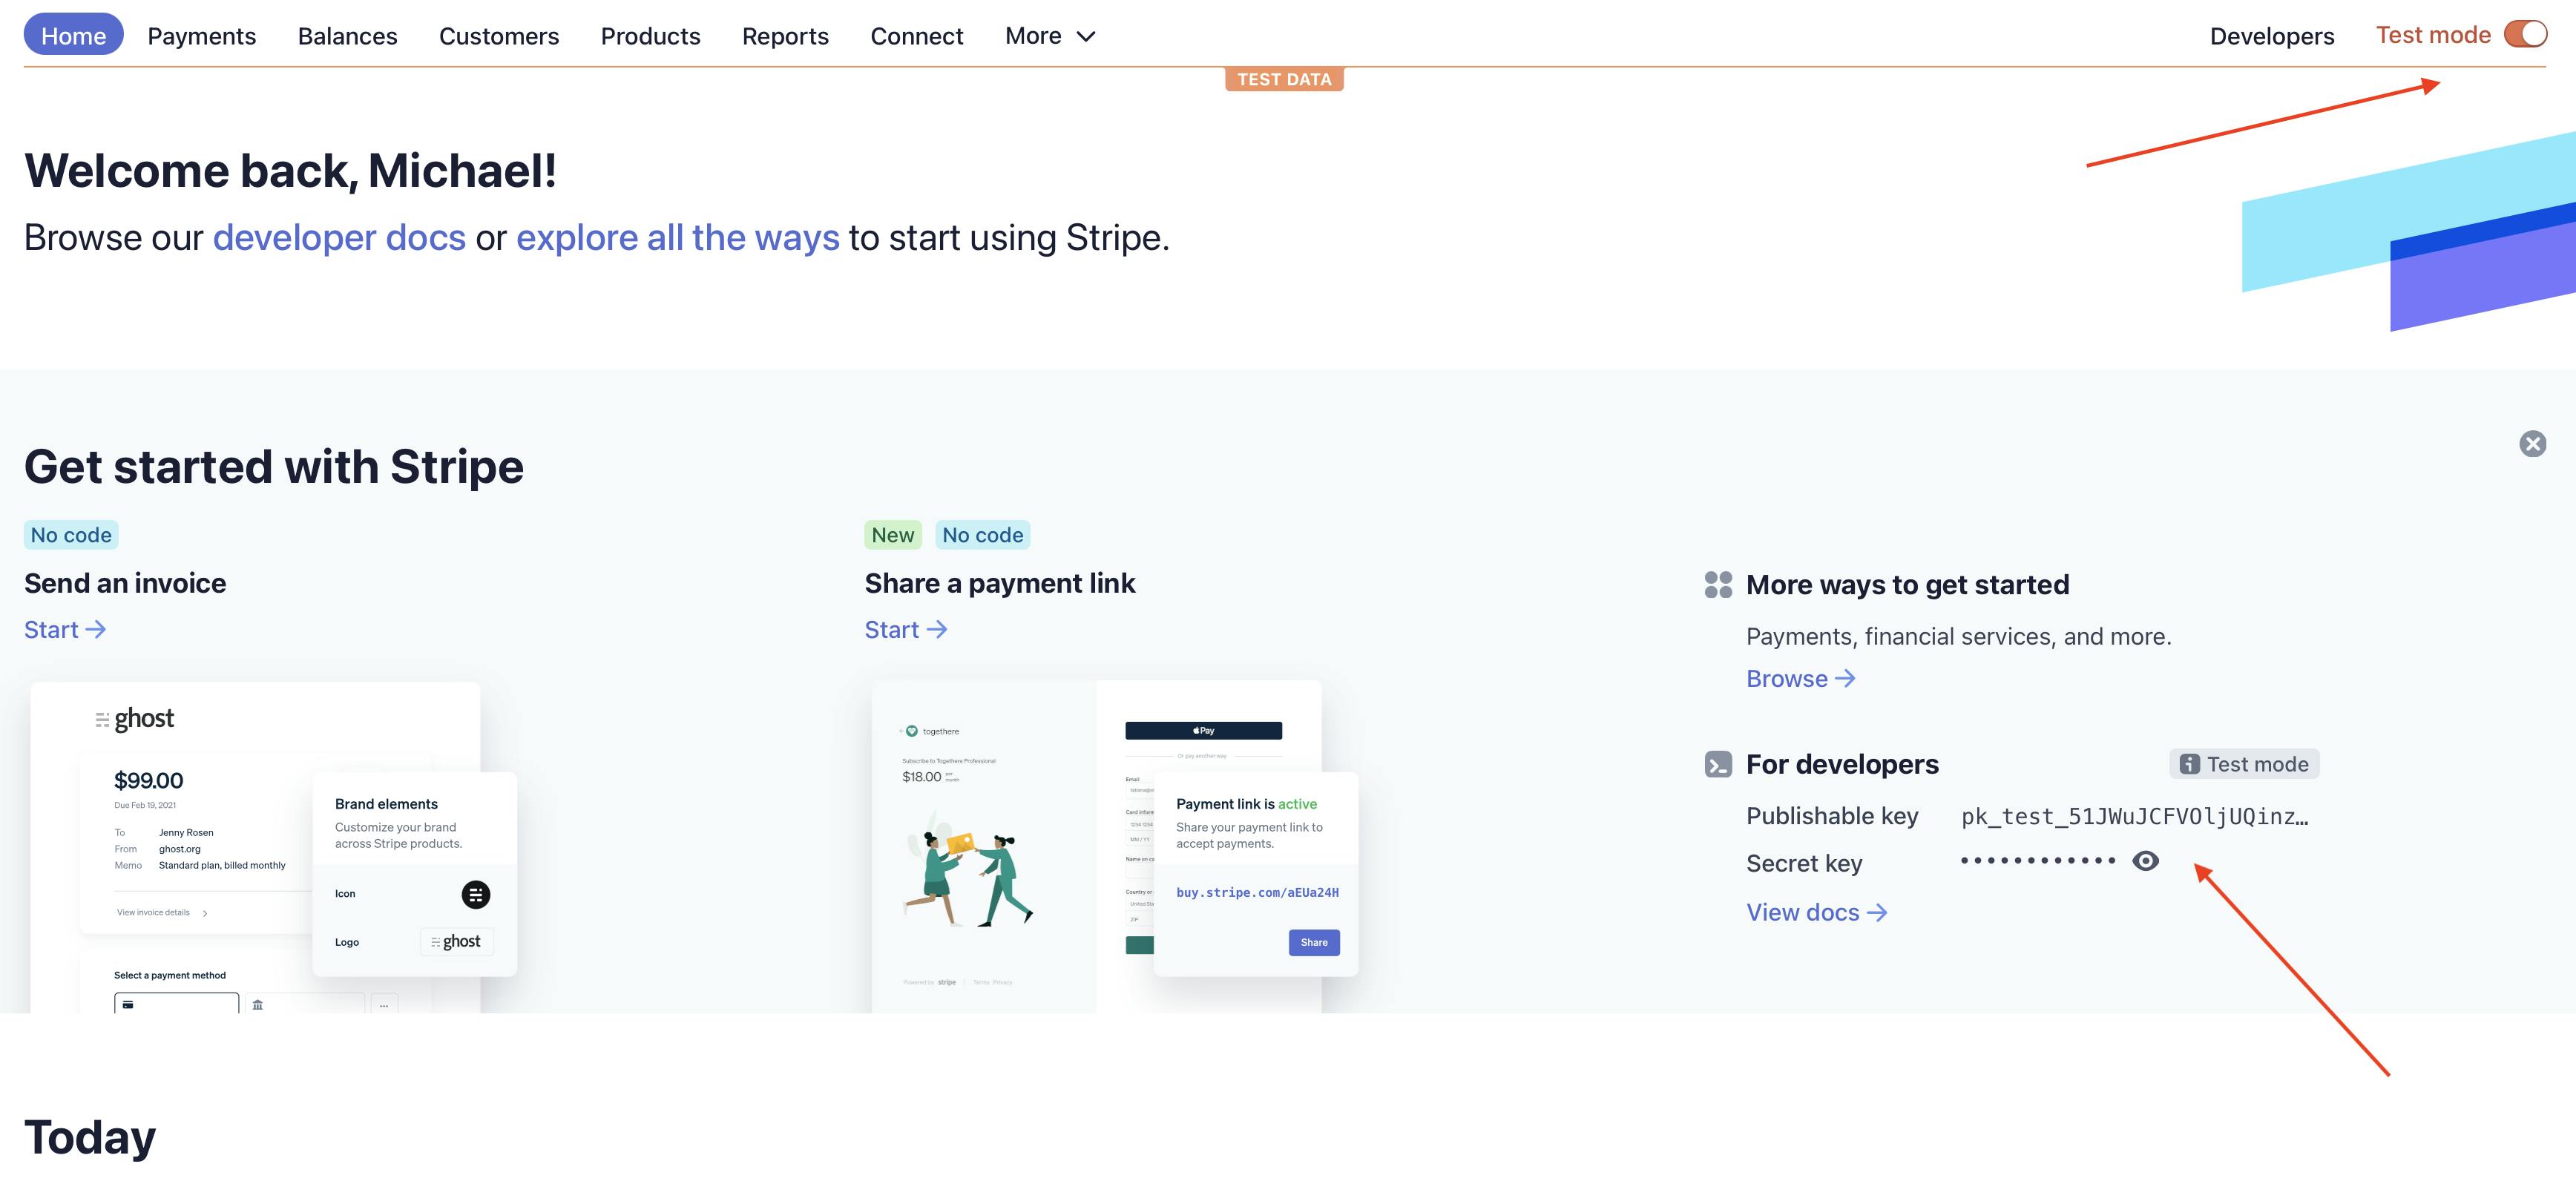
We'll start our journey in the Stripe Dashboard, specifically, on the Create New Products page. I'm not going to walk through setting up an account in this post, but once on the dashboard, make sure you are in test mode.
From the products page, go ahead and create a few one-time products.
Before creating our API to fetch those products, we'll go to the Stripe Dashboard to grab our secret keys. Jot those down, or keep the tab open. We'll be needing these shortly.
Adding our dependencies
As mentioned, we'll be using NextJS to create a page for our customers to buy our catering packages. To get started with this, we'll create a new NextJS app.
npx create-next-app catering-with-amplify
Once inside our project directory, we'll add a few needed dependencies:
npm i aws-amplify @aws-amplify/ui-react @stripe/stripe-js
- aws-amplify: Let's our frontend integrate with the backend we're about to create
- @aws-amplify/ui-react: Pre-built UI components
- @stripe/stripe-js: Allows us to redirect our customers to a checkout session.
Initializing our backend
🗒️ This project series uses version 6.3.1 of the Amplify CLI. Run
npm i -g @aws-amplify/clito bring in the latest version.
While our users need a frontend to view the products and checkout, most of our time is going to be spend setting up our backend.
To start, we'll run the following command in our terminal:
amplify init
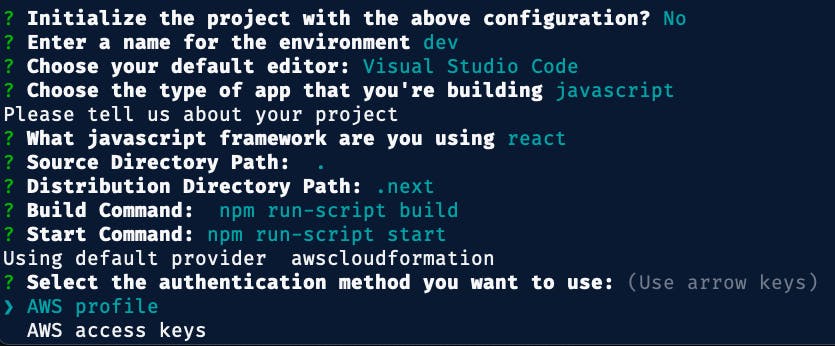
This will prompt a series of questions after detecting our application. When asked to accept the default configuration, say No.
While most of the defaults are safe to accept, there are a few areas we'll change since we are using NextJS:
* What is the name of the source directory: [enter a period here]
* What is the name of the build directory: [enter .next here]
After that, select the AWS Profile you'd like to use.
🎉 We're now ready to begin adding our AWS Services
Adding our backend services
Adding Authentication
The first service to add is our authentication session. This sets up Amazon Cognito so that our users can login after they've completed an order.
amplify add auth

- Accept the default configuration
- Select **Email** as the sign in method
- Select "No, I am done."
✅ That was easy!
The next service is the bulk of this post
Adding a REST API
In a lot of frameworks, creating an API is done by adding a file that then becomes an API route. While this is great for speed of development and simplifies the process, the tradeoff is that there is less control on what that function can be attached to. For now, we want our function to serve as an API route, later on, we'll explore how a serverless function can be triggered automatically, when someone signs up.
Amplify supports this flexibility via its CLI. To get started, run the following command:
amplify add api

- Select REST
- **Give this a friendly name like "cateringapi"**
- Provide a path: `/catering`
- Create a new Lambda function
- Name the function `cateringfunc`
- NodeJS as the environment
- Select **Serverless ExpressJS function** as the template
- Select `y` for advanced settings
- Select `N` for all options **except** for configuring secret values, select `y`
- For the key of the secret, type `STRIPE_SECRET_KEY`
- For the value, grab the **secret key** (not the publishable key) from the Stripe Dashboard (make sure you're in **test mode**) and enter it.
- I'm done
- Select the option to edit the local lambda function now
The file should open up in your editor. Take a moment to look over what was generated. A couple of highlights:
- The comments at the top show to get retrieve the secret value we created
const { Parameters } = await (new aws.SSM())
  .getParameters({
    Names: ["STRIPE_SECRET_KEY"].map(secretName => process.env[secretName]),
    WithDecryption: true,
  })
  .promise();

Parameters will be of the form { Name: 'secretName', Value: 'secretValue', ... }[]
- All of our CRUD routes have been generated for us based on the
/cateringpath we provided
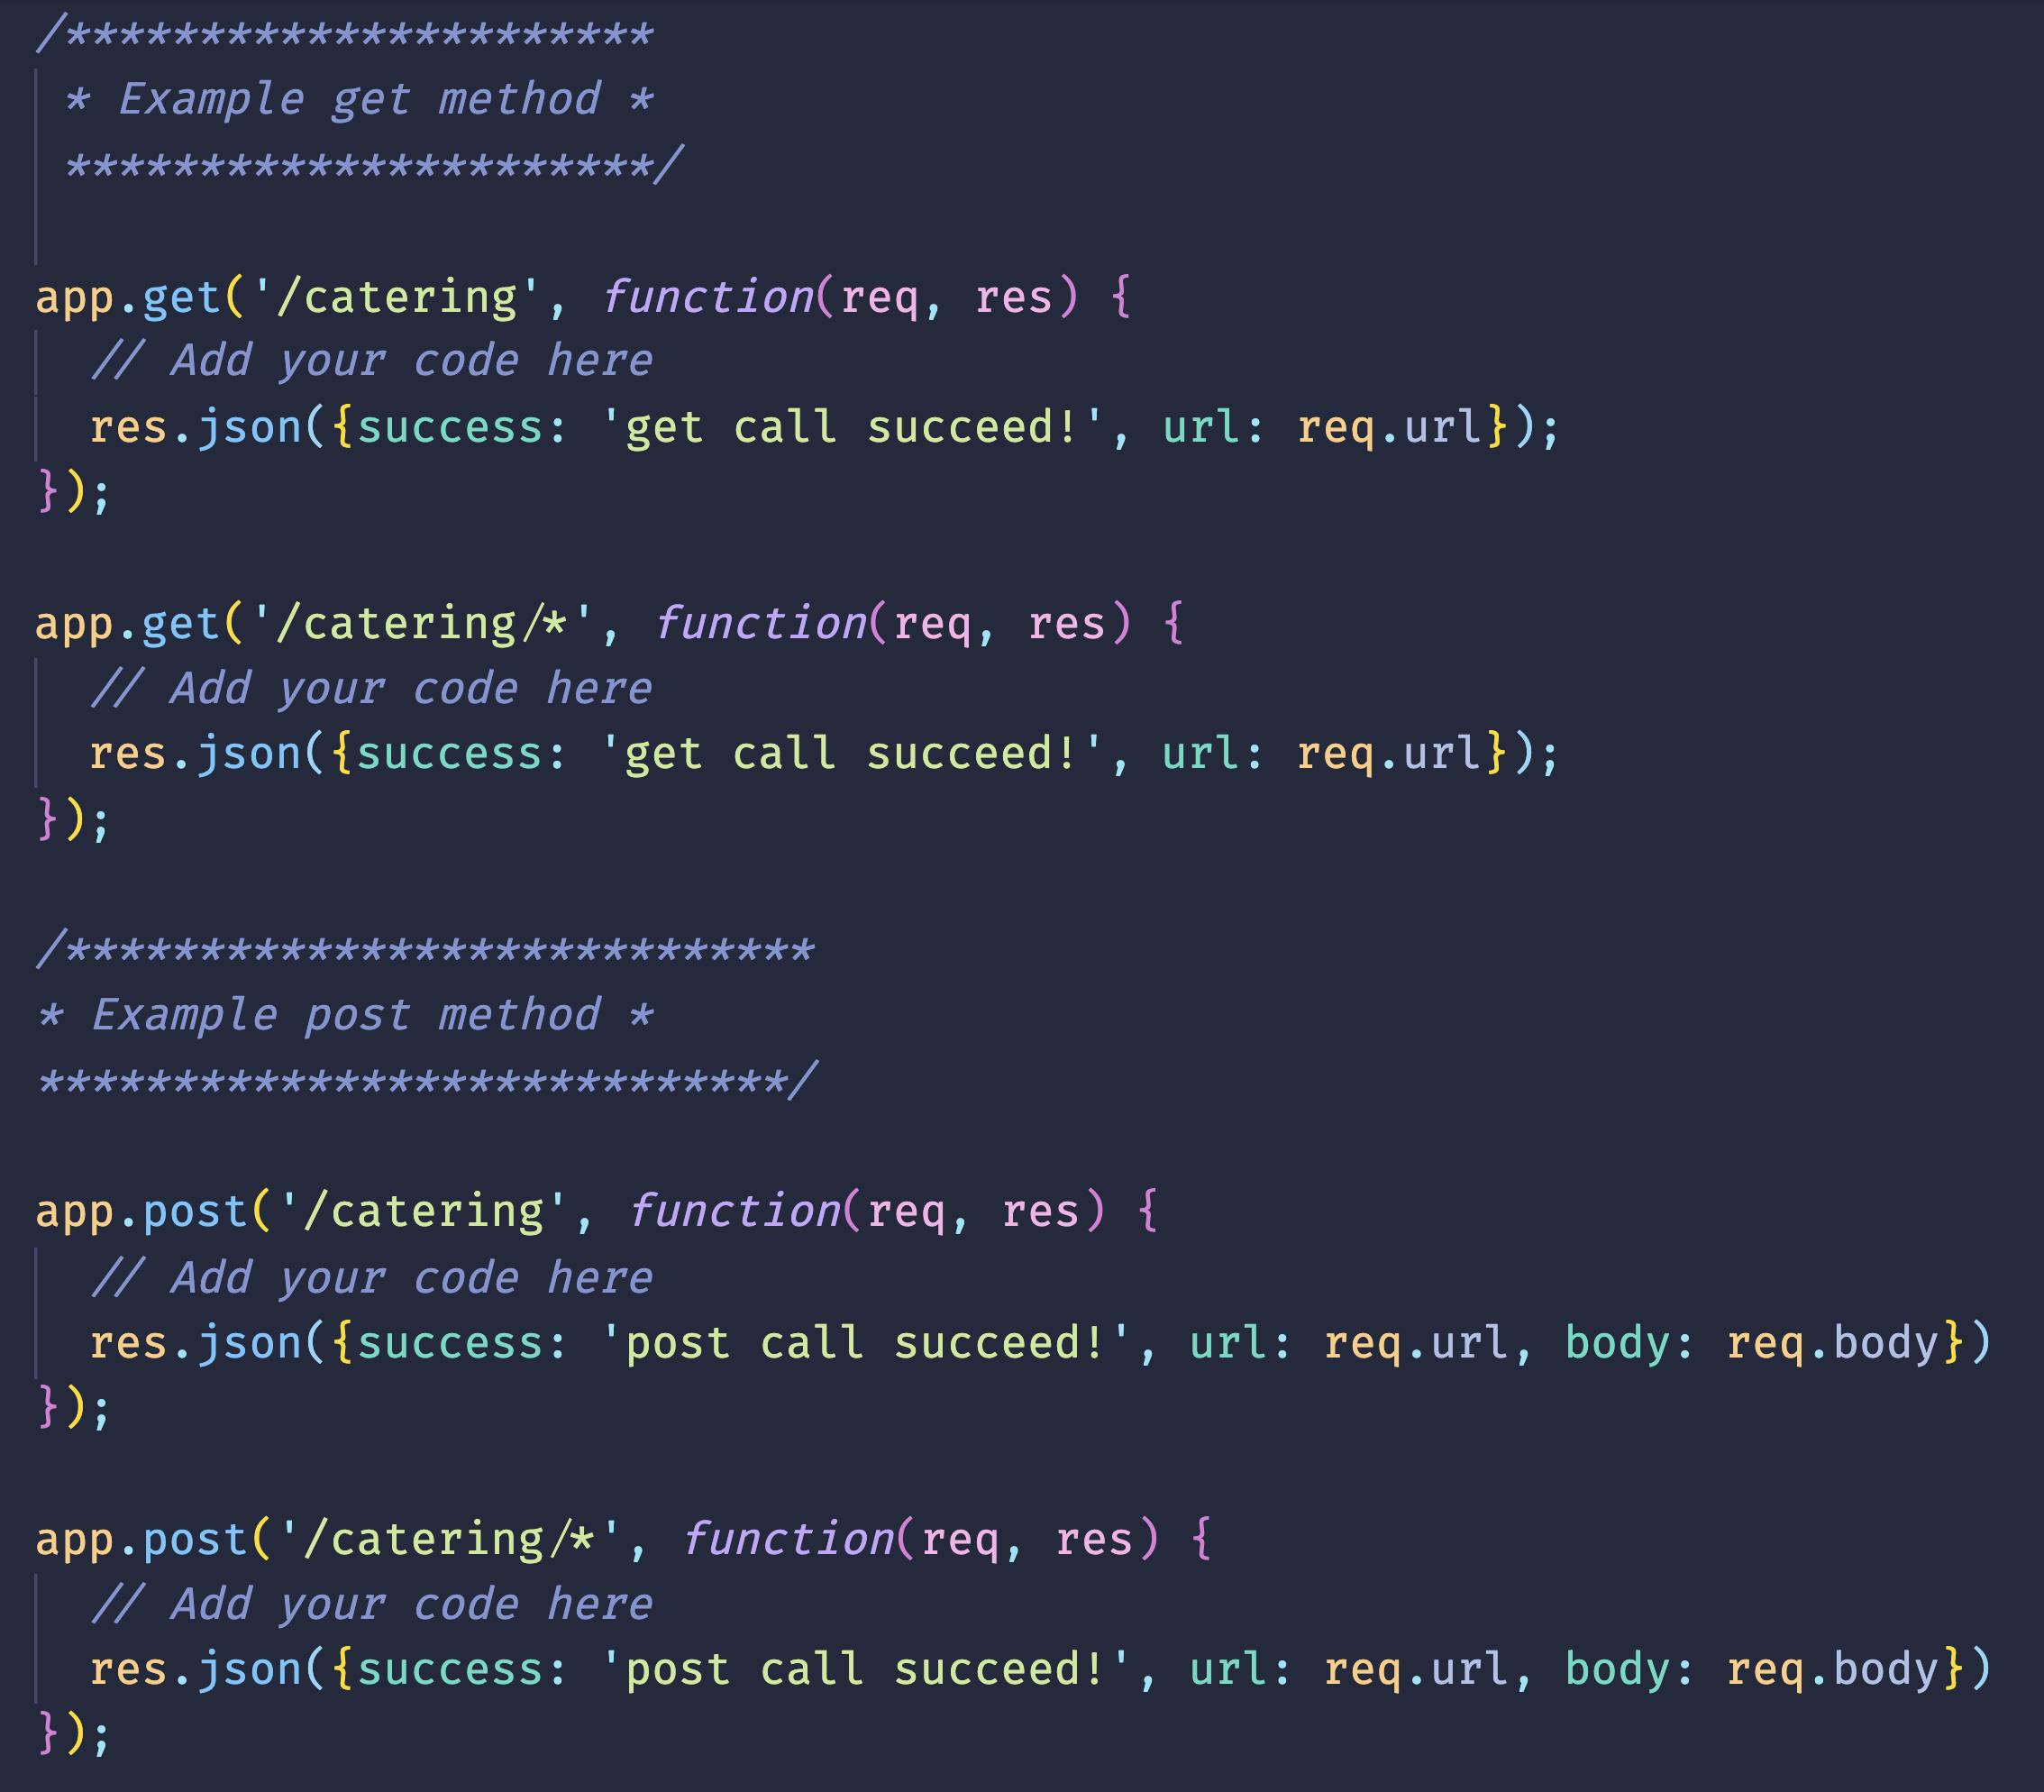
Now that we had a chance to admire the generated code, go ahead and delete everything in this file! (Really!)
Adding business logic
Adding imports
Below are the imports we'll need. The only additional one here is the stripe package. We'll add that shortly.
const express = require('express')
const bodyParser = require('body-parser')
const awsServerlessExpressMiddleware = require('aws-serverless-express/middleware')
const Stripe = require('stripe')
const app = express()
const aws = require('aws-sdk')
Helpers methods and middleware
Next up, we'll want to create a method to grab our secret key. This snippet essentially wraps the original code to do so.
const fetchStripeSecret = async () => {
    const { Parameters } = await new aws.SSM()
        .getParameters({
            Names: ['STRIPE_SECRET_KEY'].map((secretName) => process.env[secretName]),
            WithDecryption: true,
        })
        .promise()

    return Parameters[0].Value
}
Our template is based on ExpressJS a nodeJS framework meant to run on a server. In Express, middleware is a core concept.
The following automatically converts our payload to JSON, lets us run express in a serverless function, allows CORS (so we can access our API on the frontend), and finally, attaches our stripe secret to our request so we don't have to add it to every API path.
app.use(bodyParser.json())
app.use(awsServerlessExpressMiddleware.eventContext())

// Enable CORS for all methods
app.use(function (req, res, next) {
    res.header('Access-Control-Allow-Origin', '*')
    res.header('Access-Control-Allow-Headers', '*')
    next()
})

app.use(async (req, _, next) => {
    req.stripeSecretKey = await fetchStripeSecret()
    next()
})
Adding logic to our API paths
From here, we get to define our routes! The generated code prefixed our paths with /catering, but that doesn't mean we can't modify them. The below code allows us to fetch the products we created from Stripe and returns them to our frontend.
/****************************
 * get method to access stripe products *
 ****************************/

app.get('/catering/products', async function (req, res) {
    const stripe = new Stripe(req.stripeSecretKey)

    const productPriceData = await stripe.prices.list({
        expand: ['data.product'],
    })

    const productData = productPriceData.data.map(
        ({ product, unit_amount, id }) => ({
            name: product.name,
            description: product.description,
            price: unit_amount / 100,
            image: product.images[0],
            priceId: id,
        })
    )

    res.json(productData)
})
The following happens whenever a user clicks one of our Stripe products from the frontend. They send us a priceId and a fulfillmentDate, and we handle creating a checkout session and sending that session to the frontend so they can be redirected.
🗒️ Note that in the
success_urland thecancel_url, there is an expectation that those respective pages are created:/order/successand/order/canceled`. We'll create those in just a bit.
/****************************
 * post method to create checkout session *
 ****************************/

app.post('/catering/checkout-sessions', async (req, res) => {
    const stripe = new Stripe(req.stripeSecretKey)

    try {
        // Create Checkout Sessions from body params.
        const session = await stripe.checkout.sessions.create({
            line_items: [
                {
                    price: req.body.priceId,
                    quantity: 1,
                },
            ],
            payment_method_types: ['card'],
            mode: 'payment',
            success_url: `${req.headers.origin}/order/success?session_id={CHECKOUT_SESSION_ID}`,
            cancel_url: `${req.headers.origin}/order/canceled`,
            metadata: {
                fulfillmentDate: req.body.fulfillmentDate, //new Date().toISOString()
            },
            shipping_address_collection: {
                allowed_countries: ['US'],
            },
        })

        res.status(200).json(session)
    } catch (err) {
        console.log(err)
        res.status(err.statusCode || 500).json(err.message)
    }
})
Our last route is more of an extra. In the next post, we'll store orders in a database, but for now, we'll provide a way for when an order is completed, a customerSessionId is sent to the frontend. We'll send that to this route so it's possible to see the customer details later on.
/****************************
 * get method to access checkout session from client *
 ****************************/

app.get('/catering/checkout-sessions/:customerSessionId', async (req, res) => {
    const stripe = new Stripe(req.stripeSecretKey)

    const id = req.params.customerSessionId

    try {
        if (!id.startsWith('cs_')) {
            throw Error('Incorrect CheckoutSession ID.')
        }
        const checkoutSession = await stripe.checkout.sessions.retrieve(id)
        console.log(
            'the custoemr session',
            JSON.stringify(checkoutSession, null, 2)
        )
        res.json(checkoutSession)
    } catch (err) {
        res.status(404).json({ statusCode: 404, message: err.message })
    }
})
The last line of code for this file is just to export what we created:
module.exports = app
Recall, we have to install the stripe package for our function.
While in the root of your project, run the following command in your terminal:
cd amplify/backend/function/cateringfunc/src && npm i stripe && cd ../../../../..
That'll go into the functions directory, install the stripe package, and then go back to the home directory.
Before we push up our backend and configure our frontend, we still have a few more options to answer in our terminal. It should currently be in a Press enter to continue state.
Hit enter and select the following options:
Restrict API access **N**
Do you want to add another path **N**
Once that is done, let's save our changes and push up our backend to AWS by running the following command:
amplify push -y
🗒️
amplify pushwill show us the changes in our backend and ask if we would like to proceed. Adding the-yflag will automatically accept.
While our backend is being pushed up, let's switch over to our frontend
Scaffolding our frontend
😅 I'm going to be honest here, I was going to add a CSS framework, but figured if anyone wanted to use this project they would likely use their own styles. So I kept styling simple and focused on the code. The final version however uses ChakraUI to style 😎
As with every Amplify project, we'll need to tie together our frontend with our backend. Since we are using NextJS, we'll do that by updating our _app.js file to look like the following:
import '../styles/globals.css'
import Amplify from 'aws-amplify'
import config from '../aws-exports'

Amplify.configure(config)

function MyApp({ Component, pageProps }) {
    return <Component {...pageProps} />
}

export default MyApp
Afterwards, we'll add a file called getStripe.js at the root of our project. This file ensures that we use the same instance of Stripe and only load it once.
import { loadStripe } from '@stripe/stripe-js'

let stripePromise = null
const getStripe = () => {
    if (!stripePromise) {
        stripePromise = loadStripe(process.env.NEXT_PUBLIC_STRIPE_PUBLISHABLE_KEY)
    }
    return stripePromise
}

export default getStripe
Note that the getStripe file makes use of an environment variable. The value for that key can be found on the Stripe Dashboard as the publishable key.
Copy the value from there and in the root of your project create a file called .env.local.
Paste in the following (replacing the value with your actual publishable key):
NEXT_PUBLIC_STRIPE_PUBLISHABLE_KEY= YOUR_PUBLISHABLE_KEY_STARTS_WITH_PK
Creating our homepage
Our homepage is our first chance to verify our API is setup. Recall that it holds two responsibilities:
- Fetching our products
- Creating a checkout session once a user has picked a product
Replace what's in pages/index.js with the following:
import { useEffect, useState } from 'react'
import getStripe from '../getStripe'
import { API } from 'aws-amplify'

const Home = () => {
    const [products, setProducts] = useState([])

    useEffect(() => {
        API.get('cateringapi', '/catering/products').then((productData) =>
            setProducts(productData)
        )
    }, [])

    const handleProductClick = async (priceId) => {
        const stripe = await getStripe()
        const data = await API.post('cateringapi', '/catering/checkout-sessions', {
            body: { priceId, fulfillmentDate: new Date().toISOString() },
        })

        await stripe.redirectToCheckout({ sessionId: data.id })
    }

    return <main>view products</main>
}

export default Home
While discussing how react works is outside of this series, the two important parts are the useEffect(), which fetches our products once after the initial load, and the handleProductClick function that creates the checkout session.
Both of those functions make use of our API by using an API Name, Path Name flow. This is why it was important to provide a friendly name for these services in the CLI.
Feel free to style your products however you like, if just wanting to follow along, you can replace to the view products text with the following:
{products.map((product) => {
  return (
    <article
        style={{
          border: '1px solid black',
          margin: '20px',
          display: 'flex',
        }}
        key={product.priceId}
        onClick={() => handleProductClick(product.priceId)}
    >
        <div>
          <img
            src={product.image}
            alt={product.description}
            width="300px"
            height="300px"
          />
        </div>
        <div>
            <h2>{product.name}</h2>
            <h2>
              {new Intl.NumberFormat('en-US', {
                  style: 'currency',
                  currency: 'USD',
              }).format(product.price)}
            </h2>
            <p>{product.description}</p>
        </div>
    </article>
  )
})}
Before testing out our flow, recall that when a customer is transferred over to Stripe to submit a payment, they'll be transferred back to a success page when the payment succeeds, and a cancellation page if the customer backs out of paying.
In the pages directory, create the following pages:
success.jscanceled.jscustomer-session/[orderId].js(we'll revisit this one later)
For the cancellation page, we'll keep it super simple and just check the query parameters sent back to see if a user got their by Stripe:
import React, { useEffect } from 'react'

function OrderCancelPage() {
    useEffect(() => {
        const query = new URLSearchParams(window.location.search)

        if (query.get('canceled')) {
            console.log(
                'Order canceled -- continue to shop around and checkout when you’re ready.'
            )
        }
    }, [])
    return <div>Order Cancel Page</div>
}

export default OrderCancelPage
The success page will be very similar, except we'll also give them the ability to view their order by visiting the customer-session/{orderId} page.
import React, { useEffect, useState } from 'react'
import Link from 'next/link'
function OrderSuccessPage() {
    const [orderId, setOrderId] = useState('')
    useEffect(() => {
        // Check to see if this is a redirect back from Checkout
        const query = new URLSearchParams(window.location.search)

        if (query.get('session_id')) {
            setOrderId(query.get('session_id'))
        }
    }, [])

    return (
        <div>
            <h1>Order Success Page</h1>
            <Link href={`/customer-session/${orderId}`}>
                <a>View Order</a>
            </Link>
        </div>
    )
}

export default OrderSuccessPage
For the customer order page, add the following few lines:
import React from 'react'
import { withAuthenticator } from '@aws-amplify/ui-react'

function CustomerOrder() {
    return <div>Protected customer order page.</div>
}

export default withAuthenticator(CustomerOrder)
This page is protected, meaning it needs a user to have an account in order to view it. We'll dive deeper into what that means in just a moment, but for now, let's test out our flow!
Start the app
npm run dev
Visit localhost:3000. Your products should display and upon clicking a product, you should be taken to a Stripe checkout session.
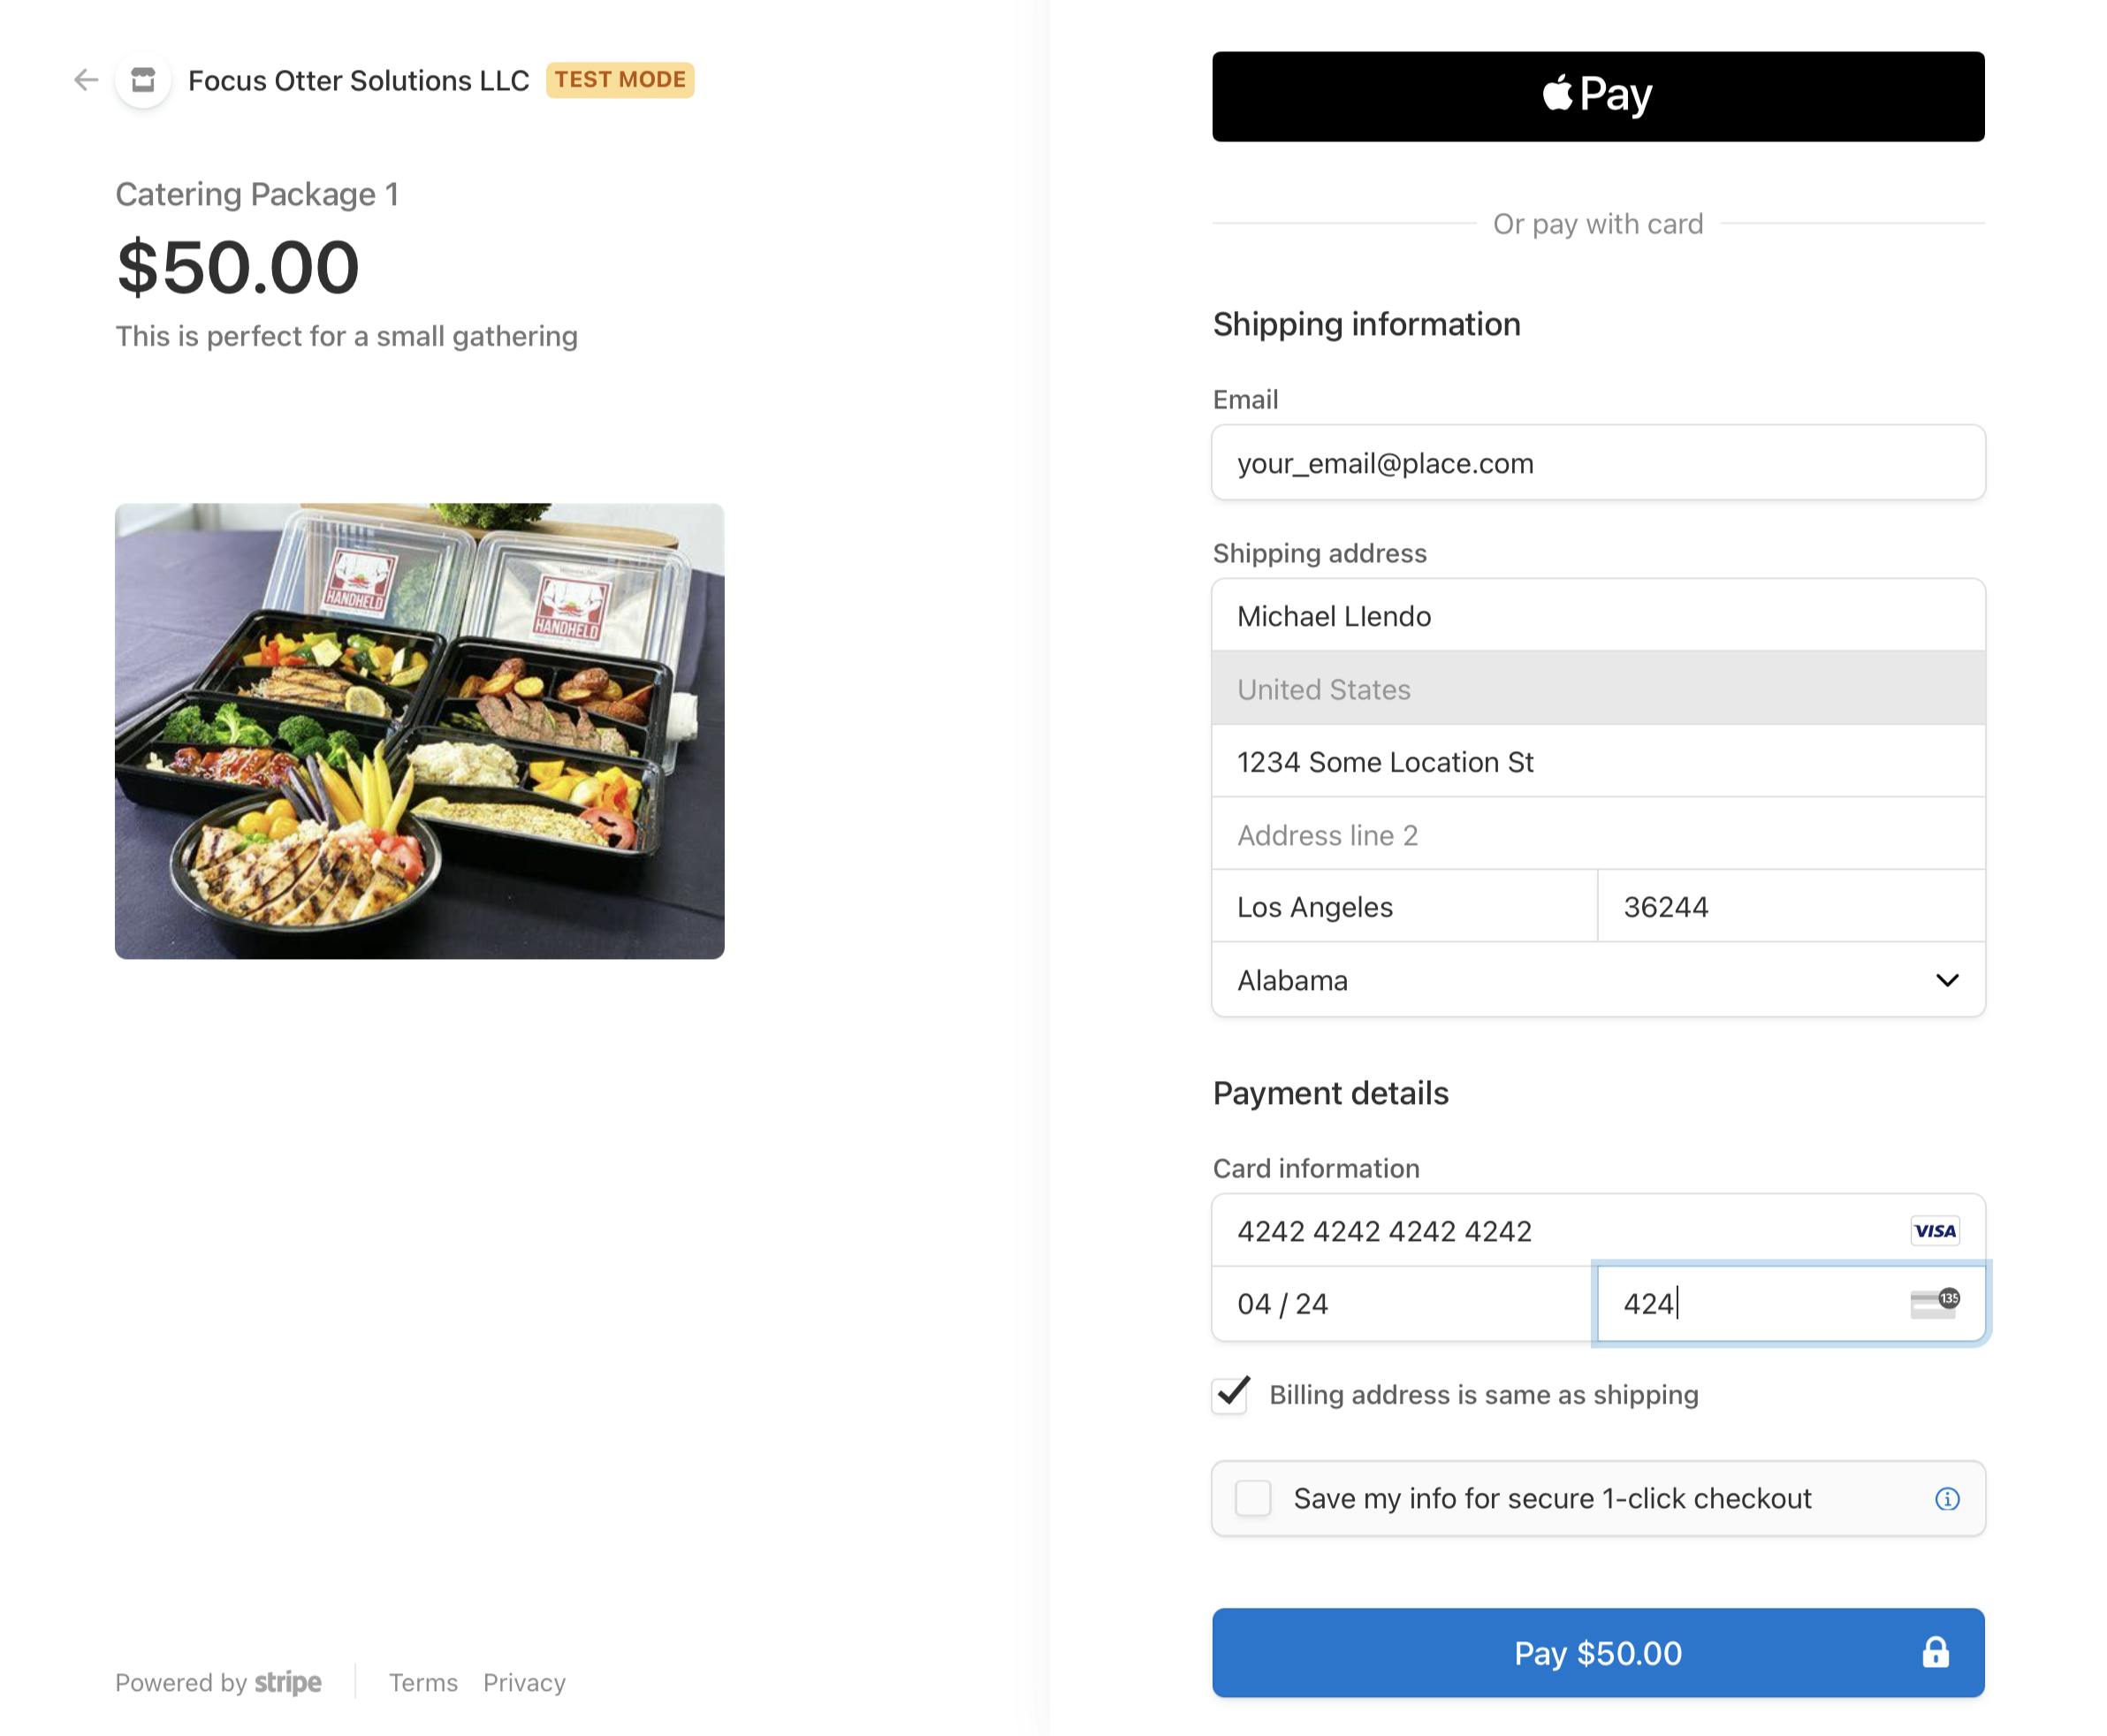
🗒️ In order for a payment to go through, you must enter a sequence of
42for the card information.
After the payment has gone through, make sure you are taken to the success page. Feel free to also press the Stripe back button to make sure you get to the canceled page.
Going the extra mile
We've done a lot so far. What we have currently can easily be turned into a decent starter project👀
But for this post, we're going to go a bit further. Specifically, when a customer purchases a product, we'll automatically create an account for them to view their order.
Our frontend is already setup to handle this flow:
When a user is taken to the success page, they can click a link to view their order. That will redirect them to the pages/customer-session/{orderId} page where we can pull in our customer details.
Because that's already taken care of, we'll instead focus on our backend.
Creating a Stripe webhook
Creating a webhook is two-fold: We first have to register our endpoint with Stripe, then we have to create the logic for it in our API.
To get started hooking into when a checkout payment has been completed, we'll first hop into our aws-exports.js file to grab our API endpoint.
This file contains all of our secrets and is rightfully automatically added to our .gitignore. Grab the endpoint value from the aws_cloud_logic_custom array:

With the endpoint, we'll once again head to the Stripe Dashboard to create a new webhook: dashboard.stripe.com/test/webhooks/create
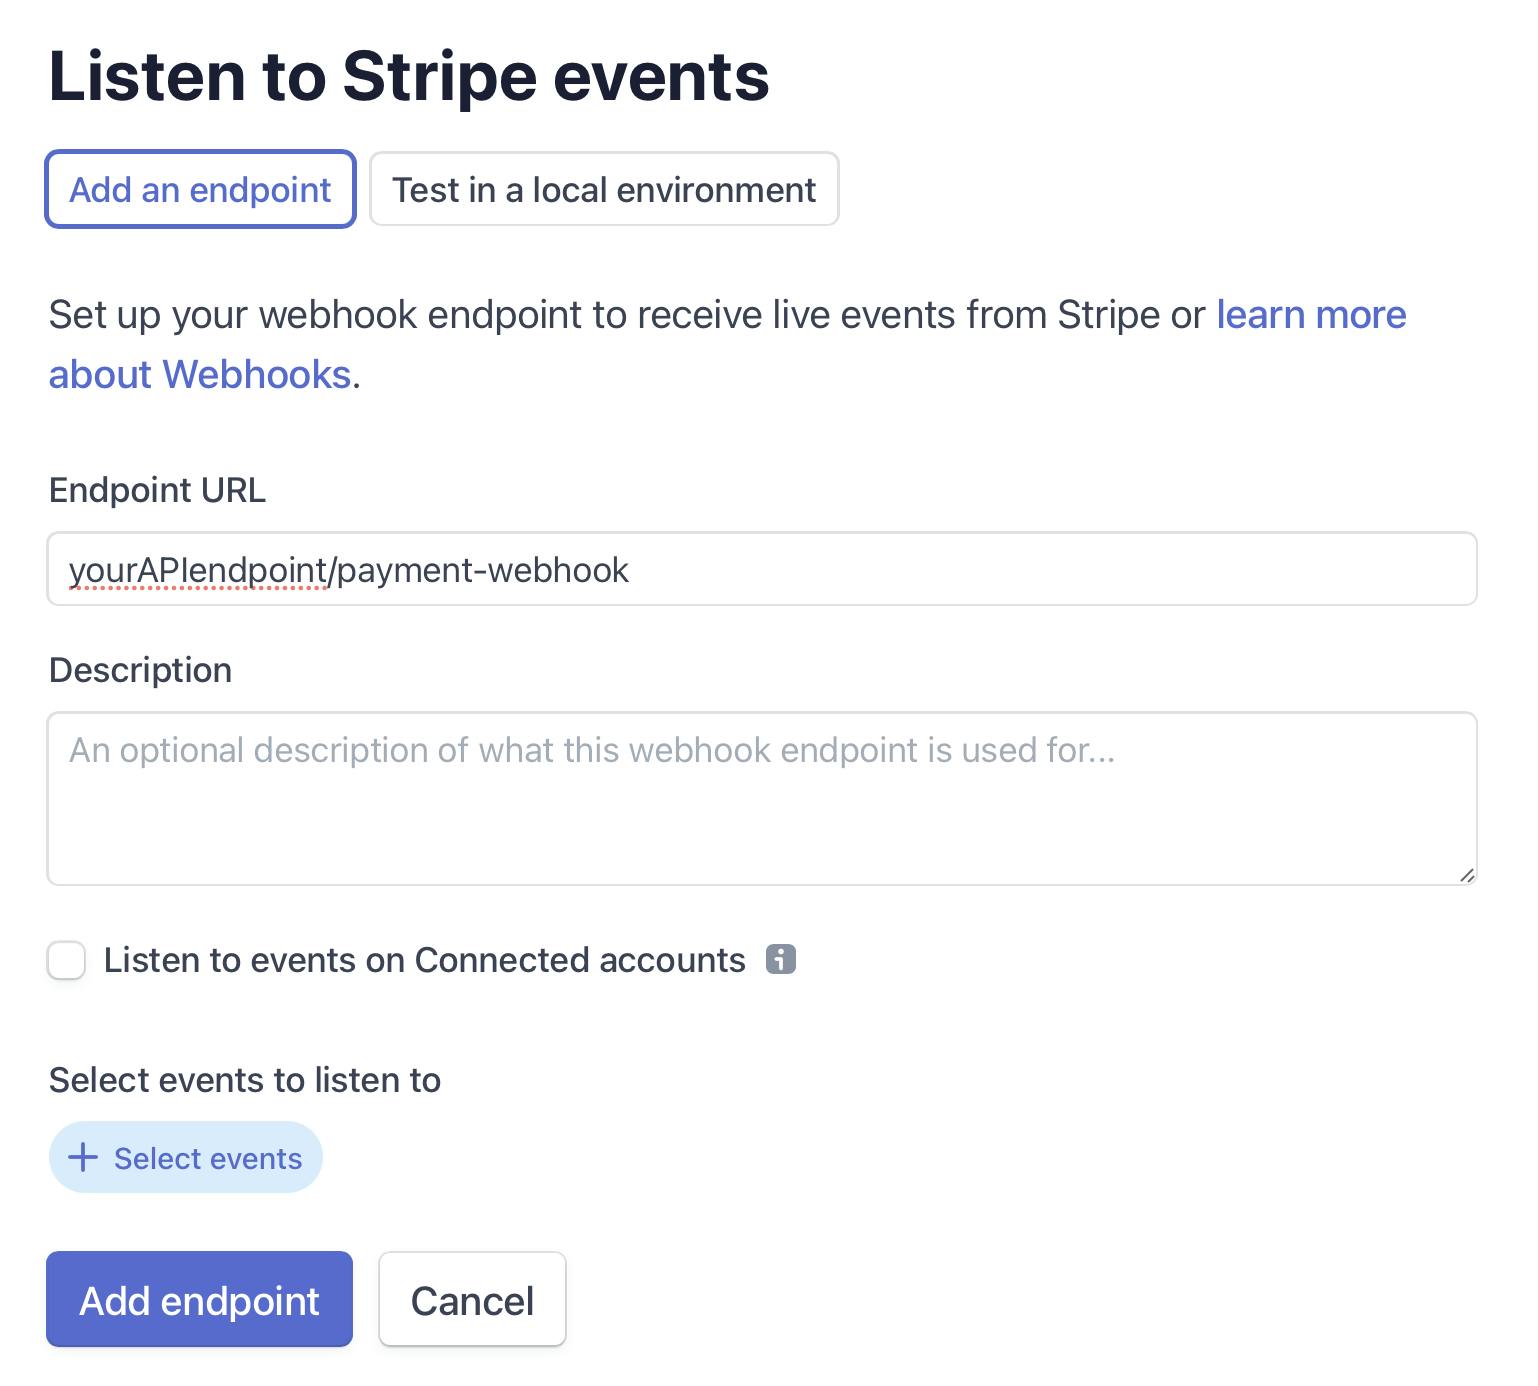
🚨Make sure to add
/payment-webhookto the end of the API endpoint.
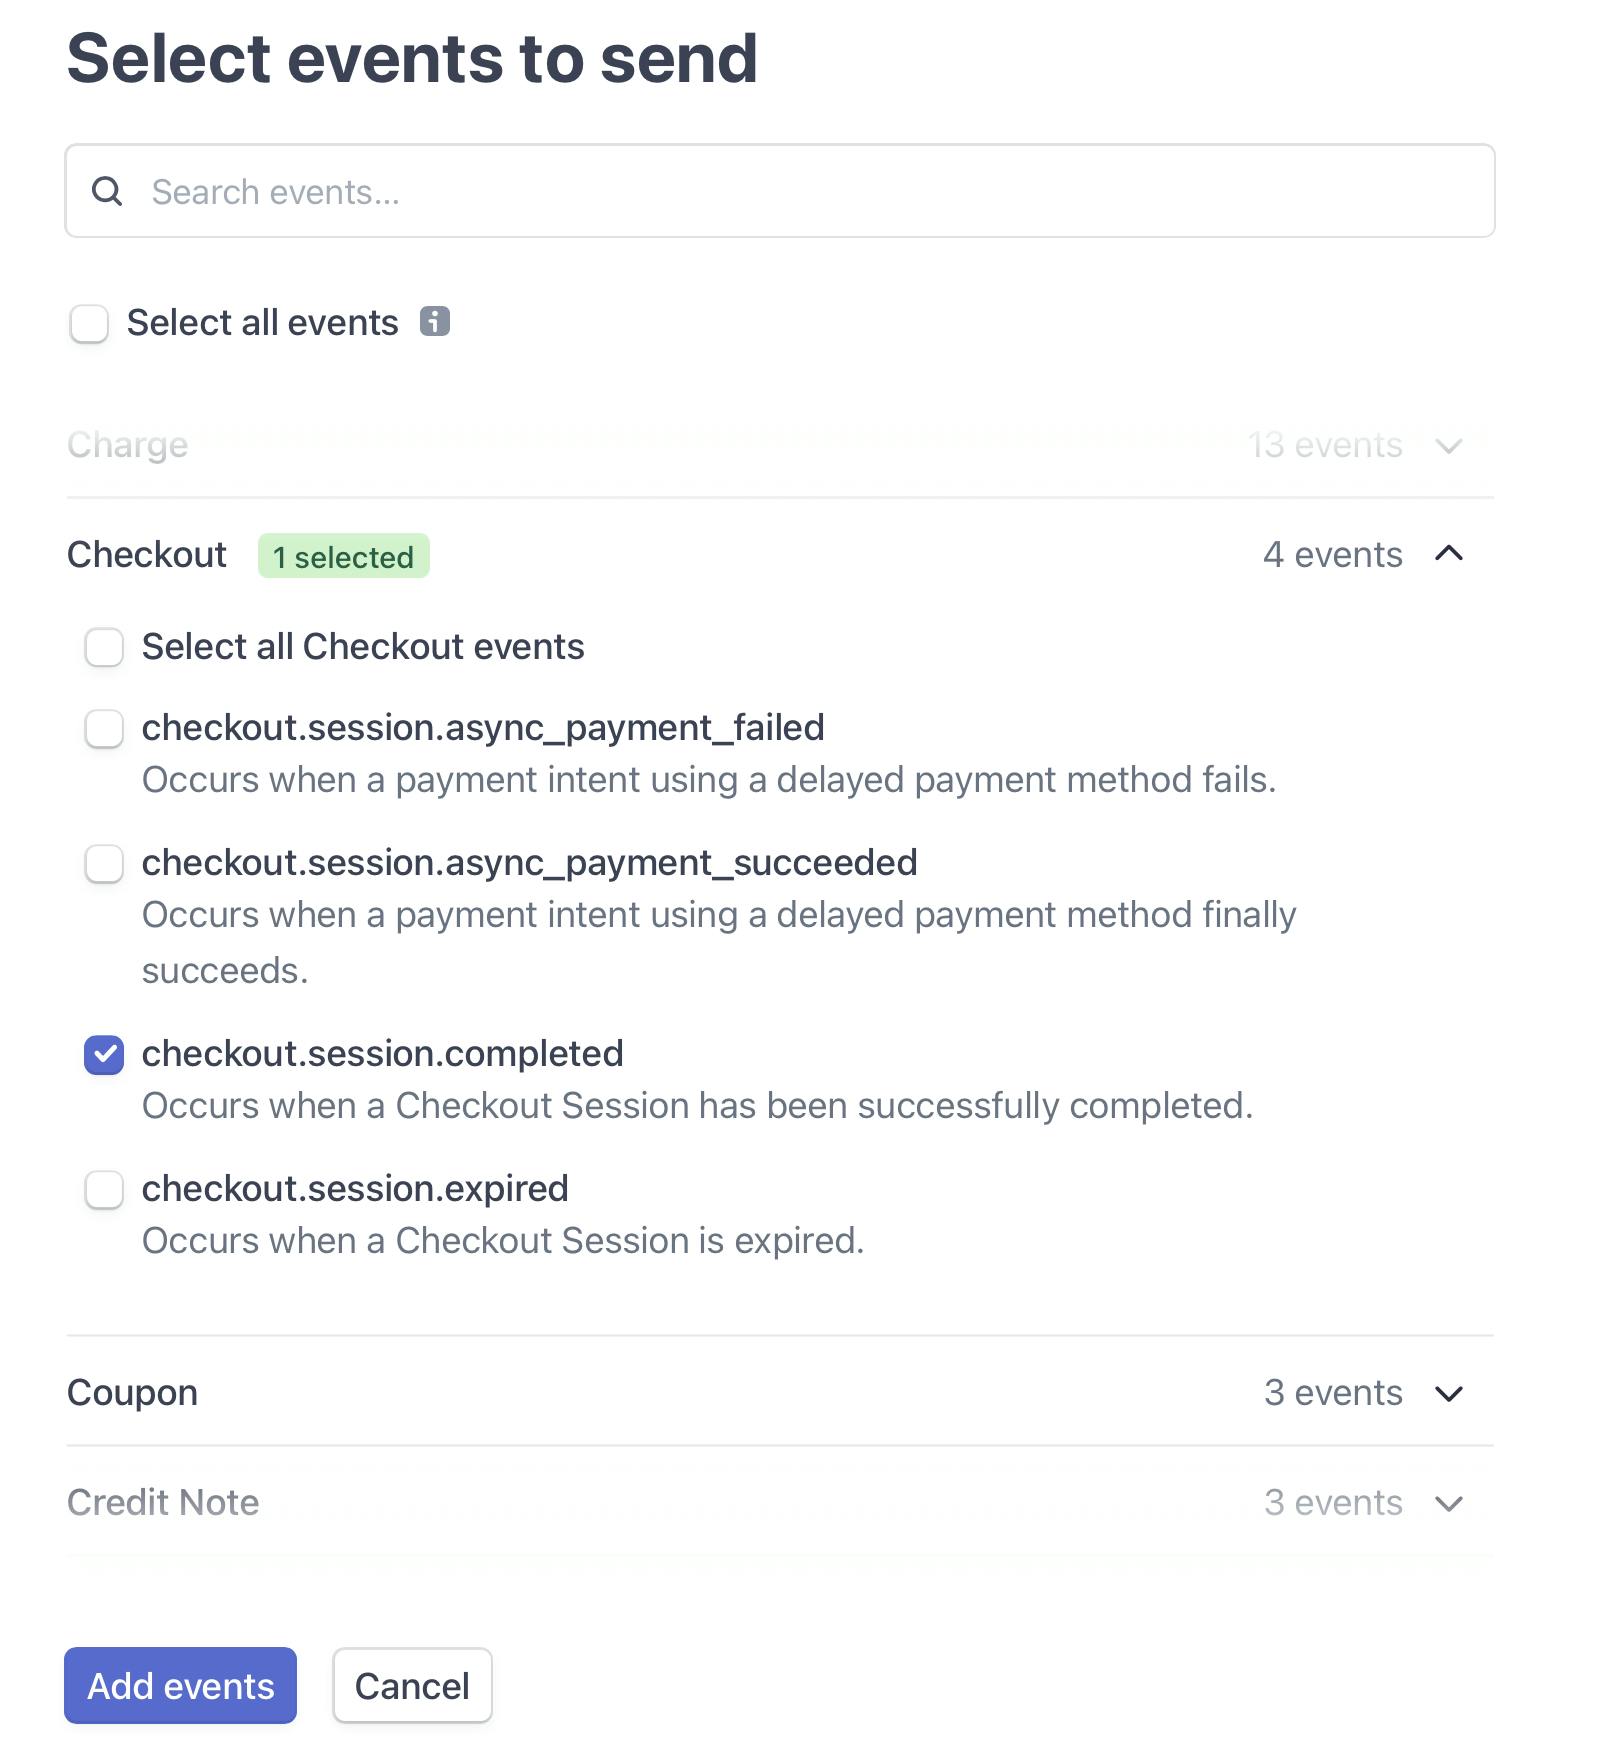
After entering in the details, click the + selected events button.
Select the checkout.session.completed event and click add events.
With our webhook created, we'll need to grab the signing secret.
🚨This is not the secret in the top-right of the Dashboard.

Copy the secret to your clipboard.
Creating a webhook endpoint
This part has a lot of similarities to our first routes. We'll start by adding a new path to our existing API via the CLI.
amplify update api
From here, we'll select the following options:
- REST
- cateringapi
- Add another path
- /payment-webhook
- Create a new Lambda function
- cateringwebhookfunc
- NodeJS
- Serverless ExpressJS function
When asked if wanting to configure advanced settings, select y and select the following options:
- Access other resources: y
- Press spacebar on auth and hit enter
- Press spacebar on create and read and hit enter
- Select 'n' for recurring schedule, lambda layers, and environment variables
- Select 'y' for wanting to configure environment secrets
For a secret name, enter STRIPE_SECRET_WEBHOOK. For the value, enter the copied webhook signing secret from the Stripe Dashboard.
When asked what you'd like to do, say Add a secret.
For a secret name, enter STRIPE_SECRET_KEY. For the value, enter the secret key value from the homepage of the Stripe Dashboard: dashboard.stripe.com/test/dashboard
🗒️ We've already entered this secret key for our first function. However, there isn't currently a way to share secrets between functions. Fortunately, the team is already working to make this a possibility soon!
Select I'm done, and n to wanting to edit the local function now.
For restricting API access select n and also n for adding another path.
🤔 "We just created a function that can create and read users from our user pool, why aren't we restricting access to it?" Excellent question! Instead of using IAM permissions to lock down the API path, we are using the Stripe webhook secret. We'll check the request headers to make sure it matches the webhook secret we stored on AWS.
Adding our endpoint logic
In our code editor, we'll navigate to amplify/backend/function/paymentwebhookfunc/src/app.js
As before, Amplify does a great job at providing sample code. Note that since we allowed create and read access to our Cognito pool, we are shown the environment variable we can use to access it.
/* Amplify Params - DO NOT EDIT
    AUTH_AMPLIFYEXAMPLE20C9CA19_USERPOOLID
    ENV
    REGION
Amplify Params - DO NOT EDIT */
More on that in a bit.
For now, let's start by removing everything except those provided environment variables.
With a near-clean slate to work with, let's begin by adding in our imports and secrets fetcher:
const aws = require('aws-sdk')
const express = require('express')
const awsServerlessExpressMiddleware = require('aws-serverless-express/middleware')
const { createCognitoUser } = require('./createCognitoUser')
const Stripe = require('stripe')
const app = express()

const fetchSecrets = async (key) => {
    const { Parameters } = await new aws.SSM()
        .getParameters({
            Names: [key].map((secretName) => process.env[secretName]),
            WithDecryption: true,
        })
        .promise()

    return Parameters[0].Value
}
Nothing too crazy here, we have many of the same imports as last time, with the addition of a createCognitoUser module. We'll fill this out in a bit.
Next, we bring in the Stripe library so we can use Stripe API's.
Finally, we have a slightly different way to fetch secret values. Since we now have two secrets (a stripe secret and a webhook secret), this method takes in the name of the secret and returns it.
Next up, we have some middleware. This is the same as the last API module.
app.use(awsServerlessExpressMiddleware.eventContext())

// Enable CORS for all methods
app.use(function (req, res, next) {
    res.header('Access-Control-Allow-Origin', '*')
    res.header('Access-Control-Allow-Headers', '*')
    next()
})
The last part is the meat of the file. Here we'll create the route, fetch the secrets and the Stripe value from the header. Once we have those, we'll try to verify that the signature value is the same that we copied from Stripe.
If it is, we check to make sure the event is the checkout.session.completed type, grab the customer's email, and use it to create a user in our userpool.
/****************************
 * post method to capture successful payment *
 ****************************/

app.post(
    '/payment-webhook',
    express.raw({ type: 'application/json' }),
    async function (req, res) {
        const stripeSecretKey = await fetchSecrets('STRIPE_SECRET_KEY')
        const stripeWebhookSecret = await fetchSecrets('STRIPE_SECRET_WEBHOOK')
        const stripe = new Stripe(stripeSecretKey)
        const sig = req.headers['stripe-signature']
        let event

        try {
            event = stripe.webhooks.constructEvent(req.body, sig, stripeWebhookSecret)
        } catch (err) {
            res.status(400).send(`Webhook Error: ${err.message}`)
            return
        }

        switch (event.type) {
            case 'checkout.session.completed':
                const paymentIntent = event.data.object
                const { email } = paymentIntent.customer_details

                const user = await createCognitoUser({
                    UserPoolId: process.env.AUTH_AMPLIFYEXAMPLE20C9CA19_USERPOOLID,
                    Username: email,
                })

                break
            default:
                console.log(`Unhandled event type ${event.type}`)
        }

        // Return a 200 response to acknowledge receipt of the event
        res.send()
    }
)

app.listen(3000, function () {
    console.log('App started')
})
module.exports = app
Two points worth calling out:
express.raw({ type: 'application/json' }): This route-level middleware tells Express not to modify the incoming JSON data (don't try to parse it for us). The payload has to be unmodified or else Stripe will reject it.process.env.AUTH_AMPLIFYEXAMPLE20C9CA19_USERPOOLID: Make sure to replace that with your actual environment variable
Automatically creating users
In our app.js file, we imported a function called createCognitoUser. When it's called, we pass both the userpool ID and the customer's email address.
Let's create this file (in the same directory as app.js) and add our business logic.
The code in here will be relatively straightforward. Using the userpool ID and the customer's email, we first try to create a new user. If that fails, we check to see if it failed because that user already exists. In either attempt, we either return the user or throw an error.
const aws = require('aws-sdk')

const cognito = new aws.CognitoIdentityServiceProvider({
    apiVersion: '2016-04-18',
})

const createCognitoUser = async ({ UserPoolId, Username }) => {
    try {
        const user = await cognito
            .adminCreateUser({
                UserPoolId,
                Username,
                DesiredDeliveryMediums: ['EMAIL'],
                UserAttributes: [
                    {
                        Name: 'email',
                        Value: Username, //email they used to pay
                    },
                ],
            })
            .promise()

        return user
    } catch (e) {
        //check if user already exists
        if (e.code === 'UsernameExistsException') {
            const user = await cognito
                .adminGetUser({
                    UserPoolId,
                    Username,
                })
                .promise()

            return user
        }

        throw Error('application error', e)
    }
}
module.exports.createCognitoUser = createCognitoUser
🗒️ Recall that when we first added authentication, we said our users will sign in via their email. That's why we are using the email value as their username.
Now when a user gets signed up, they will receive an email with a temporary password, and when they try to sign in with that password, they will automatically be prompted to change it to something else, asked if they want to confirm it, and be taken to a protected page!
Testing out our application
Before we try this out, there are a few things we have to make sure we account for.
- If you haven't already, make sure you install the
stripepackage for this function to use. Even though it is part of the same API, it's still a function that has its own set ofnode_modules.
cd amplify/backend/function/cateringwebhookfunc/src && npm i stripe && cd ../../../../..
- This relates to when we entered a duplicate secret key earlier. Currently, Amplify only tries to find secret keys for the first function that gets created. We can workaround this by extending the permissions our webhook function has:
In the src folder of our paymentwebhookfunc directory, there is a file called custom-policies.json.
Open this file and paste in the following:
[
    {
        "Action": ["ssm:GetParameters"],
        "Resource": ["arn:aws:ssm:YOUR_REGION:YOUR_AWS_ACT_NUMBER:*"]
    }
]
If you're unsure about your region, it's the aws_project_region value in your aws-exports.js file.
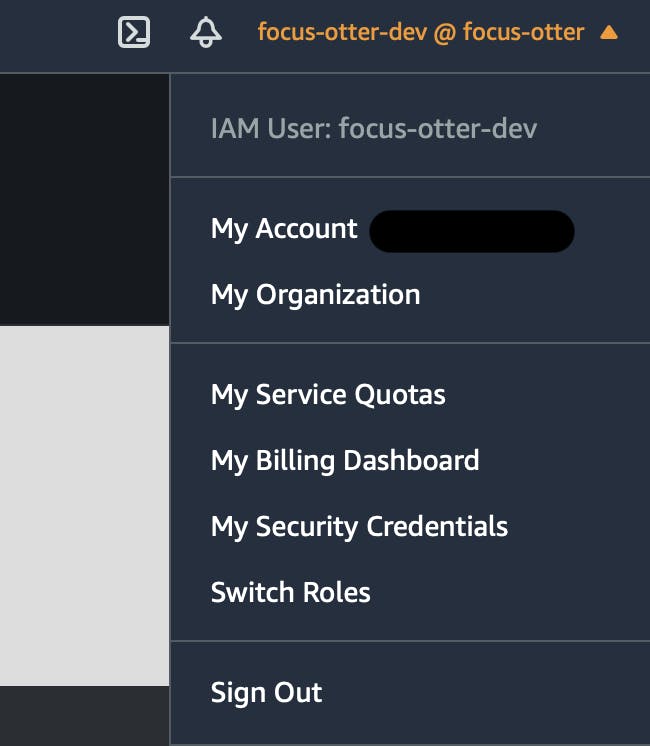
For the account number however, you'll have to log into the AWS Console and grab it from the top-right portion.
If you know how to grab it, go ahead and do your thing, if not, follow along:
In your terminal, run amplify console and select Amplify Console
After signing in, you'll find your account number in the top-right dropdown.
🗒️ Again, this is just temporary, once support for credentials improves, I'll remove this portion of the post.
With that done, let's run amplify push -y to sync our local changes with the cloud.
Testing our flow
Make sure your app is running on localhost:3000
npm run dev
Buy a product as before, when the purchase succeeds, you should be taken to the success page.
Check your email for a signup confirmation that contains a temporary password.
Back in your app, click the link to view your order and use your email and temporary password to login.
From here, you should be prompted to change your password, and optionally, verify your email.
🎉Once that is all done, you're directed to the order page🎉
Extra Credit Challenge
As mentioned in the beginning, functions don't need to be attached to an API. For example, Cognito allows us to attach them to authentication events.
Since users already have to provide an email to pay, having them also verify that email may seem like an unnecessary step. It'd be great if after a user signs up, but before they are confirmed, we automatically verify their email!
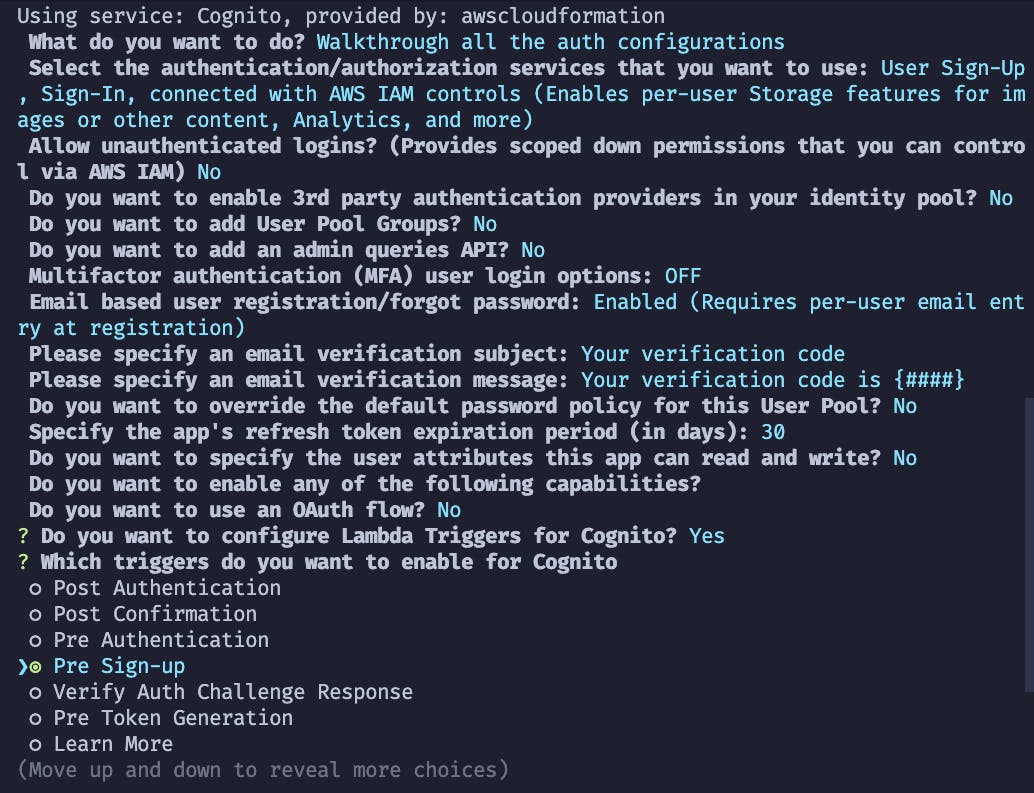
By running amplify update auth you can do just that!
Below are the CLI options to get to the trigger:
And here is a link to a code snippet to auto-verify emails
This is part 1 of a many-part series!
In this post, we created a REST API and allowed our app to accept Stripe payments. We also added a secure webhook to automatically create users for our application. Once a user has been created, they can signin to view their order details.
This is still just scratching the surface.
Next, we'll go deep on how we can combine Expo, Amazon Location Service, and AWS AppSync to deliver a realtime geo delivery app that can respond to geo updates and order status changes!
If you have any comments, suggestions or ideas on what you'd like to see implemented, feel free to leave a comment and let me know!

