

Send an SMS to Customers Using React and AWS Amplify
Whether it's notifying customers that their food is ready, getting school notifications, or a status update on a delivered package, SMS is a great way to get a communicate.
When it comes to sending push notifications, email, or SMS, AWS has a service known as Amazon Simple Notification Service or SNS. In this post, we'll discuss how we can leverage SNS inside of a project built with React and AWS Amplify.
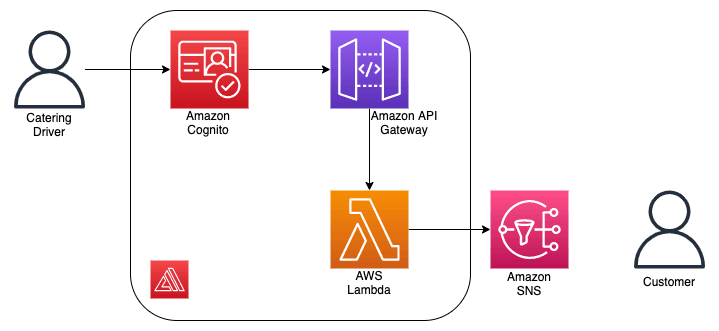
Specifically, we'll mimic a scenario often found in delivery apps, such as catering companies: Customers have sent us orders, and now that the order is ready, we'll send a notification that the order is out for delivery. The architecture setup is a bit contrived, but this post will contain plenty of foundational tools for folks to get started with and will help us build more complex apps in the future.
Key SNS Concepts
When working with SNS, it's important to define four main ideas you'll commonly run into:
- Topic: It's possible to create many instances of the SNS service. You can for example, create on that sends emails regarding signups, and another that sends texts regarding orders. Each SNS instance has a name, which AWS calls a "topic".
- Publisher: Simply put, who is sending the message. In our example, we'll create an API to publish the message ourselves. However, this can also be triggered based on another action, such as an item being saved to a database.
- Subscriber: Converse to a publisher is a subscriber. Who are the recipients.
- Fan Out: One of the most common design patterns in serverless architectures. This allows multiple endpoints (emails, phone numbers, etc) to subscribe to a single topic. In doing so, when a single message is published, it can be sent (or fanned out) to multiple targets.
Project Starter Files
To keep the focus on sending SMS messages to our customers, our project will use a static list of orders. To get started with this setup, feel free to clone this repo from GitHub and install the dependencies.
Upon starting the project, you should see the following page on localhost:3000
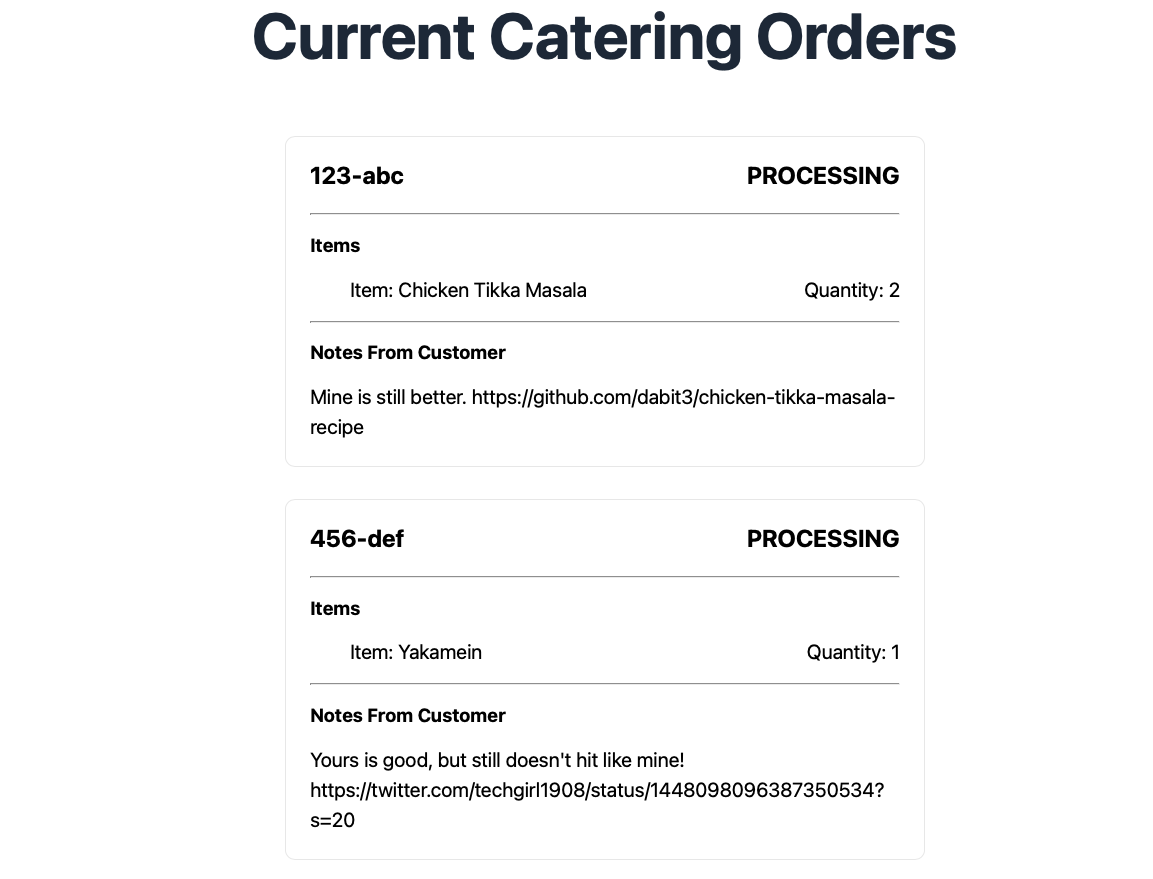
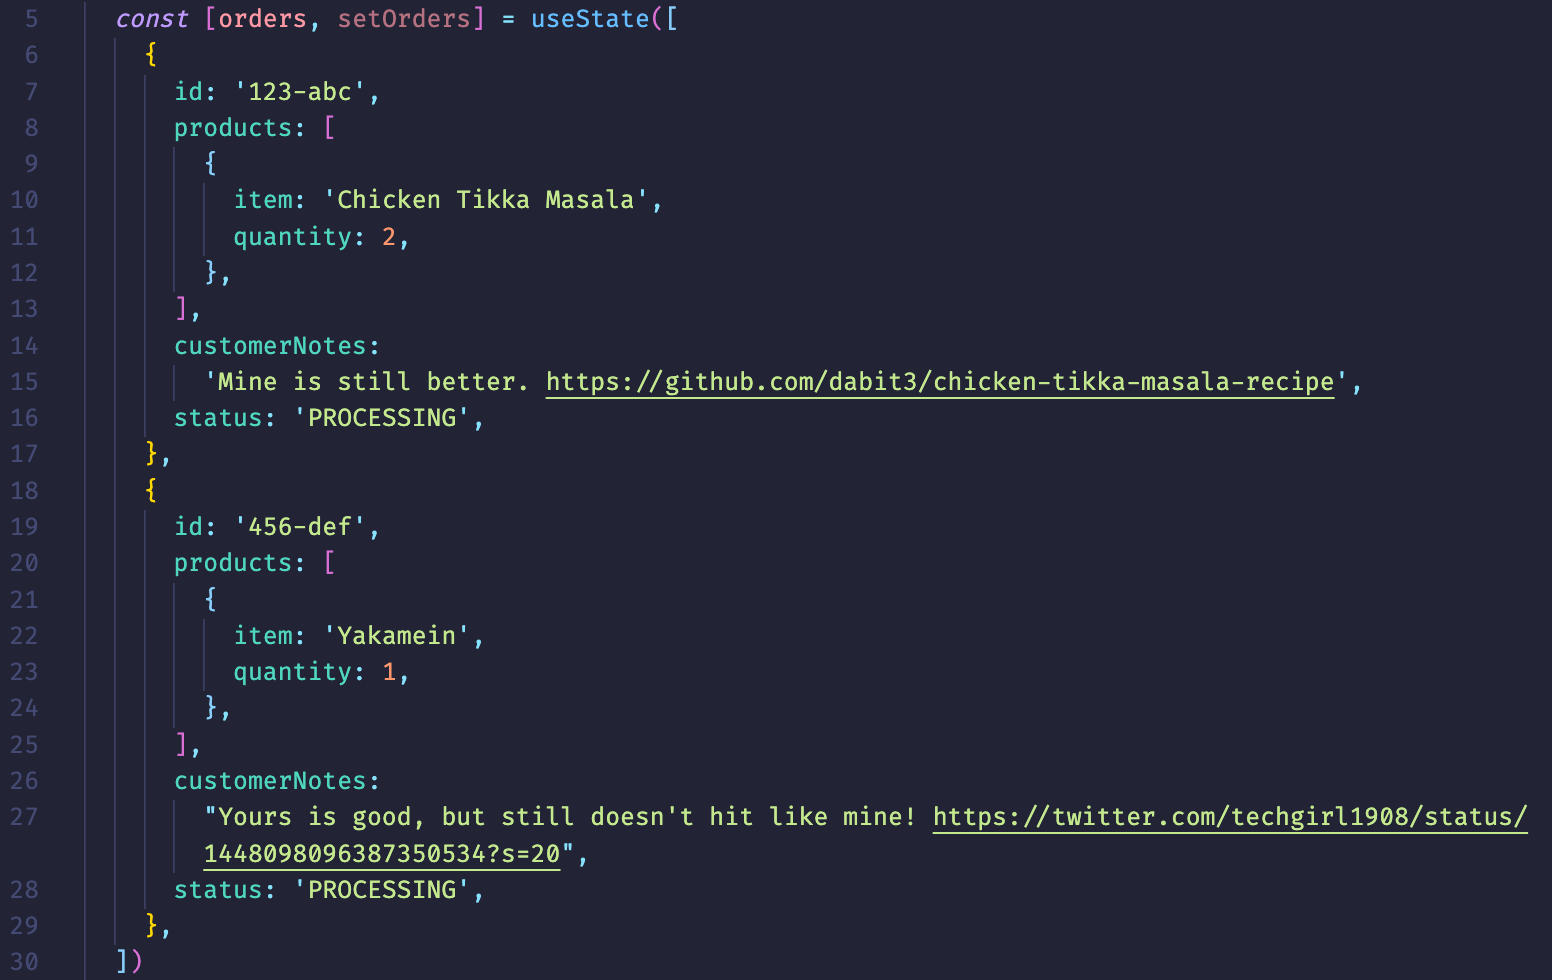
The markup to create the application isn't the focus, but feel free to take a look. The mock data used for an order is definitely something worth calling out. In particular, note that an order is made up of an id, products, status, and customerNotes.
🤔 Because this is a delivery app, you might be wondering why there aren't fields like
phoneNumberandaddress. Instead of having those accessible on the frontend, we'll use the order'sidto send them to the driver from our backend whenever an order is ready for delivery. This helps protect sensitive customer information by only allowing drivers to access them when they need them.
Adding Our Backend
Recall our scenario: A driver is given a list of customer orders. When selecting an order, we want to notify the customer that their order is being delivered.
To get started, we'll want to first setup Amplify so we can begin adding categories.
If needing to setup AWS Amplify for the first time, add run the command
npm i -g @aws-amplify/cliand follow the prompts after runningamplify configure.
In your terminal and while in your project's directory, run the following command to initialize Amplify in your project:
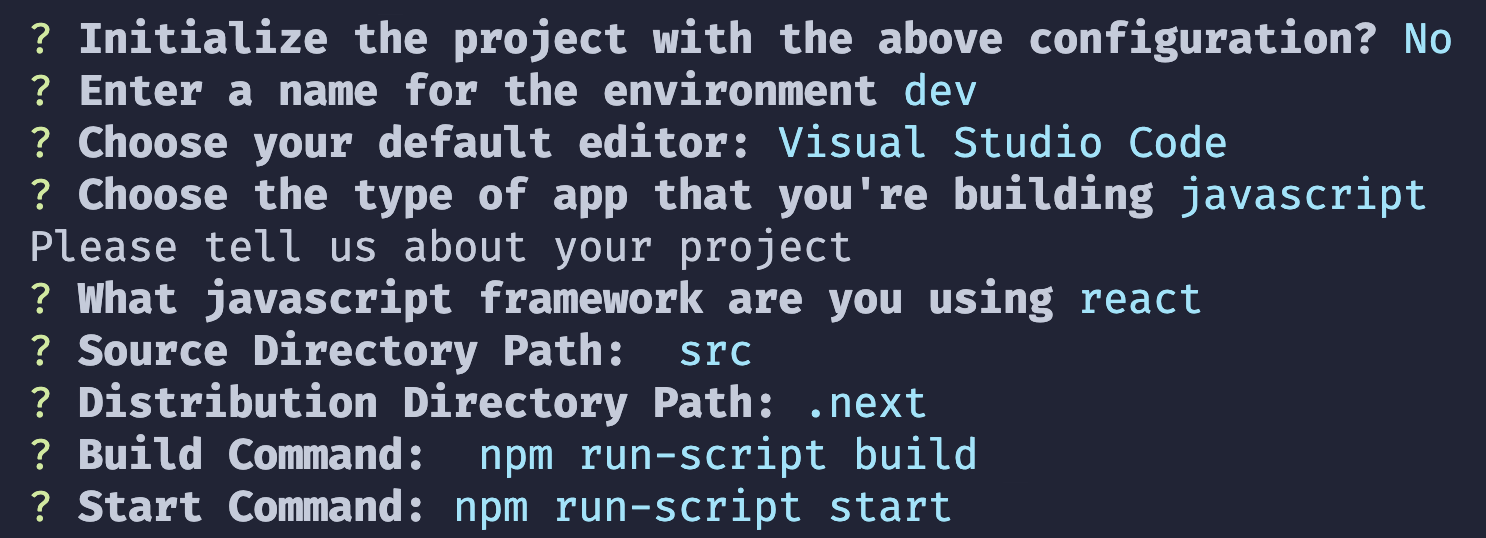
amplify init
After selecting a name for the project, select n when asked if wanting to accept the default configuration.
The default configuration assumes a project created with create-react-app, but this project is scaffolded with create-next-app.
While most of the defaults will be the same, when asked for a Source Directory Path, instead of src, use .
Also, when asked for a Distribution Directory Path, instead of build, use .next
Once done initializing our project with Amplify, we'll install two packages:
aws-amplify: This will allow us to connect our frontend to our cloud backend@aws-amplify/ui-react: Prebuilt UI components so we don't have to write our own login and signup forms
npm i aws-amplify @aws-amplify/ui-react
Authentication
One of the greatest features of Amplify, is its ability to easily add authentication.
This allows developers to focus more on their apps business logic and less on unvarying app aspects. In the case of our application, we want to provide our drivers the ability to login. In our terminal, we'll run the following command:
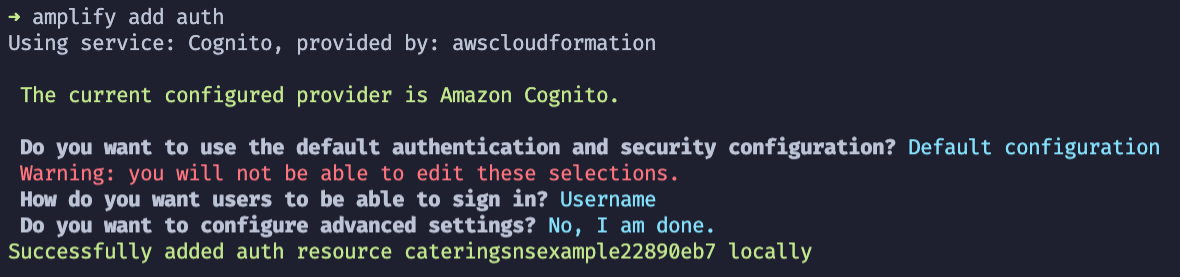
amplify add auth
This will walk us through a series of prompts. In this project, we'll accept the default configuration and have drivers signup with a username.
Adding an API
This is the main part of the project!
From here, we'll create an API that instructs a serverless function to send an SMS message.
Using the Amplify CLI again in our terminal, we'll run the following command:
amplify add api
As before, this will ask a series of prompts on how we would like to configure our API. Amplify supports both GraphQL and REST API's, and both can be configured in the same project. For our purposes, we'll create a REST API and select the options in the screenshot below:
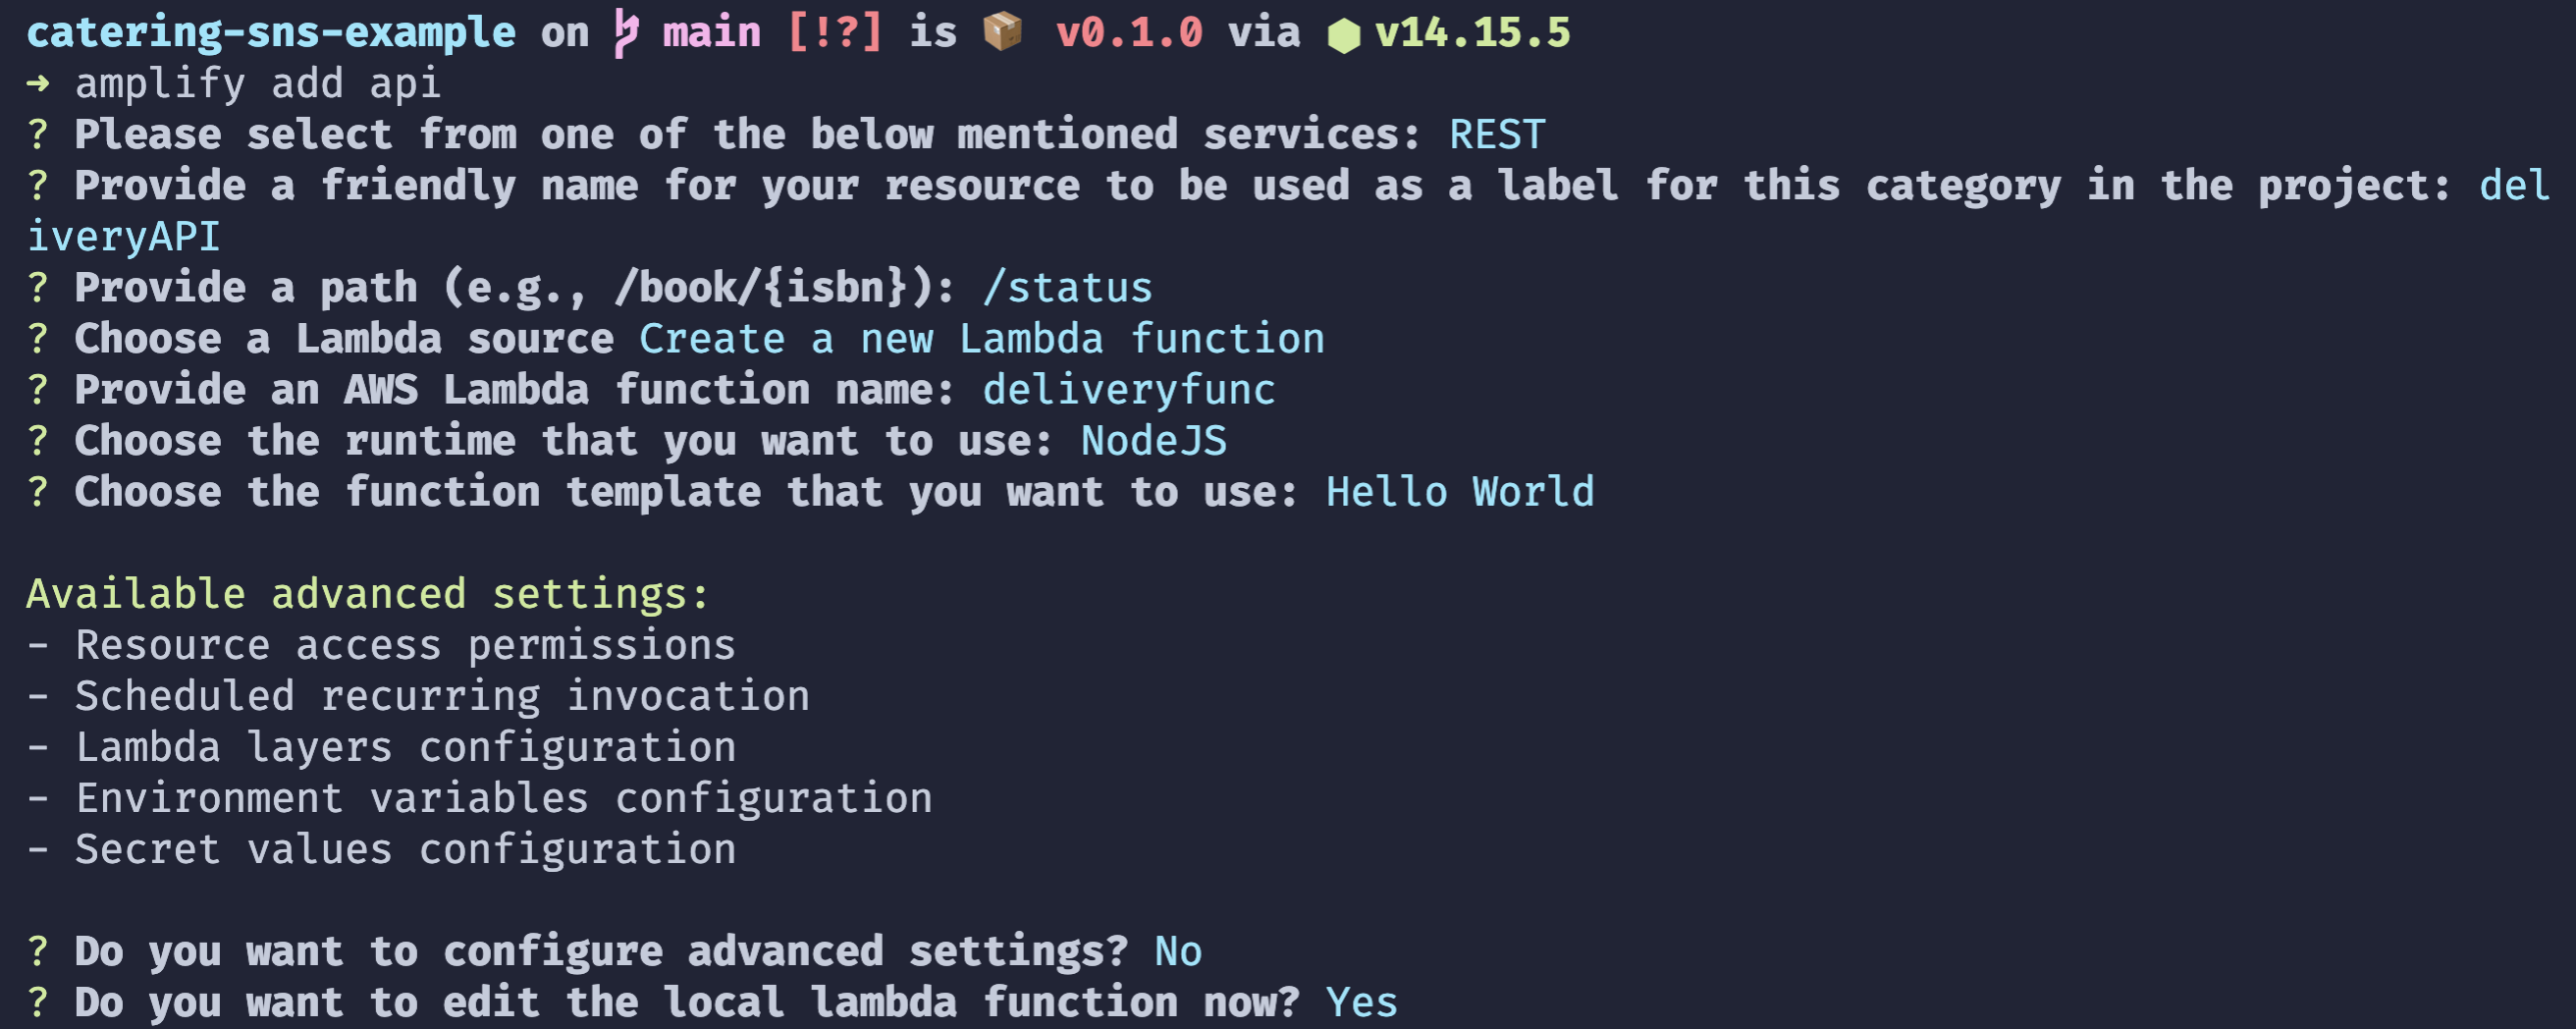
🚨We'll update the code for the Lambda function that was created for us in the next step, but keep the terminal prompt open as there are a few more prompts to answer.
For the Lambda that was just templated for us, let's replace the generated code with the following:
/* Amplify Params - DO NOT EDIT
    API_DELIVERYAPI_APIID
    API_DELIVERYAPI_APINAME
    ENV
    REGION
Amplify Params - DO NOT EDIT */ const AWS = require('aws-sdk')
const SNSClient = new AWS.SNS()

exports.handler = async (event) => {
    // 1. get orderID from the event
    const orderID = JSON.parse(event.body).orderID

    // 🪄 used orderID to look up orderDetails in database 🪄

    const order = {
        orderID: '123-abc',
        address: '987 fakeaddress ln',
        phoneNumber: '+12813308004', //replace with your phone #
    }

    let response

    try {
        // 2.  🎉 send order update to customer
        const resp = await SNSClient.publish({
            Message: 'Your order is out for delivery',
            TargetArn: process.env.SNS_TOPIC_ARN,
            MessageAttributes: {
                sms: {
                    DataType: 'String.Array',
                    StringValue: JSON.stringify([order.phoneNumber]),
                },
            },
        }).promise()
        console.log(resp)
        // 3. send response back to the frontend
        response = {
            statusCode: 200,
            headers: {
                'Access-Control-Allow-Origin': '*',
                'Access-Control-Allow-Headers': '*',
            },
            body: JSON.stringify({
                address: '987 fakeaddress ln',
            }),
        }
    } catch (e) {
        console.log(e)
        // todo: update response for when things go bad 😢
    }
    return response
}
Aside from bringing in the aws-sdk itself to create an new SNS instance, there are 3 key areas we'll want to focus on (I noted the code snippets above to reflect the 3 areas).
The data from the frontend is sent as a string and is accessible from the
bodyof the event. By parsing it out, we can use that to lookup the order from a database.Here, we send the message! This showcases how easy it is to publish a message. We specify the SNS topic we want to send to, specify a message, and provide some attributes. The attributes are important here. By default, SNS will publish a message to all of its subscribers. This allows us to specify the exact subscriber(s) to send to. More on that last bit in a minute!
We allow CORS access and send the address to the driver on the frontend.
🗒️ Because the purpose of this post is to showcase how to send an SMS message, we're removing topics like database lookups or updating database fields.
With our Lambda function coded out, back in your terminal, finish the prompts by answering the remaining questions as show in the screenshot below.

Creating Our SNS Topic
In our Lambda function, you'll notice that there is an environment variable for the target ARN:
TargetArn: process.env.SNS_TOPIC_ARN
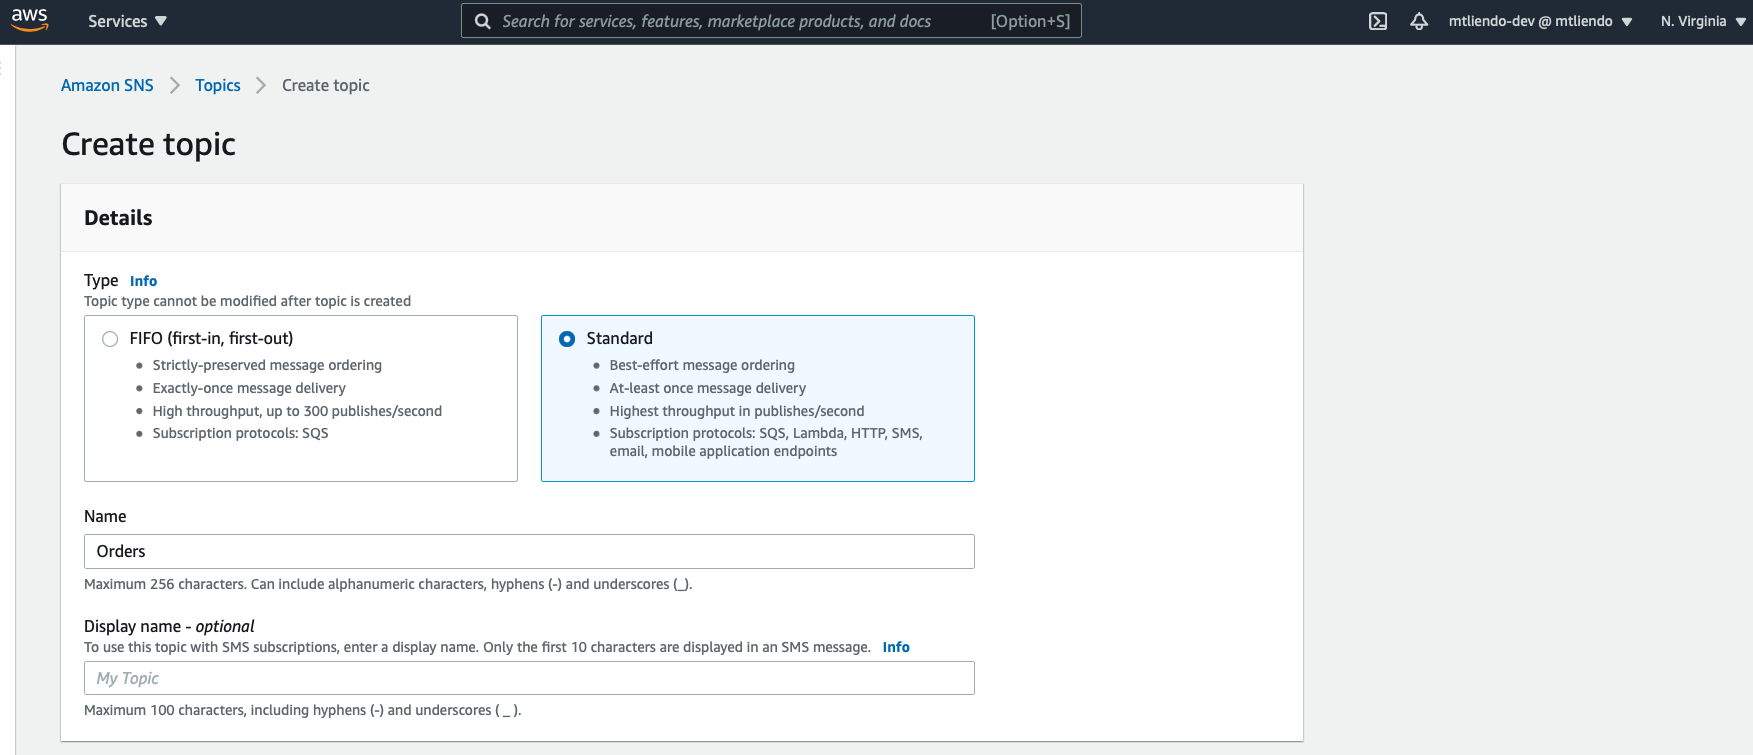
This assumes that we have an SNS topic already configured. Amplify doesn't have a CLI command to create SNS topics, but we can do so in the console and the use the CLI to handle the rest.
Head to this link to be taken to the AWS Console for SNS, note you may be promoted to sign into your AWS account.
🗒️ Ensure the region in the top right of the page is the same as the region your Amplify project is in.
From here, select "Standard" as the topic type, and give it a name. Once done, click the "Create topic" button at the bottom on the page.
The next step is to create a subscriber. This can be done automatically through the API or manually via the Console. While we're in the Console we'll select "Create Subscriber" and on the following page, enter our subscriber details
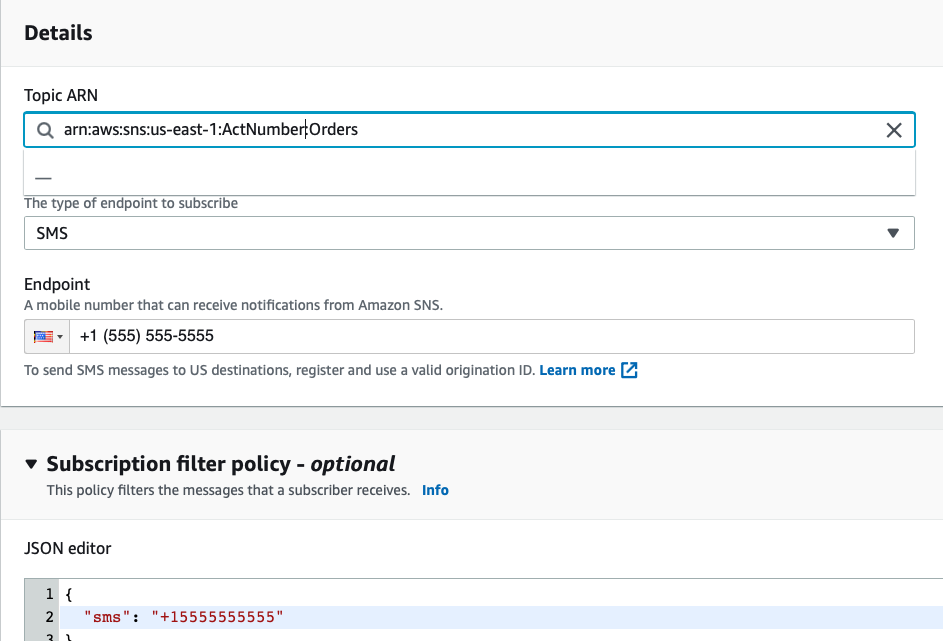
🚨Copy the ARN. We'll need that in a bit. Also note that the phone number entered, should be replaced with a valid phone number and is what should be put in the
orderobject inside of our Lambda function.
You may be wondering what is going on with the filter policy. When publishing to an SNS topic, the message will automatically be fanned out to all of the subscribers. By specifying a filter policy on the subscriber, we are telling SNS that this subscriber only cares about messages with those attributes. Note that these attributes match up with what is in lambda function:
await SNSClient.publish({
            Message: 'Your order is out for delivery',
            TargetArn: process.env.SNS_TOPIC_ARN,
            MessageAttributes: {
                sms: {
                    DataType: 'String.Array',
                    StringValue: JSON.stringify([order.phoneNumber]),
                },
            },
        }).promise()
With our topic created with a subscriber, we can head back to our code.
Updating Our Function
As mentioned, you'll want to update the phone number in our Lambda function to be the same as the phone number entered in your SNS topic.
Next, we'll update need to give our Lambda function permission to call SNS, and also set the environment variable for the SNS_TOPIC_ARN.
To update the Lambda permissions, Amplify now creates a file called custom-policies.json whenever a lambda function is created.
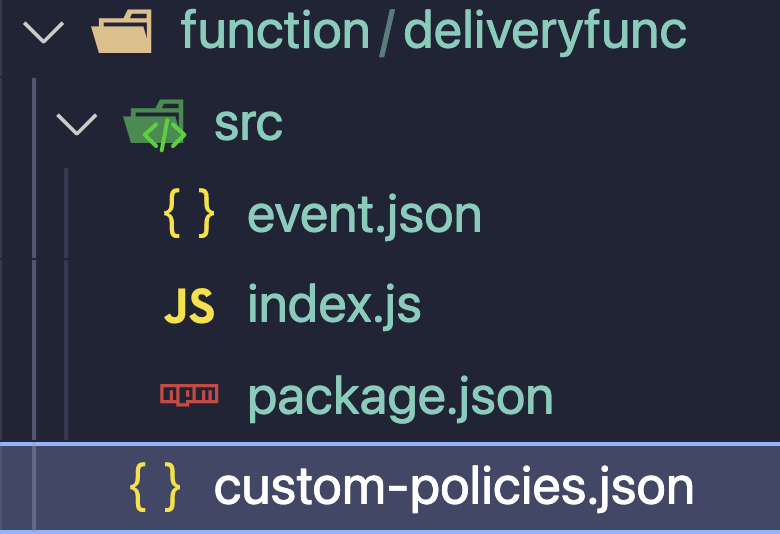
Replace the contents of that file with the following JSON policy, replacing the ARN with the ARN of your SNS topic:
[
  {
    "Action": ["sns:Publish"],
    "Resource": ["arn:aws:sns:us-east-1:ActNumber:Orders"]
  }
]
That's all it takes to give our function permission to call SNS.
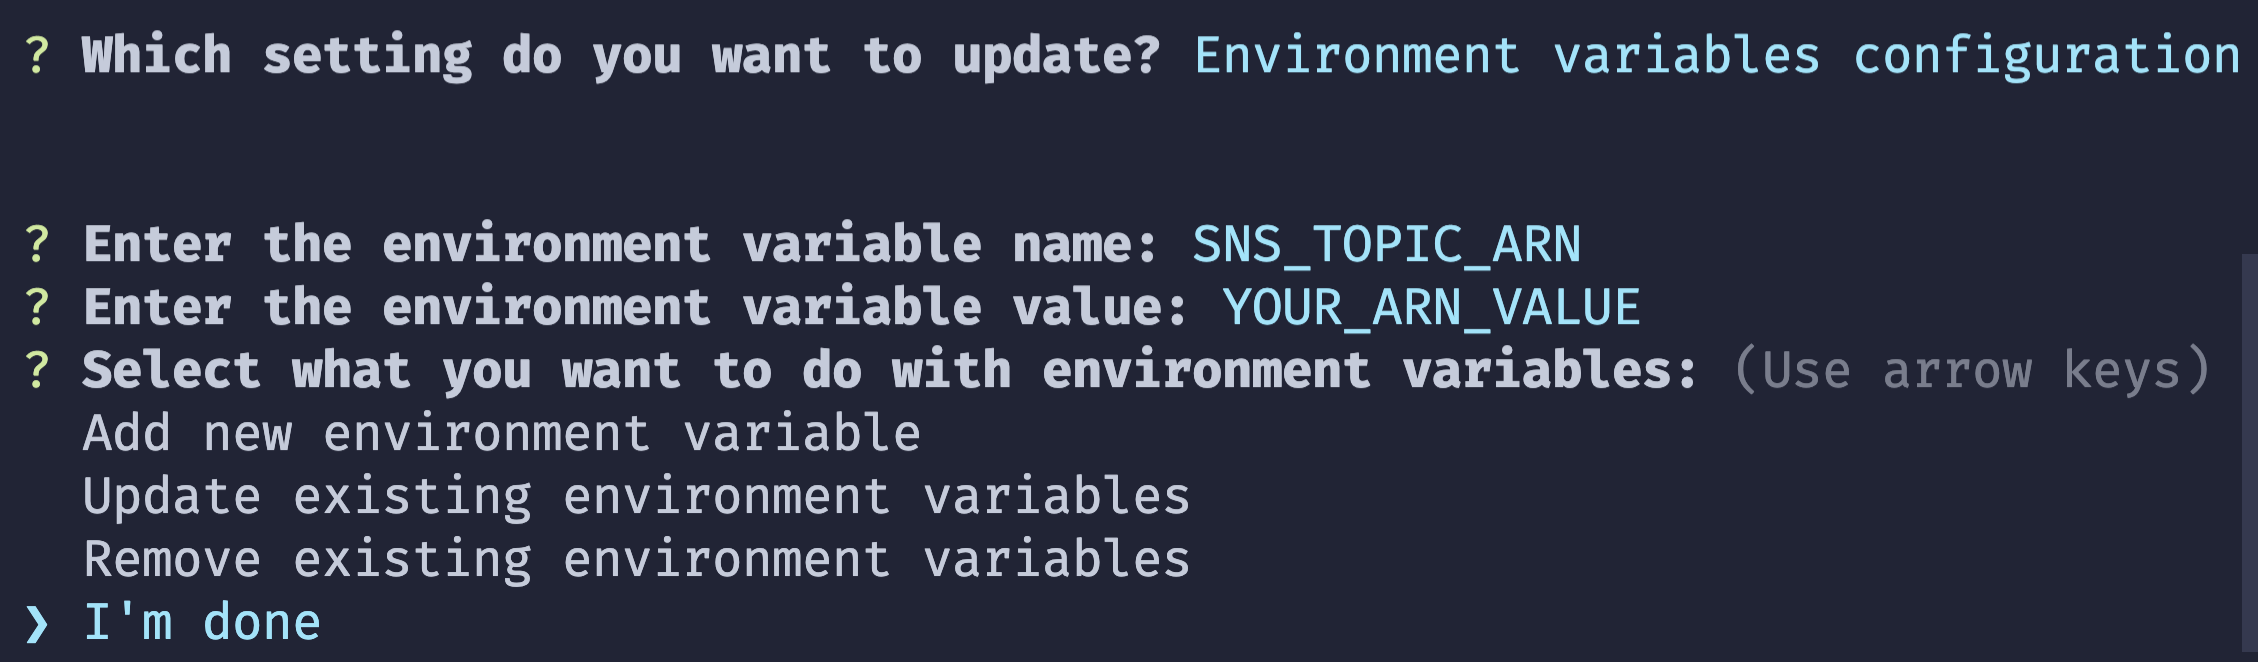
To add the environment variable, we'll use the CLI. Run the following command in your terminal:
amplify update function
Select the Lambda function we are working with and follow the prompts to add an environment variable as show in the screenshot below:
With that, our Lambda function is now configured to send messages to subscribers!
Go ahead and push up all of local backend services to AWS by running the following command:
amplify push -y
Testing Our Application
With our backend changes up, let's create a test user and configure our frontend to trigger an API call.
In _app.js, uncomment the code so that we can our frontend can be configured with the credentials needed to talk to our backend.
Next, we'll do the same in index.js. Note that in addition to the import and export statements, there is the onClick handler definition and where it's being called that need to be uncommented.
With everything saved, go ahead and restart the application, sign up for an account, and upon clicking a product, the phone number used to subscribe should receive a message!
🚨 To clean up the app, run
amplify delete. This will delete all of the Amplify created resources, both locally and in the cloud. Note that since the SNS topic was created outside of Amplify, that would have to be done manually.
While a bit contrived, this example showcased how to use Amplify to send updates to SNS subscribers and a practical use case for using filter policies. In a real world application, a database entry could serve as a trigger for the Lambda instead of an API call. If interested in how to setup a database trigger, feel free to checkout my post on Setting Up A Serverless Contact Form.
Thanks for checking out this post, let me know your thoughts down in the comments and stay tuned for more tips on how Amplify can speed up your development flow!


