

The frontend engineers guide to VTL
featured: Understanding VTL and how it applies to AWS AppSync

A moment in time
The year is 2001. JavaScript is 6 years old but the community hasn't fully accepted it as a pillar of the web. You've finally made up your mind that you'll write code in Textpad instead of JEdit. Y2K is over, and you're ready to code your first website so you can finally tell your friends on AIM) that you're a "Webmaster".
While Java is still championing the model-view-controller paradigm for building applications, you read about a new language from Apache: Velocity Template Language (VTL).
It's simple, elegant, and oddly not too far from what we're writing over 20 years later.
<html>
  <body>
    Hello $user.firstName!
    <table>
    #foreach( $order in $orders )
      #if ( $customer.hasPurchased($order) )
        <tr>
          <td>
            Congrats! This item ($order) is on sale!
          </td>
        </tr>
      #end
    #end
    </table>
  </body>
</html>
🚨 Spoiler alert: JavaScript rose in adoption, and VTL in fact did not win the frontend space.
The fact however is that outside of the frontend space, the Apache project never stopped investing in VTL. In fact, it's used today by many Java-based startups and enterprises that want an XML alternative to creating fast and human-readable templated code.
This post will dive into the core features of VTL, and how AWS AppSync (a managed GraphQL service) uses it to provide low-latency responses while handling millions of connections.
By the end of this article, you'll create a GraphQL schema in AppSync with full CRUD operations and data persisted in DynamoDB. All connected by VTL.
But before we get into that, let's talk about why we should even care when tools already exist to automate this for us.
Why should frontend engineers care about VTL
The landscape of what a frontend developer/engineer is changing. Before, all one had to do was call an API from the frontend. Now, we manage cloud functions, file uploads, and have to understand how the data is stored on the backend.
Fullstack is the new frontend.
However, tooling has also gotten better so that a lot of the low-level maintenance is managed for us so we can focus on our business logic. AWS Amplify is a great showcase of this.
However, when things break--and they do, or when a higher degree of optimization has to be applied, understanding VTL becomes just as important as the folks that understand the webpack configuration.
The nice thing is that those folks typically command a higher salary as well 🤑
Let's cover some of the basics to see what we're getting ourselves into
VTL basics
A lot of JavaScript concepts still apply. Logical operators such as !, ||, <, and others still apply. In addition, boolean, string, objects, etc are still available to use.
The subtle differences in how we interact with those values are what we'll focus on in this section.
Variables
As seen above, variables are specified by a $ + variableName.
$myFirstVariable
Variables support camel, kebab, and snake casing styles, and can include numbers.
🗒️ Most of the time, you'll see camel-case.
Properties and methods
Similar to objects in JavaScript, a variable can also have properties tied to it as well.
$user.firstName
Methods should also feel familiar.
$user.getUsername()
$user.setLastName("Otter")
$user.setLanguages(["JavaScript", "VTL", "HTML")
🗒️ In terms of acceptable values, all primitive types in JavaSript (strings, boolean, etc) are valid, as well as complex types such as arrays and objects.
Comments
Comments don't require a lot of explaining. They are specified with two hash marks.
## don't delete this variable
$superImportant1
In addition, multiline comments can be achieved by adding a *.
#*
this is a long comment
broken over many lines
*#

### Directives

The reason I even mention comments is that they are so similar (visually) to directives.

In JavaScript, we have `setTimeout`, `fetch`, `alert`, and other pre-defined methods that we can use, but never have to define.

VTL has the same thing--predefined methods declared by the runtime, except they are called _directives_.

By far, the most common directive is `#set`.

```js
#set($name = "Focus Otter")
String interpolation
Similar to Javascript where there are 3 possible quote values (single, double, or backtic), VTL supports two variations.
Single: Used to display the string as-is Double: Used to interpolate strings together
Combining what we know right now, we can already start to put some of our knowledge to use.
## create a name variable
#set($name = 'Focus')

#*
Next, I'll add "Otter"
to the end of the variable
*#

#set($fullname = "$name Otter")
There are other directives that are built into VTL, but set is all we'll cover here. Later on, we'll explore some of the AppSync-provided VTL directives.
Conditionals
In VTL, as in JavaScript, a simple if-statement is the preferred way of writing a conditional statement.
## VTL uses a double equal sign for strict equality
#if( $age == 10)
  ##insert code to do stuff
#end
🗒️ That's right!
ifandendare directives
Note that this can be also used with other directives: #elseif and else.
Iterating
The last directive we'll showcase is foreach
#set($allProducts = ["keyboard", "mac", "magic mouse"])

#foreach( $product in $allProducts )
 ## do stuff
#end
Simple. To the point. And admittedly, easier to read than JavaScript.
Working with AppSync
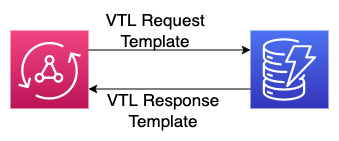
The image above showcases how VTL is used when combined with AppSync and DynamoDB. In short, when a request is made to say fetchTodos, a VTL template is used to send that request to DynamoDB. The goal of that template is to take the request from AppSync and transform it into something that DynamoDB can understand.
Subsequently, another template is used to take the response from DynamoDB and send that to AppSync/our frontend.
Each CRUD operation will have its own set of request/response templates.
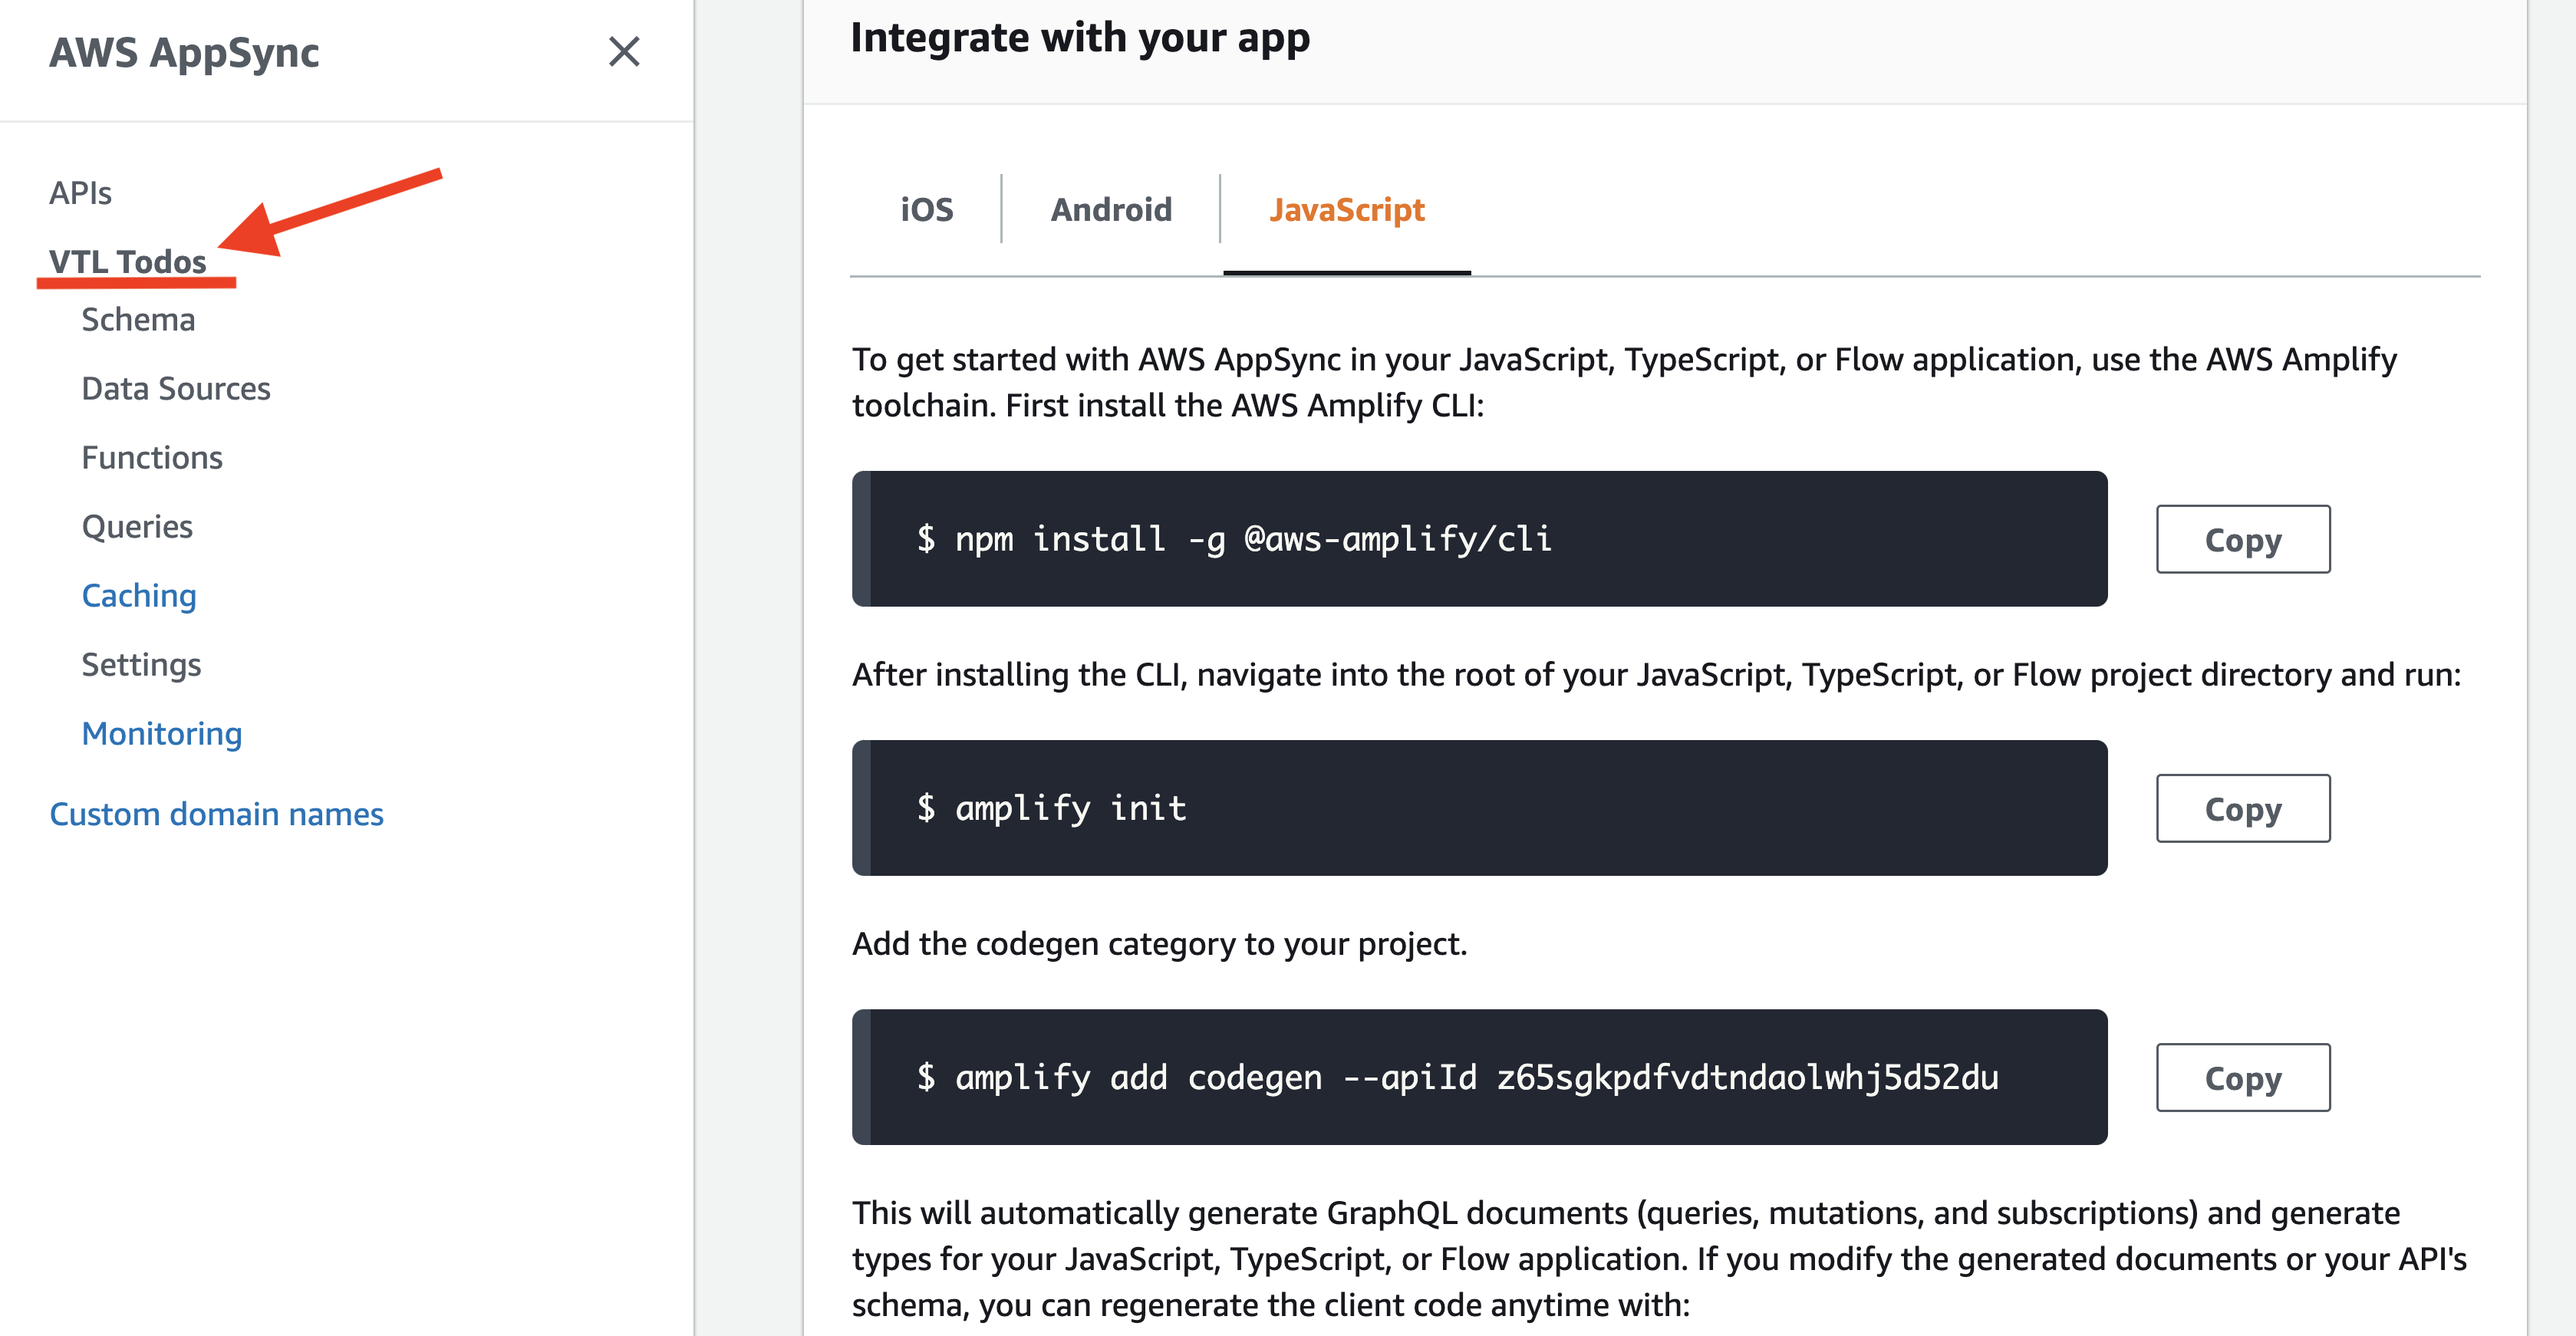
Log in to your AWS Account, and head to the AppSync console.

Once there, click the "Create API" button.
On the next page, select "Build from scratch" and click next.
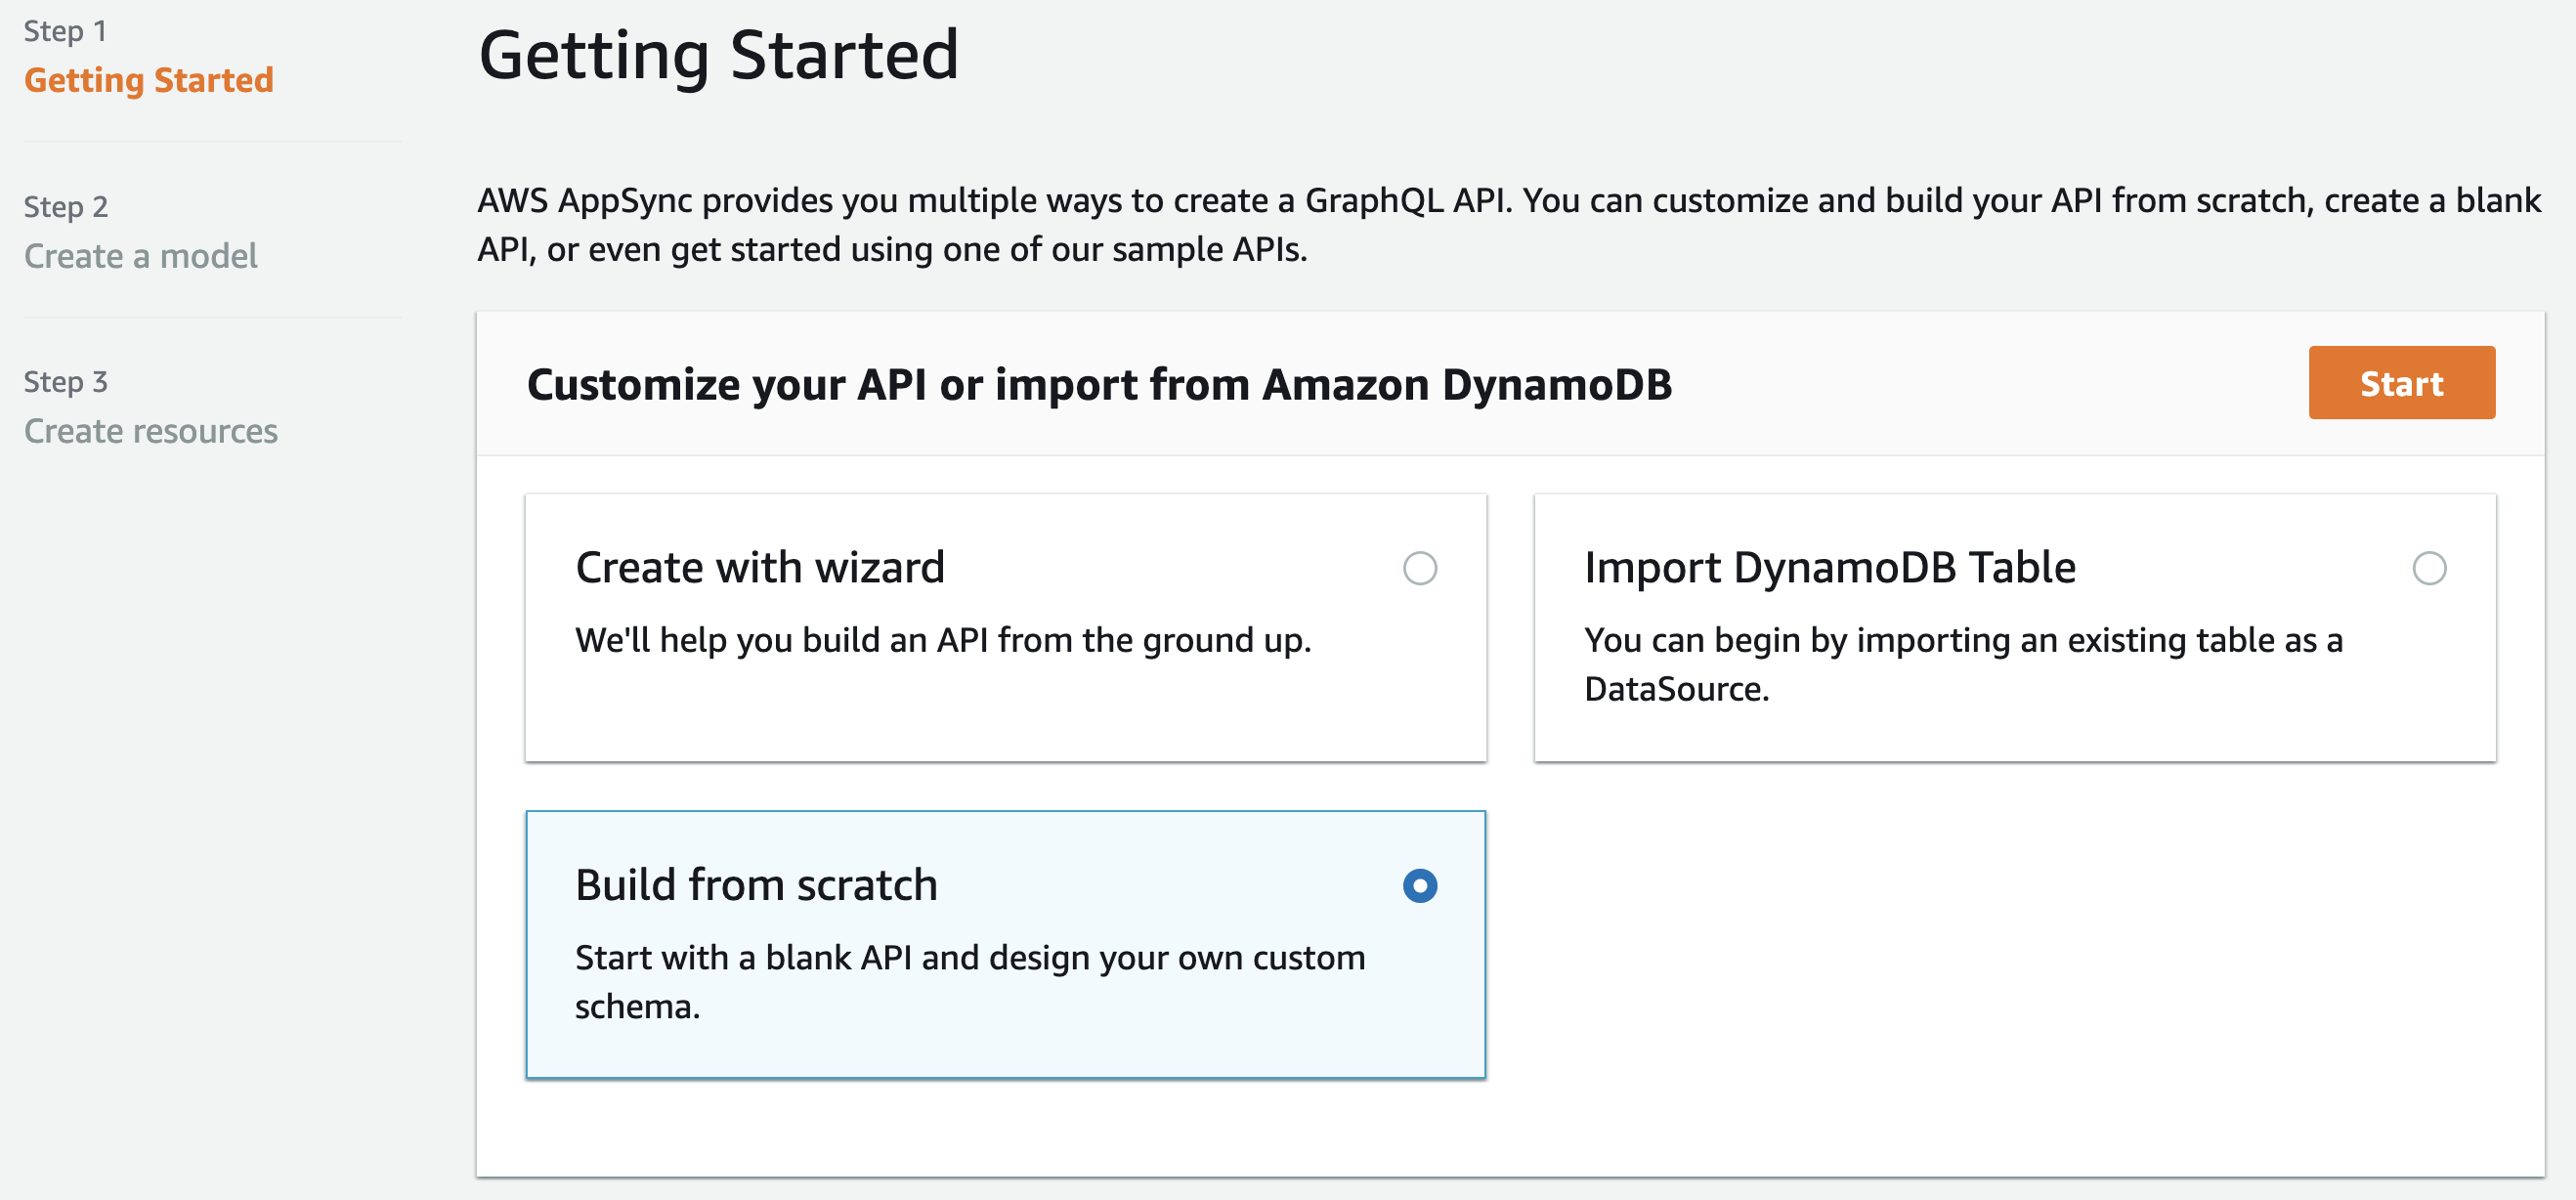
On the "API configuration" screen, name your API VTL Todos and select "Create".
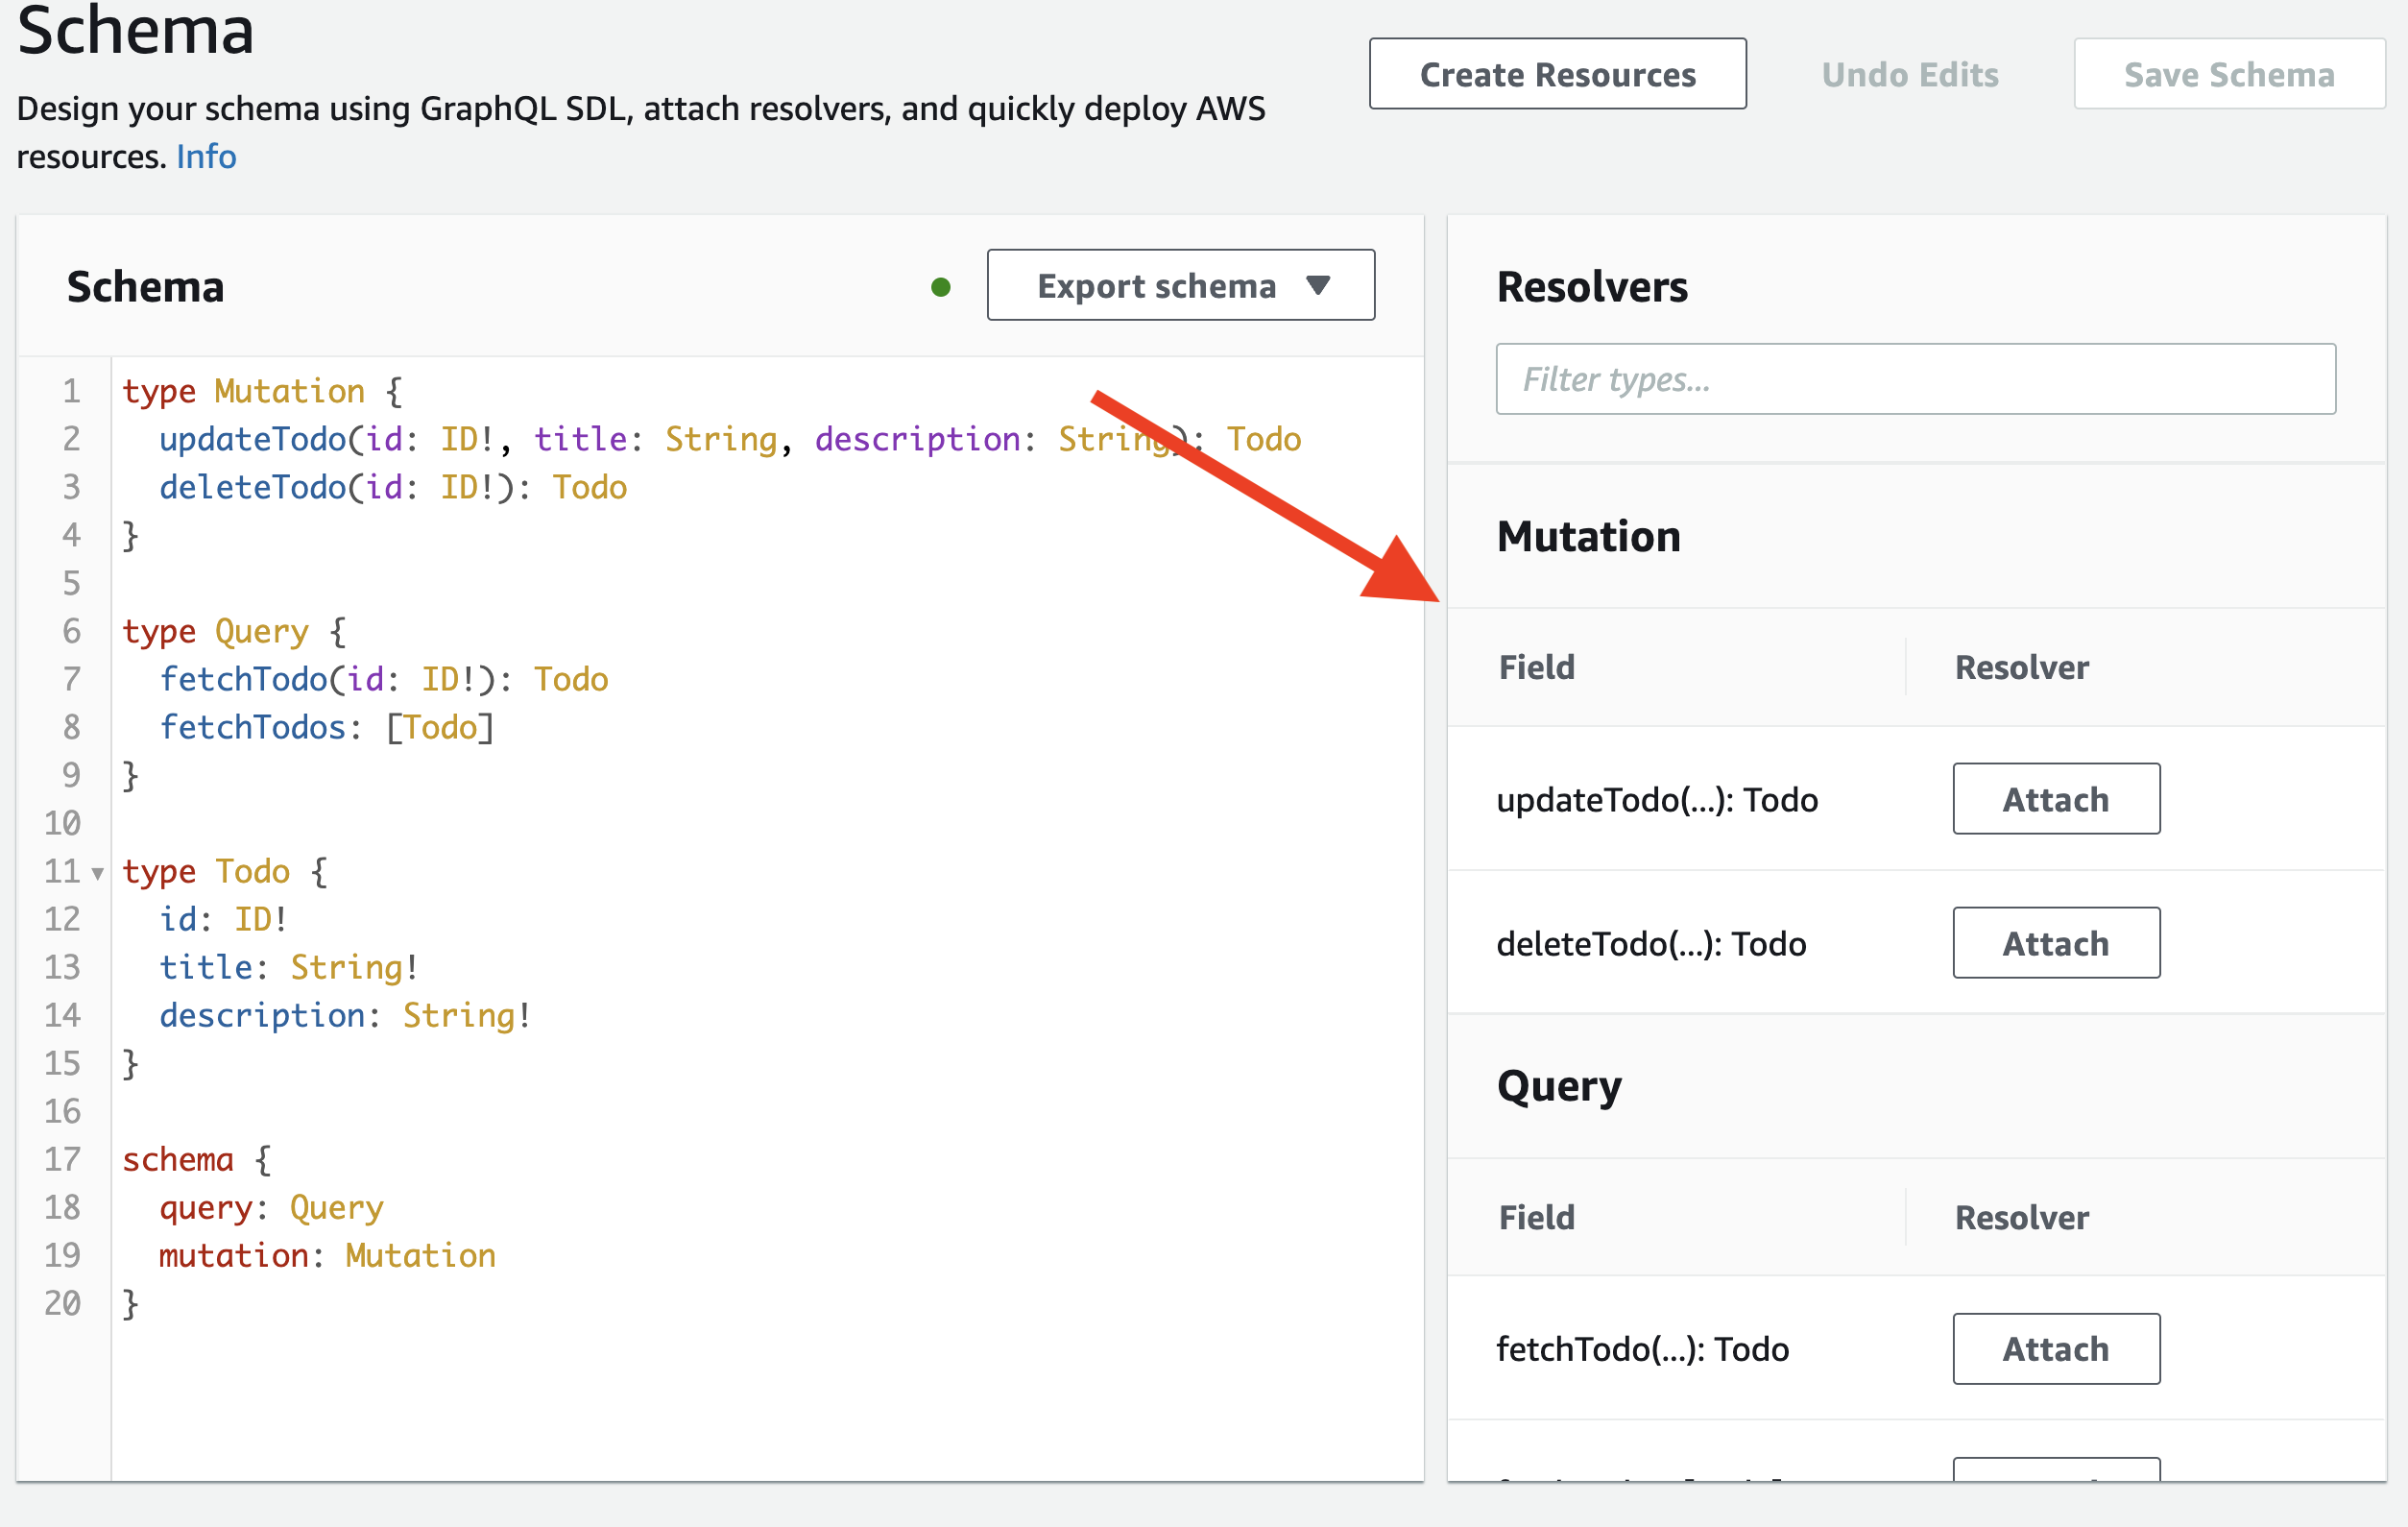
The next page asks us to Define our schema. Click the orange "Edit Schema" button to get started.
If coming from Amplify, you may be used to writing something like the following:
type Todo @model {
  id: ID!
  name: String!
  description: String!
}
The power of Amplify is that it will automatically generate all of the request/response VTL mappings and create a DynamoDB table for us.
Again--we're doing this to peel back the magic of Amplify and have complete control over how our app behaves.
That means instead of the above schema, we'll create a more verbose version:
schema {
    query: Query
    mutation: Mutation
}
type Query {
      fetchTodo(id: ID!): Todo
      fetchTodos: [Todo]
}
type Mutation {
        updateTodo(id: ID!, title: String, description: String): Todo
        deleteTodo(id: ID!): Todo
}
type Todo {
    id: ID!
    title: String!
      description: String!
}
This schema is a lot more prescriptive about what is happening: We have a schema that contains both query and mutation properties. Each of those properties can define what operations they'd like to have.
Click the orange "Save Schema" button in the top right.
Currently, all we have is a schema. It doesn't have a data source, let alone mapping templates connected between them.
Let's change that.
Creating our data source
I won't cover DynamoDB in this project outside of how it relates to AppSync. So we'll speed through the creation of our database.
Head to the DynamoDB console and select the orange "Create table" button on the right.
🔥 Tip: open this link in another tab to easily switch back to our AppSync schema.
Name the table Todos_Table with a partition key of id.
Keeping the default settings button selected is fine, but note that this is another difference in how Amplify will set up our database.
In Amplify, the @model directive will provide an On-Demand database. This allows the database to automatically scale as traffic increases, but at a slightly greater cost. In contrast, the console's default setting is to use a Standard table which is free-tier eligible, and offers 5 units of read/write capacity, while also scaling automatically.

Click "Create table" at the bottom of the screen.
Next, let's add our newly created DynamoDB table as our data source.
Attaching our data source
Back in our AppSync
On the left-side panel, select "DataSources".
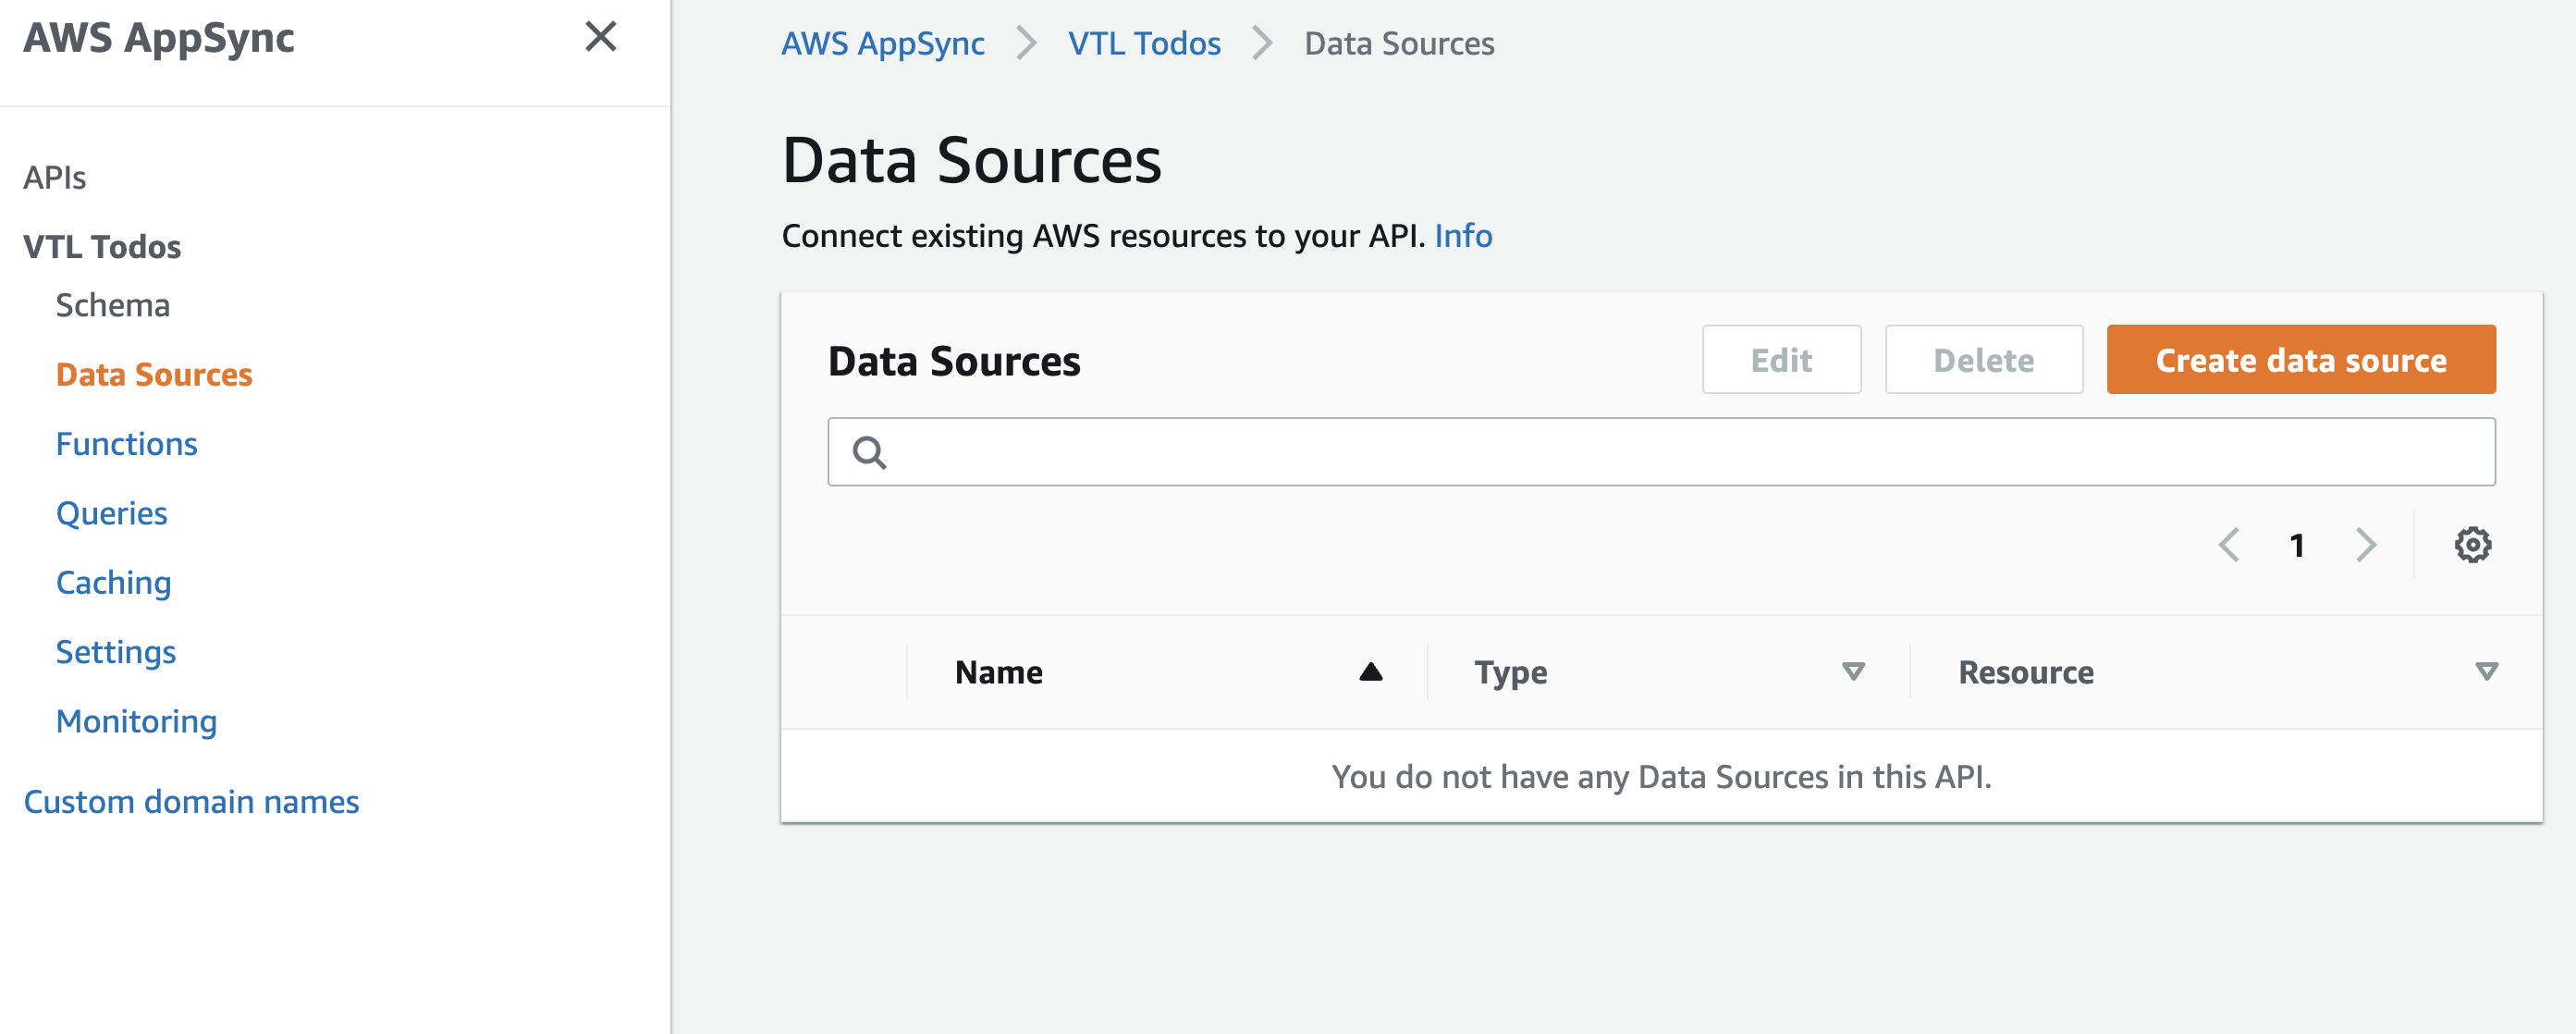
This screen will show all of the data sources we have configured in our project--currently none.
Click the orange "Create data source" button on the right to add our first one.
For the name, enter Todos.
For the data source type, note the options:
- Amazon DynamoDB table: The most often used option due to its flexibility and scalability
- Amazon OpenSearch domain: An EC2 that provides greatly enhanced search functionality
- AWS Lambda Function: The most flexible option due to having complete control over what can be done inside of the function
- Relational database: A MySQL and Postgres compatible table backed by Amazon Aurora
- HTTP endpoint: A direct connection to an external endpoint
- None: No connection. Useful for simply passing data without persisting it.
🗒️ It's worth noting that Amplify uses graphql directives for first-class support of the first 3 options. There is currently limited support for
HTTPdata sources and no support forNONEdata sources.
Select a data source of Amazon DynamoDB table and the region of the DynamoDB table we just created (for me, us-east-1).
Click the orange "Create" button.
The console will automatically create the needed role for AppSync to talk to our DynamoDB table. Note that there is also the option to have the console automatically create the connection between our API and DynamoDB.
We'll keep this unchecked, but feel free to toggle it on to see how our schema would be modified...just remember to toggle it off again.
Select "Create"
Attaching Resolvers
As you may have noticed, creating a schema and attaching a data source is fairly straightforward.
The good news is that adding VTL to make the appropriate connections follows that same path.
Back in the schema panel, note the right-hand side that lets us attach resolvers.
Creating/Updating Todos
In the "Mutation" field, select "Attach" for the updateTodo operation.
The next screen asks us to select a data source. Make sure this resolver is for Mutation.updateTodo.
Select our Todos table that we created earlier.
🔥 The nice thing about doing this ourselves is that we have the utmost flexibility in how our data is connected.
🤯 AppSync defaults to showing a Put Item request (which is exactly what we need), and automatically generates the VTL for us.
This is a VTL object.
Let's talk about what is happening here.
This object maps to a DynamoDB operation. Specifically, the putItem operation to update an item or create it if it doesn't exist.
The key property relates to the id we specified as the partition key for our DynamoDB table. This is also where we finally see some VTL in action.
$util.dynamodb.toDynamoDBJson($util.autoId())
We now know that $util is a variable with some properties on it--the last one, toDynamoDBJson being a method.
Just as there can be pre-defined directives like #set, the AppSync VTL runtime also has pre-defined variables.
The most common ones are $util and $ctx.
$util: Short for utilities. Contains several helpers that ease otherwise difficult tasks. In this case, it's generating a unique ID with $util.autoId() and putting it in a format that DynamoDB can use.
$ctx: Short for context. Contains information about the incoming request.
As for the rest of the Todo data, we simply pass all of those along as an object thanks to the $util.dynamodb.toMapValuesJson($ctx.args) helper.
What's important to note is that when creating a Todo, we never have to pass in an id because this is being created for us.
🔥 In fact, Amplify uses this same approach when creating the
createdAtandupdatedAtfields (note the comments, also in VTL, that mention the$util.time.nowISO8601()helper).

Note the screenshot above.
When a call to create or update an item is made, our the request template we just created gets invoked and performs the operation on our DynamoDB table . No functions involved, just straight to the table.
When the operation completes, the response is made back to AppSync as we can see in the following response mapping template:
## Pass back the result from DynamoDB. **
$util.toJson($ctx.result)
This option simply takes a DynamoDB response, and automatically translates it into a JSON object that is easier to work with on the frontend.
🗒️ This option shows up because the Return single item field is selected.
Back at the top of the page, click Save Resolver and head back to our schema.
Deleting an item
To create the resolver to delete an item, we'll follow the same flow as before:
- Click the "Attach" button
Mutation.deleteTodoresolver - For the data source select our
Todostable
This time, we'll use the dropdown to "Delete item by id"
As the comment states, if our unique value was something other than id, we can update it as appropriate.
🗒️ The
"${ctx.args.id}"value is what's know as "expanded notation" in VTL. If it were just$ctx.args.idit would be viewed as one (incorrectly formatted because of the periods) variable name. So braces are used to "drill" into the$ctxobject.
Keep the response of "Return single item" the same, and click "Save Resolver".
Fetching a list of Todos and single Todo
As before, make sure you're on the fetchTodos: [Todo] resolver and click "Attach".
For the request dropdown, select "List items" and for the response select "Return a list of results"
🗒️ The request template uses a
scanoperation, however, the comments in the template show how toqueryand use pagination as well.
Click "Save resolver" and repeat the steps for Query.fetchTodo aside from the following changes:
- The request mapping template should be for "Get item by id"
- The response should be for "Return a single item"
🗒️ The comments listed in the
requestare especially useful in helping understand what options are available
Click "Save resolver"
Testing in the console
Our API, by default, is protected with a public API key. This can be viewed by clicking "Settings" on the left panel
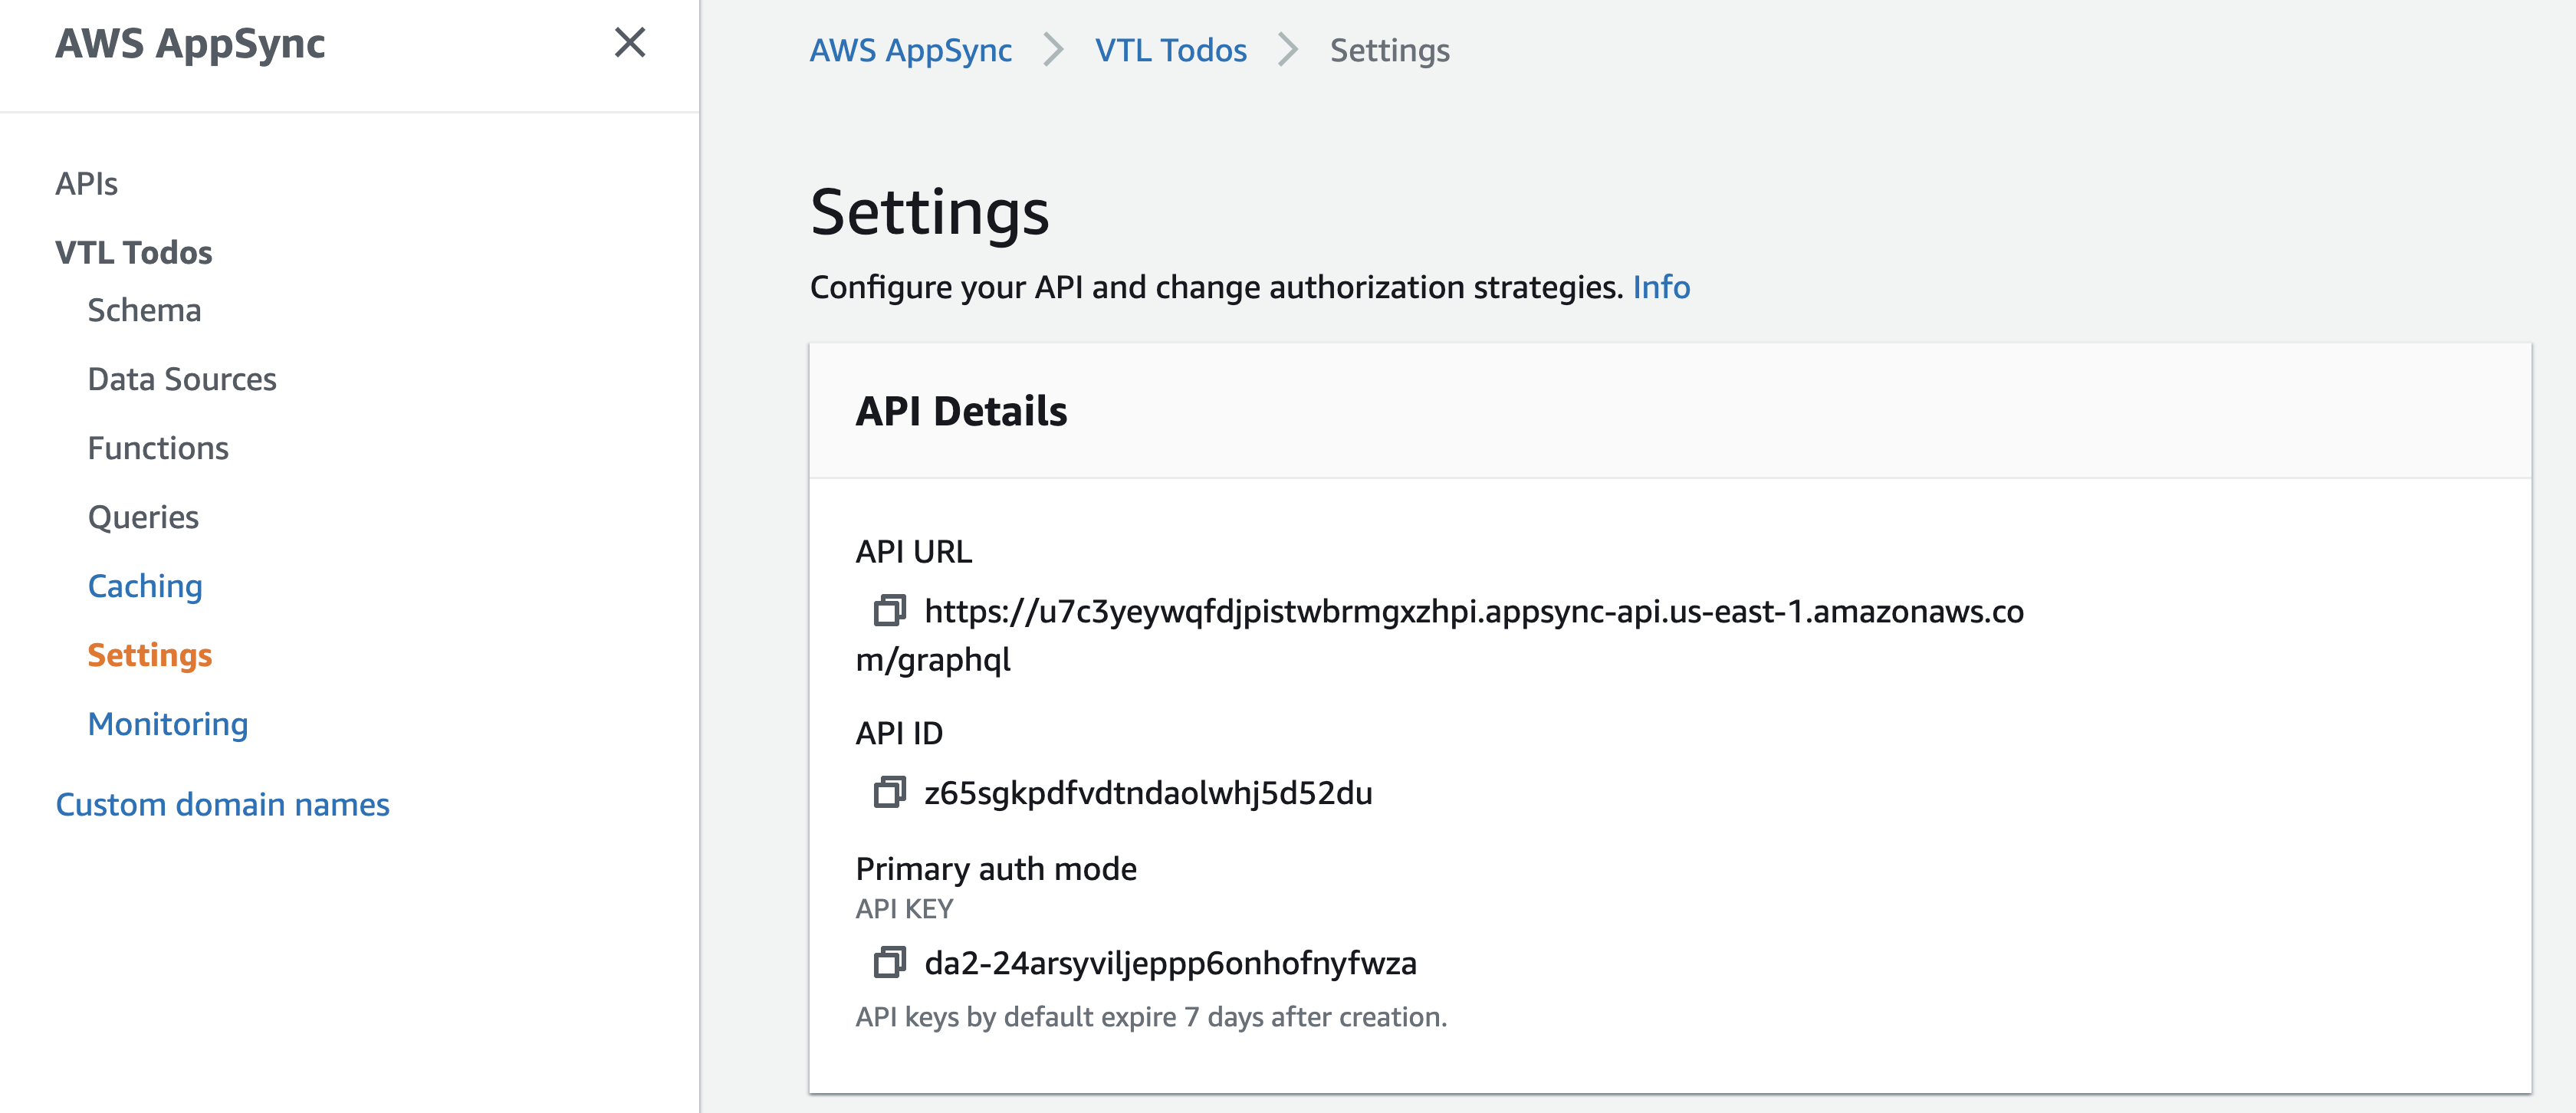
Because it's public, it'll automatically be used when we make requests in the console.
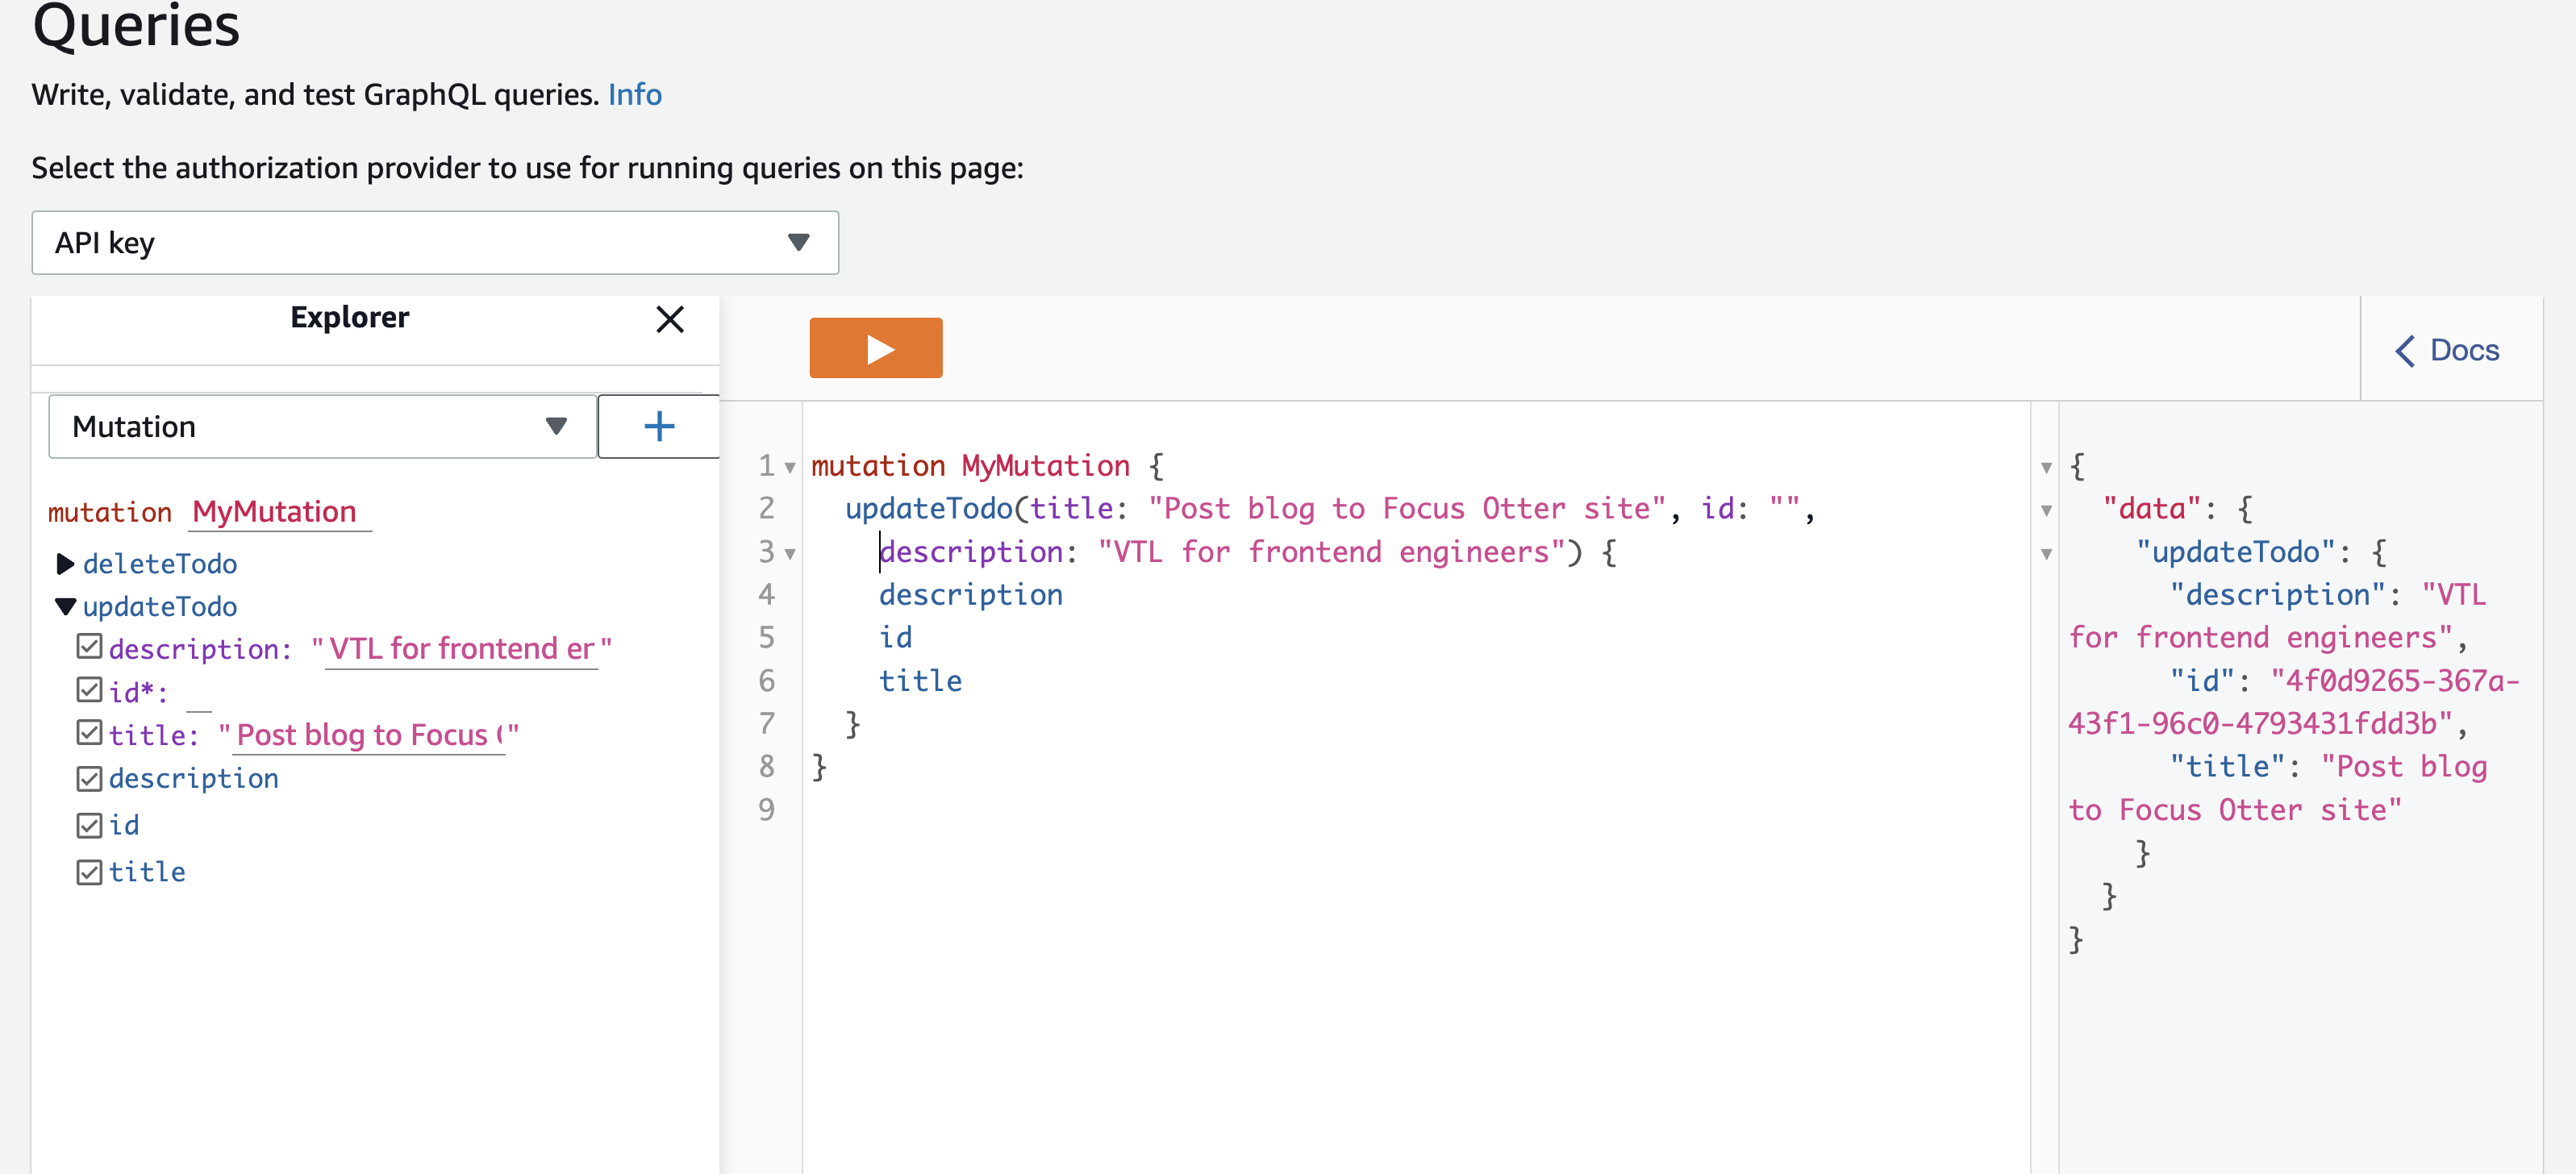
From the left panel, click the "Queries" link.
Feel free to test out all of our operations. The values should also be reflected in DynamoDB.
Here is an example of adding Todo to our database:
Testing in Postman/Fetch
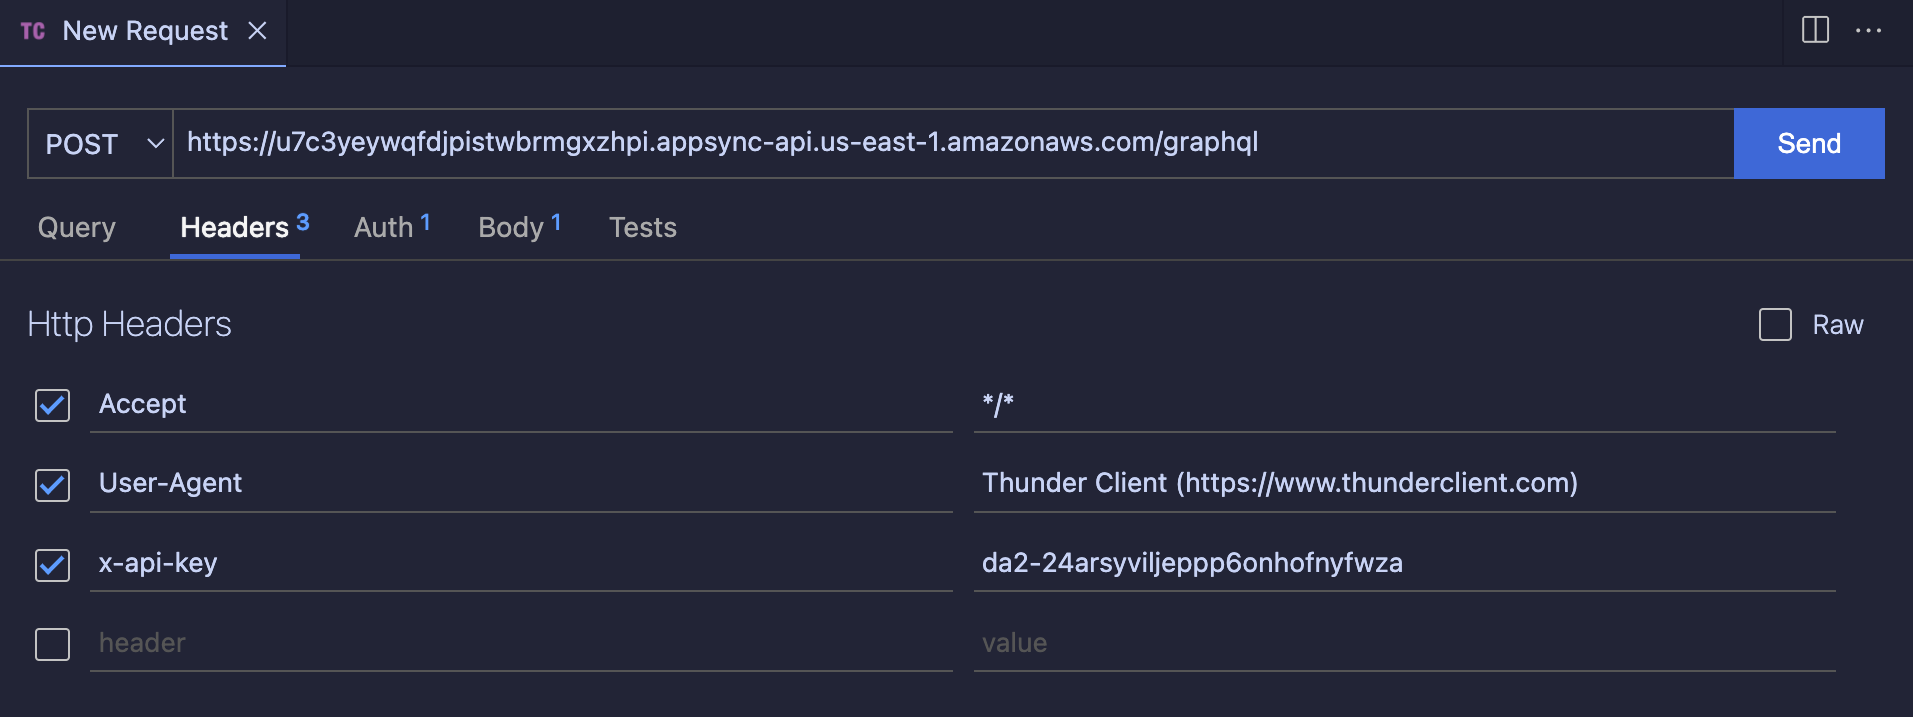
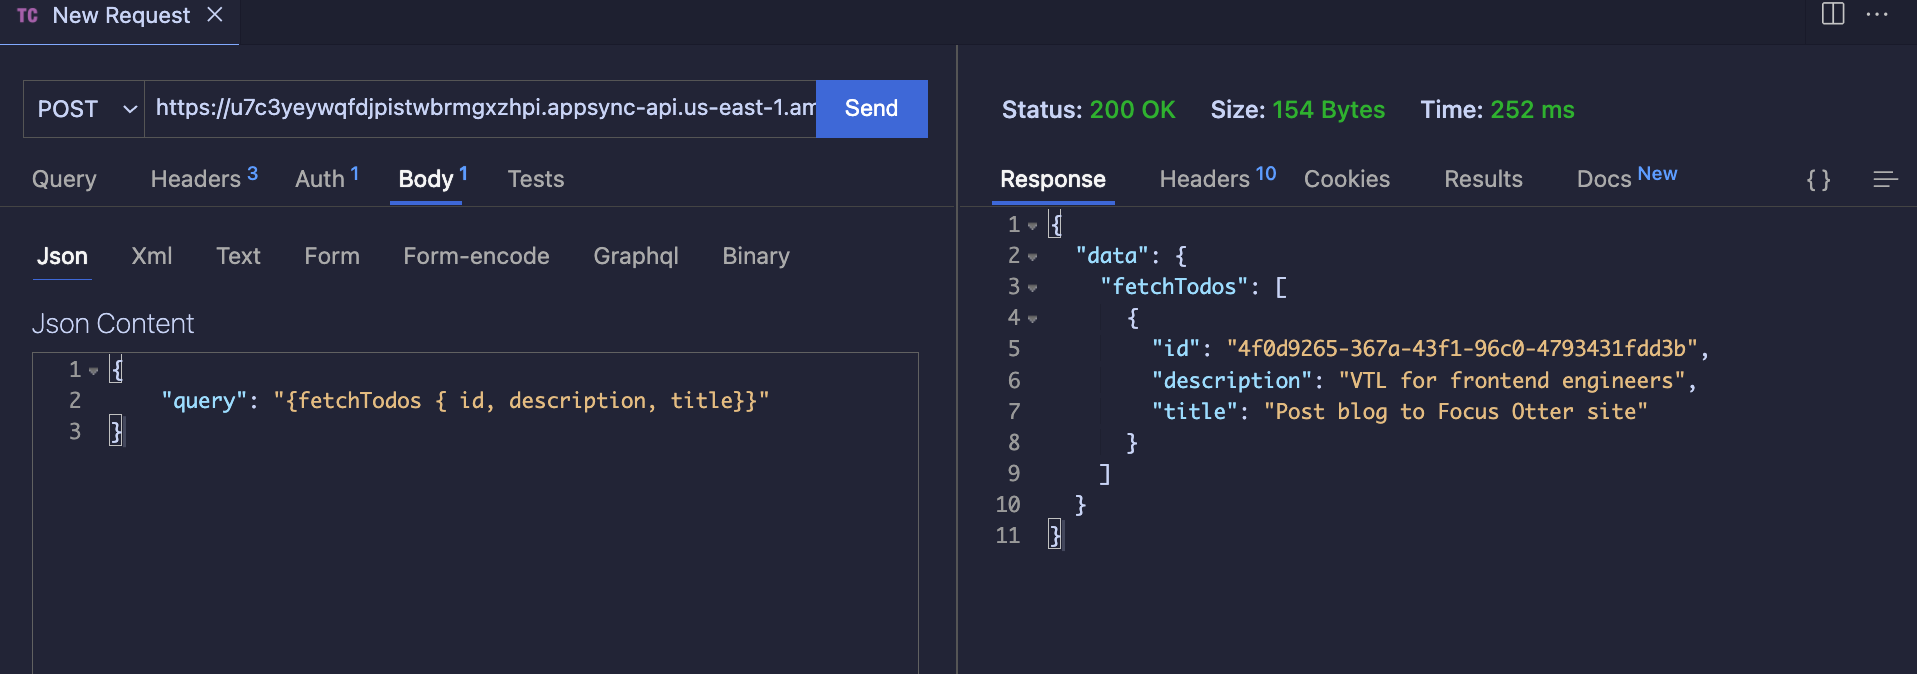
Calling from Postman (I prefer to use the ThunderClient VS Code extension) is a straightforward process.
The main part is to set pass the API key as an x-api-key header.
Once that is done, passing a correctly formatted query is the only other tricky part. I always forget to wrap the query string in braces.
Testing in Amplify
The best part of designing our own AppSync API is that we can use it in our Amplify project. The Amplify docs have a great walkthrough on how to add our API values into a project.
In addition, the AppSync console has steps on how to add your API to Amplify in such a way that the code for the schema and resolvers are automatically generated for you as well! This gives the flexibility of creating a schema exactly how we want while having the ease of frontend development still intact.
🔥 Shoutout to the AppSync team for the awesome focus on Developer Experience!
Conclusion
This was a super fun article to write. Mainly because I was able to have my own perception of VTL changed. At first glance, it's kinda weird and intimidating, but its ease of use and power are pretty quickly realized.
This post is so that I can begin writing more mid to advanced-level content on AppSync while still having a pathway for folks not familiar with AppSync to get started.
What AppSync topics would you like me to cover next? Let me know down in the comments!


