

Auth0 + React + CDK = ❤️
A guide to using JWT Authorizers in a fullstack application

In a fullstack application, it's common to have a frontend team and a backend team. This has the benefit of separate deploys and each team choosing their tools. However, connecting the two experiences together can often delay product launches.
This post will show how a front-end team can set up an application that allows users to authenticate with Auth0. Afterward, we'll see how a backend team can provision backend resources with the AWS CDK. In doing so, we'll also allow authenticated users to perform CRUD operations on a database by sending a JSON Web Token.
We'll create a todo application to make sure we cover all of the CRUD operations. One of the requirements for this application is that a user can only GET, UPDATE, and DELETE their todo items--not those of other authenticated users. Though simple, this is similar to what you find in blogs, shopping carts, etc.
Creating the frontend with Auth0
We'll use create-react-app to get our project set up, though the concepts apply to using other JS frameworks.
In your terminal, run the following command:
npx create-react-app@latest auth0-frontend
Once the project is done being created, go ahead and change into its directory and install the following package:
npm i @auth0/auth0-react
🗒️ This package is a wrapper around their popular auth0 SPA and provides both hooks and react components that we'll be taking advantage of.
Now that we have the package installed, paste the following code in the index.js file:
import React from 'react'
import ReactDOM from 'react-dom'
import { Auth0Provider } from '@auth0/auth0-react'
import './index.css'
import App from './App'

ReactDOM.render(
    <React.StrictMode>
        <Auth0Provider
            domain={process.env.REACT_APP_AUTH0_DOMAIN}
            clientId={process.env.REACT_APP_AUTH0_CLIENTID}
            redirectUri={window.location.origin}
            audience={process.env.REACT_APP_AUTH0_AUDIENCE}
            scope={process.env.REACT_APP_AUTH0_SCOPE}
        >
            <App />
        </Auth0Provider>
    </React.StrictMode>,
    document.getElementById('root')
)
In the snippet above, we use the <Auth0Provider/> to wrap our <App/>. Doing so with the first 3 props will allow authentication (the ability to sign in). However, in our app, we'll also be generating a JSON Web Token (JWT) for authorization (access control) so we'll also add an audience, and a scope prop.
Our application will store the prop values as environment variables. We'll define these values shortly from Auth0.
With our index file configured, let's create a single page that will ask the user to log in, and once they are logged in, will allow them to make authenticated calls.
Replace the entire App.js file with the following:
import { useAuth0 } from '@auth0/auth0-react'

function App() {
    const {
        error,
        isAuthenticated,
        isLoading,
        user,
        getAccessTokenSilently,
        logout,
        loginWithRedirect,
    } = useAuth0()

    if (isLoading) {
        return <div>Loading...</div>
    }
    if (error) {
        return <div>uh oh...something went wrong</div>
    }
    if (isAuthenticated) {
        return (
            <div>
                <button onClick={() => logout({ returnTo: window.location.origin })}>
                    logout
                </button>
                <button onClick={addOrUpdateTodo}>Add/Update Todo</button>
                <button onClick={listTodos}>List Todos</button>
                <button onClick={deleteTodo}>Delete Todo</button>
            </div>
        )
    } else {
        return (
            <div>
                <button onClick={() => loginWithRedirect()}>login</button>
            </div>
        )
    }
}

export default App
While the actual UI consists of simple buttons and text, there is a lot of functionality brought in with the useAuth0 hook that we imported:
error: Details of an error that may have occurred during the sign up/sign in processisAuthenticated: A simple boolean that keeps track of if the user is signed inisLoading: A boolean that is true after the user has signed in, but before the token is receiveduser: Details of the currently signed in user such as email and the user's IDgetAccessTokenSilently: An async method that will fetch a JWT without having the user resign in using either an access token or a refresh token.logout: A function that will log the user outloginWithRedirect: A function that will log the user in and send them to a predefined route.
As you can see, Auth0 does a lot of authentication management for us!
In this todo app, we'll need to make various API requests to our backend. To use these APIs, we'll need to get a secure JWT by calling the getAccessTokenSilently method as explained above. Instead of storing the token in localStorage, we'll just grab it and pass it as a header to our API in this app. Our API will require a valid token to access any of the API's resources.
Still in the app.js file, let's create a function right after we destructure the props from the useAuth0 hook:
const baseFetchCall = async ({ method = 'get', body = {}, urlExt = '' }) => {
            const auth0Params = {
                baseUrl: process.env.REACT_APP_BASE_URL,
                audience: process.env.REACT_APP_AUTH0_AUDIENCE,
                scope: process.env.REACT_APP_AUTH0_SCOPE,
            }

        try {
            const token = await getAccessTokenSilently({
                audience: auth0Params.audience,
                scope: auth0Params.scope,
            })

            const res = await fetch(auth0Params.baseUrl + urlExt, {
                method,
                body: method !== 'get' ? JSON.stringify(body) : null,
                headers: {
                    Authorization: `Bearer ${token}`,
                },
            })
            const data = await res.json()
            return data
        } catch (e) {
            console.log(e)
        }
    }
This function is purposefully made generic so that it allows get, put, update, and delete request methods to be made--as well as the body or extra URL paths when appropriate.
It also calls the getAccessTokenSilently function, passing in a few environment variables. Once the token is given, a fetch request is made to our to-be-created endpoints, passing in the token, and optionally the body as well.
The last step in this file is to add the methods to call the baseFetchCall function.
Just after the baseFetchCall definition, add the following:
const addOrUpdateTodo = async () => {
        await baseFetchCall({ method: 'post', body: { title: 'walk the dog', } })
    }

    const listTodos = async () => {
        await baseFetchCall({})
    }
    const deleteTodo = async () => {
        await baseFetchCall({ method: 'delete', urlExt: `/REPLACE_WITH_TODO_ID` })
    }
- addOrUpdateTodo: Takes in a
bodythat contains the todo title. If anidis passed in, an item is updated if found. Otherwise, an item is created with a random ID. - listTodos: Get all of the todos for the currently signed-in user.
- deleteTodo: Delete the todo of the currently signed-in user if found. The backend expects this value to be in the URL path.
Setting up an Auth0 app
Before we go into the development of our backend, let's get the values for the environment variables that we defined.
Create a .env file in the root of your directory and add the following:
REACT_APP_AUTH0_AUDIENCE=
REACT_APP_AUTH0_DOMAIN=
REACT_APP_AUTH0_CLIENTID=
REACT_APP_AUTH0_SCOPE=openid
REACT_APP_BASE_URL=
The first three values are what we'll need from auth0, the fourth value simply specifies openid as our scope (this allows us to get basic information like the users email), finally, the last value is our API endpoint. We'll grab that from our backend once it deploys.
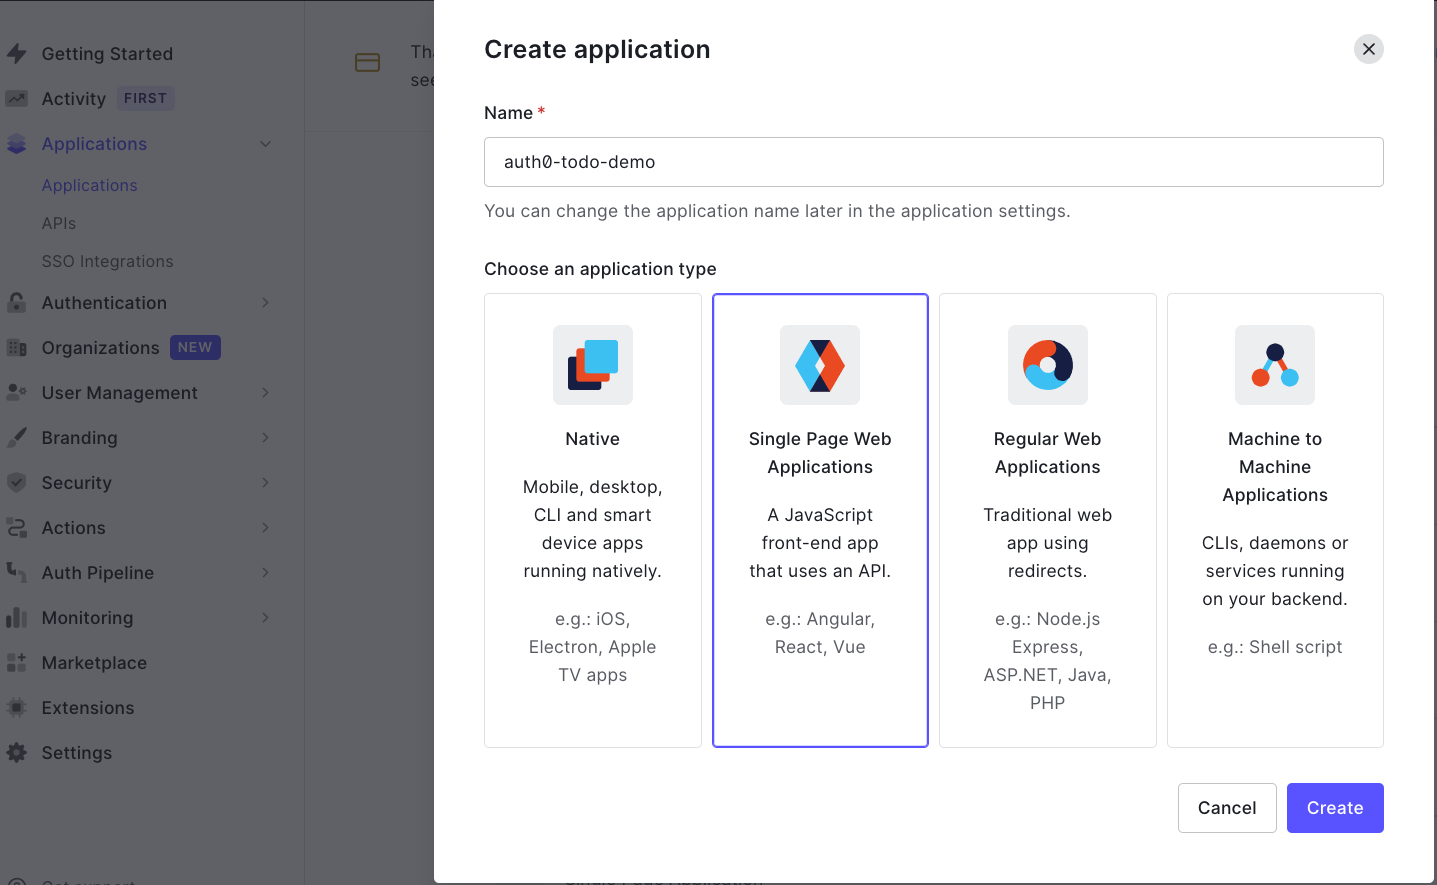
In your Auth0 Dashboard create a new single-page application and name it auth0-blog-demo.
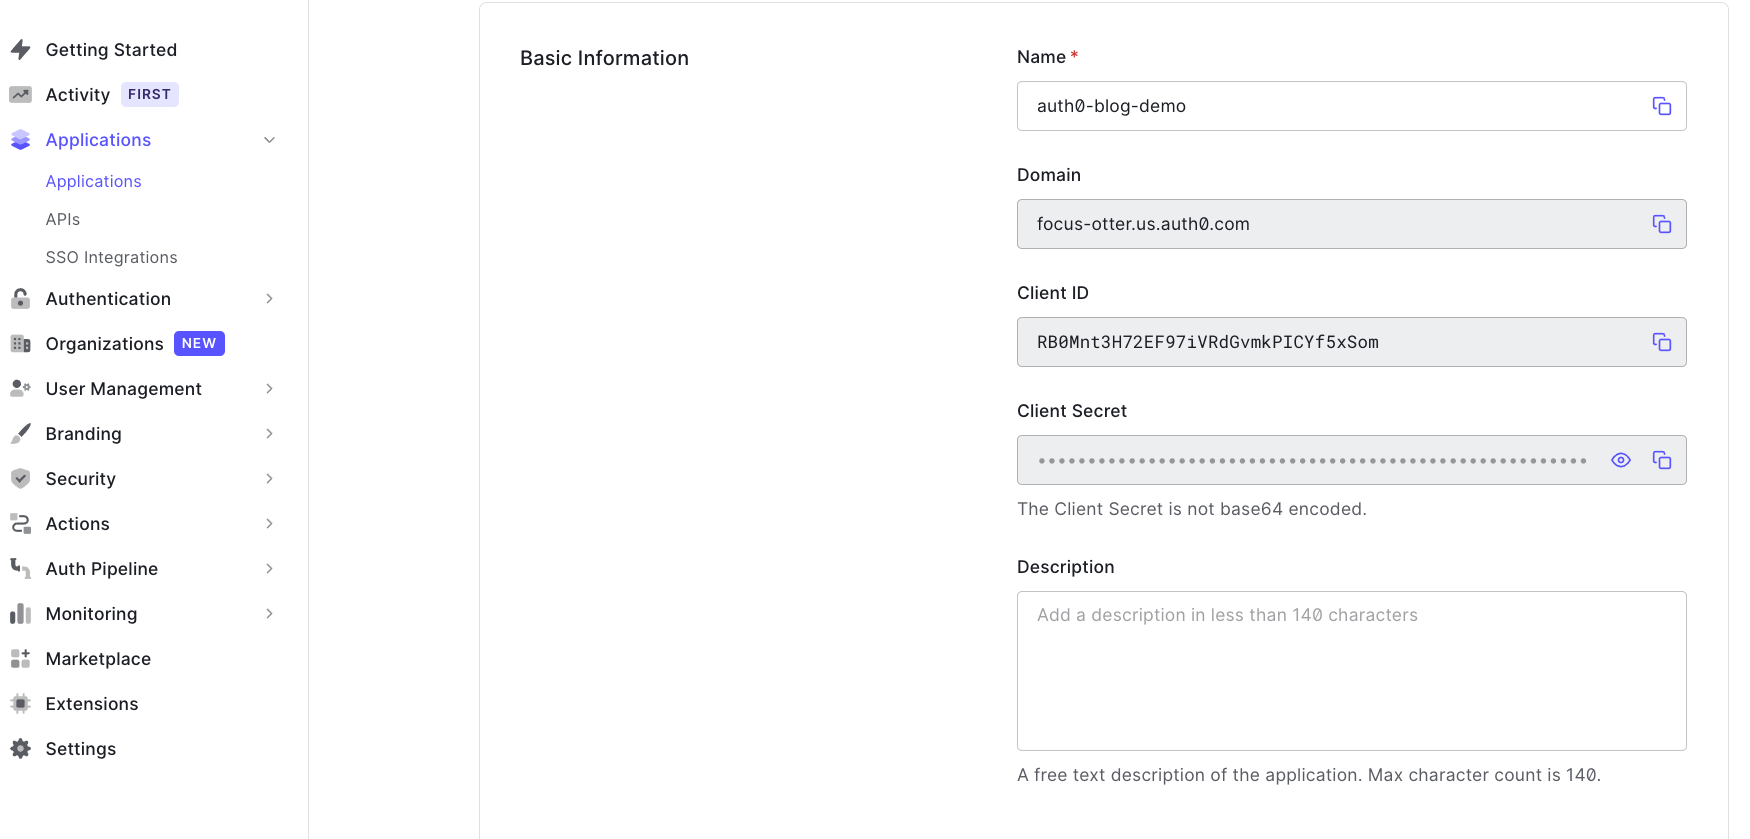
On the settings tab, copy the Domain and the Client ID and paste them into your .env file.
Next, still on the settings tab, scroll down and configure the allowed callback URLs, allowed logout URLsand allowed web origins to use http://localhost:3000
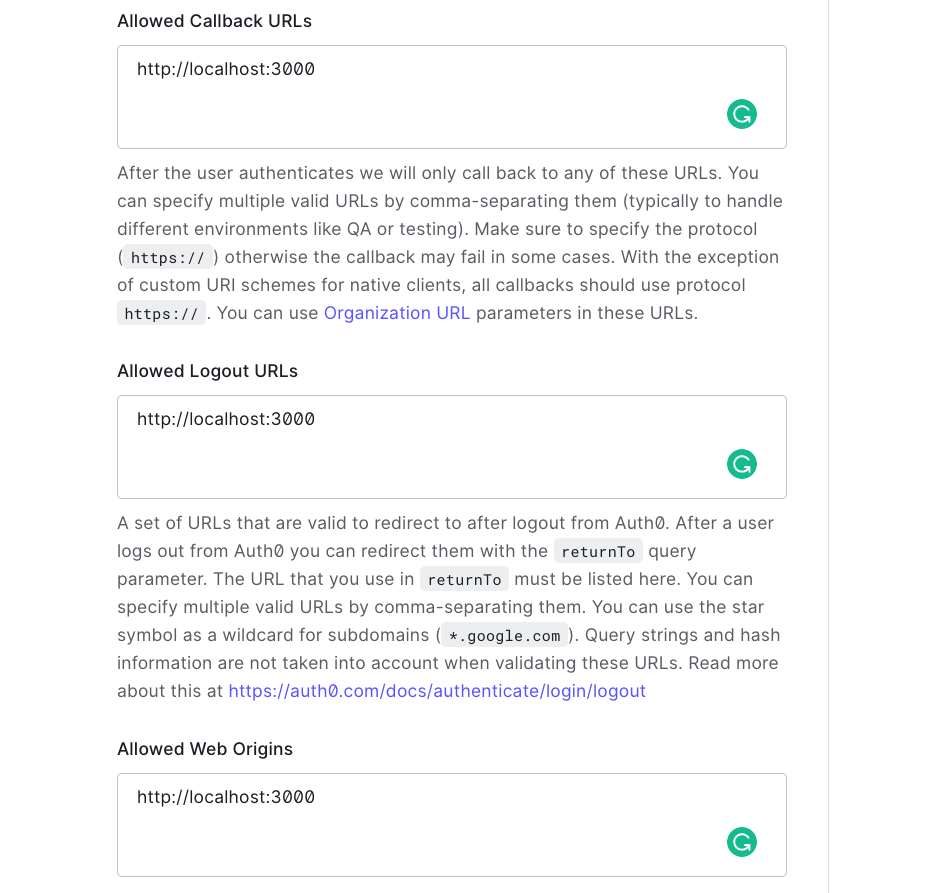
🗒️ We are using
localhost:3000because that is the port that our application will run on locally when we runnpm start.
Finally, scroll down to the bottom and click save.
These are all the settings we need to allow our frontend to authenticate our users. However, as mentioned, we are also wanting to create an API that needs a JWT from Auth0 to be accessed.
To make the connection between the JWT obtained from our frontend and the API that we're going to create in AWS, we'll create an Auth0 API.
On the left sidebar, under "applications", select APIs.
For the Name, enter auth0-blog-demo-api.
For the Identifier, enter https://auth0-blog-demo-api.com

🗒️ An Identifier (also known as an audience) is a way of saying, "what is the intended domain that is going to to use this API. It's never called by Auth0.
Before hitting Create, copy the Identifier and paste it in your .env file for the AUDIENCE value.
🗒️ If you like, go ahead and run
npm startin your react application and you should be able to sign up, sign in, and log out of the application. The APIs won't work just yet. We'll create the backend for that in the next section.
Creating our backend API with the AWS CDK
With our frontend ready for user signups, let's create a backend so that users can interact with our API. We'll use the AWS Cloud Development Kit (CDK) to create our backend infrastructure. This allows us to write our infrastructure in TypeScript and take advantage of TypeScript types for rich docs and autocompletion.
If wanting to learn how to do all of this in the console, I have a YouTube video that provides a walkthrough that is great to get an understanding of what we're trying to accomplish here:
Project Scaffolding
🗒️ This application uses v1 of the AWS CDK. To install the latest version of v1, run
npm i -g aws-cdk@v1
In your terminal, create a new directory, outside of our frontend application called jwt-backend-api and change into that directory.
md jwt-backend-api && cd $_
Now that you're in the directory, create a new cdk project by running the following command:
cdk init app -l typescript ./
The above command will initialize a new CDK application with typescript into our current directory.
Next, we'll install a few dependencies that we'll need for our project. Each dependency starts with @aws-cdk/. We can use a shorthand available in NPM so we don't have to write the prefix for all of our packages:
npm i @aws-cdk/{aws-dynamodb,aws-apigatewayv2,aws-apigatewayv2-authorizers,aws-apigatewayv2-integrations}
For information on the CDK packages we installed, feel free to visit the AWS CDK docs page.
Finally, open the project in your editor and navigate to the lib/jwt-backend-api-stack.ts file. This is where we'll create our infrastructure.
Replace the contents of this file with the following snippet:
import * as path from 'path'
import * as cdk from '@aws-cdk/core'
import * as lambda from '@aws-cdk/aws-lambda'
import * as dynamoDB from '@aws-cdk/aws-dynamoDB'
import * as apiGW from '@aws-cdk/aws-apigatewayv2'
import * as apiGWAuthorizers from '@aws-cdk/aws-apigatewayv2-authorizers'
import * as apiGWIntegrations from '@aws-cdk/aws-apigatewayv2-integrations'

export class JwtBackendApiStack extends cdk.Stack {
    constructor(scope: cdk.Construct, id: string, props?: cdk.StackProps) {
        super(scope, id, props)

        //our code will go here

    }
}
Not much going on here. Just importing our dependencies, removing some of the boilerplate. Now let's start adding our backend.
Creating a DynamoDB table
Our API is going to call our Lambda functions, and our Lambda functions are going to use our Database. So it makes sense to start with our database first and work backwards.
Fortunately, doing so in the CDK is really easy. Underneath the our code will go here comment, add the following:
//create the dynamodb table
const todoTable = new dynamoDB.Table(this, 'todoTable', {
  billingMode: dynamoDB.BillingMode.PAY_PER_REQUEST,
  partitionKey: { name: 'owner', type: dynamoDB.AttributeType.STRING },
  sortKey: { name: 'id', type: dynamoDB.AttributeType.STRING },
})
This creates a DynamoDB table where we only pay for each incoming and outgoing request, and specify an owner as our portion key and the todo's id as the sort key.
Creating our Lambda functions
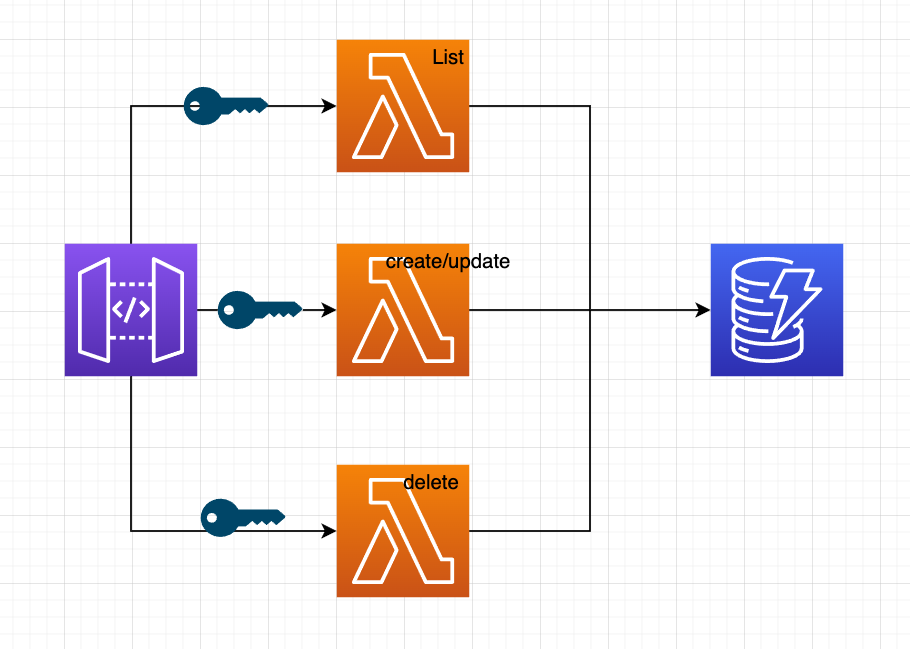
To ensure the principle of least-priviledge we will have 3 API routes, and each one of those routes will call a different Lambda function.
Paste in the following code to create our functions:
// create the lambda function to create (POST) a todo
const createTodoFn = new lambda.Function(this, 'createTodoFn', {
    runtime: lambda.Runtime.NODEJS_14_X,
    handler: 'createTodo.main',
    environment: {
        tableName: todoTable.tableName,
    },
    code: lambda.Code.fromAsset(path.join(__dirname, 'todoFunctions')),
})

// create the lambda function to list (GET) todos by id
const listTodosFn = new lambda.Function(this, 'listTodosFn', {
    runtime: lambda.Runtime.NODEJS_14_X,
    handler: 'listTodos.main',
    environment: {
        tableName: todoTable.tableName,
    },
    code: lambda.Code.fromAsset(path.join(__dirname, 'todoFunctions')),
})

// create the lambda function to DELETE a todo by id
const deleteTodoFn = new lambda.Function(this, 'deleteTodoFn', {
    runtime: lambda.Runtime.NODEJS_14_X,
    handler: 'deleteTodo.main',
    environment: {
        tableName: todoTable.tableName,
    },
    code: lambda.Code.fromAsset(path.join(__dirname, 'todoFunctions')),
})

// grant permission for our function to post to the table
todoTable.grant(createTodoFn, 'dynamodb:PutItem')
todoTable.grant(listTodosFn, 'dynamodb:Query')
todoTable.grant(deleteTodoFn, 'dynamodb:DeleteItem')
In the above snippet, we define each Lambda function by naming it and passing in a few parameters. A few parameters to callout:
- runtime: Which version of node are we using. We want to take advantage of
async/awaitso we'll say node 14. - handler: Where our code is found. This uses a
FILE_NAME.EXPORT_NAMEsyntax. - environment: This is how we can expose environment variables to our function. Note that these are not secrets but rather ways of referencing values.
- code: In what directory can we find the code. This can be a local directory, or an S3 bucket, or even inline. Here we say our functions will live in a
todoFunctionsdirectory.
Defining our Lambda handlers
Still inside of the lib directory of our project, create a new folder called todoFunctions. Then, inside of it, create three files: createTodo.js, deleteTodo.js, and listTodos.js.
Next, we'll create a package.json file so that we can install dependencies specific to our Lambda functions. For our project, we'll use the uuid package to generate unique ID's for our todo items.
cd lib/todoFunctions && npm init -y && npm i uuid
createTodo handler
Inside of createTodo.js add the following:
const AWS = require('aws-sdk')
const { v4: uuidv4 } = require('uuid')
const dynamodb = new AWS.DynamoDB.DocumentClient()
const tableName = process.env.tableName

exports.main = async (event) => {
    const owner = event.requestContext.authorizer.jwt.claims.sub
    const putItemParams = {
        TableName: tableName,
        Item: { owner, id: uuidv4(), ...JSON.parse(event.body) },
    }
    try {
        await dynamodb.put(putItemParams).promise()
        return {
            statusCode: 200,
            body: JSON.stringify({
                success: 'put call succeed!',
            }),
        }
    } catch (err) {
        return {
            statusCode: 500,
            body: JSON.stringify({ err }),
        }
    }
}
🗒️ As mentioned from our handler, this code lives at
lib/todoFunctions/createTodo.jsinside amainfunction.
The function is simple in the sense that it just takes the information passed from the frontend and either creates a new item with a unique ID, or if todo already exists (by having the same id as another todo), then updating it instead.
However what's worth calling out is the following line:
const owner = event.requestContext.authorizer.jwt.claims.sub
Instead of the frontend passing the user ID of the signed in user, we instead inspect the incoming JWT to grab the user ID (sub). API Gateway will automatically decode the JWT and put that information on the event object. 🎉
deleteTodo handler
Inside of the deleteTodo.js file, paste in the following code:
const AWS = require('aws-sdk')

const dynamodb = new AWS.DynamoDB.DocumentClient()
const tableName = process.env.tableName

exports.main = async (event) => {
    const params = { id: event.pathParameters.todoId }

    const condition = {
        owner: {
            ComparisonOperator: 'EQ',
            AttributeValueList: [event.requestContext.authorizer.jwt.claims.sub],
        },
    }
    let removeItemParams = {
        TableName: tableName,
        Key: params,
        KeyConditions: condition,
    }

    try {
        const data = await dynamodb.delete(removeItemParams).promise()
        return {
            statusCode: 200,
            body: JSON.stringify(data),
        }
    } catch (err) {
        return {
            statusCode: 500,
            body: JSON.stringify({ err }),
        }
    }
}
In this function, we tell how we want items to be deleted. We could setup our API so that the id of the item that needs to be deleted is in the event.body, however here we're showcasing how parameters can be passed from the path of a route as well.
ex) https://my-api.com/MY_TODO_ID
We'll see in the API section how we can specify a dynamic route on our API.
What's also worth calling out is that we don't one signed in user to be able to delete the todo of another signed in user. To prevent that, we add a condition that says, "look at the owner field (that we add when an item is created), and check to make sure it equal the user ID found in our JWT.
listTodos handler
Now that we understand the previous two handlers, the last one we'll implement becomes much easier to understand.
In listTodos.js paste in the following code:
const AWS = require('aws-sdk')

const dynamodb = new AWS.DynamoDB.DocumentClient()
const tableName = process.env.tableName

exports.main = async (event) => {
    const condition = {
        owner: {
            ComparisonOperator: 'EQ',
            AttributeValueList: [event.requestContext.authorizer.jwt.claims.sub],
        },
    }

    let queryParams = {
        TableName: tableName,
        KeyConditions: condition,
    }
    try {
        const data = await dynamodb.query(queryParams).promise()
        return {
            statusCode: 200,
            body: JSON.stringify(data),
        }
    } catch (err) {
        return {
            statusCode: 500,
            body: JSON.stringify({ err }),
        }
    }
}
The only thing worth calling out is that we are only allowing users to list their own todo items by specifying the condition.
Setting up our API integrations
With our functions created, let's go back into our jwt-backend-api-stack.ts file and add create what AWS calls integrations. Simply put, when someone goes to an API Gateway route, they don't have to call a Lambda function. In fact, AWS allows for several services and endpoint variations to be invoked.
So we'll take our Lambda functions and wrap them in an integration, so that they can be attached to API Gateway.
Underneath where we added our todoTable.grant() permissions, added the following:
//set the lambda and an integration to create a todo
const createTodoIntegration = new apiGWIntegrations.HttpLambdaIntegration(
    'createTodoIntegration',
    createTodoFn
)
//set the lambda and an integration to list todos
const listTodosIntegration = new apiGWIntegrations.HttpLambdaIntegration(
    'listTodosIntegration',
    listTodosFn
)

//set the lambda and an integration to delete a todo
const deleteTodoIntegration = new apiGWIntegrations.HttpLambdaIntegration(
    'deleteTodoIntegration',
    deleteTodoFn
)
In addition, we'll also create an authorizer. This will get attached to our API and tell it how we would like to protect our endpoints. In our case, we're providing the values from Auth0. Our API will automatically talk to Auth0 on our behalf to make sure the JWT it received is valid.
🗒️ The Auth0 credentials here aren't secret, but they're probably better suited to be put in an environment variable.
//setup the jwt authorizer
//🚨 make sure the ending slash is at the end of the issuer!
const issuer = 'https://focus-otter.us.auth0.com/'
const authorizer = new apiGWAuthorizers.HttpJwtAuthorizer(
    'TodoAuthorizer',
    issuer,
    {
        jwtAudience: ['https://auth0-blog-demo-api.com'],
    }
)
Creating our HTTP API
AWS has two types of APIs. REST APIs and HTTP APIs.
The former allows for greater customization in terms of what services we'd like to interact with, and advanced security controls.
Recently, HTTP APIs were introduced and offer a much easier getting started path when working with Lambda functions and a significant reduction in cost, and offer built in JWT authorizer support (notice how we never had to write our own code to decode and inspect the JWT!).
In the following snippet, we'll create an HTTP API, configure CORS so that only the Authorization header is allowed, and only allow a few methods. Because our API needs a valid JWT, we'll allow any origin, though this can be updated with a specific frontend endpoint as well:
//create the HTTPApi, but also lock it down
const httpApi = new apiGW.HttpApi(this, 'HttpApi', {
corsPreflight: {
    allowHeaders: ['Authorization'],
    allowMethods: [
        apiGW.CorsHttpMethod.POST,
        apiGW.CorsHttpMethod.GET,
        apiGW.CorsHttpMethod.DELETE,
    ],
    allowOrigins: ['*'],
},
})
//add the lambda and the jwt authorizer to the api route
httpApi.addRoutes({
    path: '/todos',
    methods: [apiGW.HttpMethod.POST],
    authorizer,
    integration: createTodoIntegration,
})

httpApi.addRoutes({
    path: '/todos',
    methods: [apiGW.HttpMethod.GET],
    authorizer,
    integration: listTodosIntegration,
})

httpApi.addRoutes({
    path: '/todos/{todoId}',
    methods: [apiGW.HttpMethod.DELETE],
    authorizer,
    integration: deleteTodoIntegration,
})

new cdk.CfnOutput(this, 'API Endpoint', { value: httpApi.apiEndpoint })
Notice how we specify our integrations (Lambda functions) as an API route. In addition, notice how the delete route uses a dynamic path to accept any todo ID. That todoId field is what we use in our deleteTodo Lambda function.
Lastly, we add a cdk.CfnOutput statement so that when our application gets deployed, we print the API Endpoint in the console so that we can update our frontend baseUrl value.
Testing the application
To test our application, we'll want to deploy our backend stack. While in the directory of your backend, run the following command in your terminal:
cdk synth && cdk deploy
The first part of that command will check for any issues in our stack by synthesizing our CDK code to cloudFormation.
Once our code is deployed to AWS, check the console to grab the URL of our API. Paste that URL in the .env file of our frontend application as the REACT_APP_BASE_URL value, making sure to add /todos at the end.
Now, restart your frontend by running npm start and try signing in/up.
From there, you should be able to create a todo, see it listed when you refresh the page, and also delete it. To fully test our application, try creating another user and notice how you aren't able to view or modify their todos.
Final Thoughts
This end-to-end experience solves a problem I had where I could find one tutorial that handled the frontend, another for the backend, but nothing cohesive.
The application can be expanded to allow for protected routes, different framework implementations and so on, but all of the principles will remain the same.
As always, I hope you liked this post and if you prefer end-to-end solutions like this or smaller one-sided solutions, I'd appreciate it if you left a comment for some feedback!
Thanks again for checking out the post and I'll catch you all next time!


