

Fullstack Workshop: Create an SMS scheduler with NextJS and AWS Amplify

I'm currently going through Yan Cui's excellent course on AWS Step Functions and it's been great so far. In it, he uses the Serverless Framework to explain various state machine patterns and concepts.
In an attempt to escape tutorial overload, I decided to build out his examples in AWS Amplify instead so that they had a frontend component to them as well.
In this workshop, we'll use Step Functions in an Amplify project by creating a site where users can enter their phone number and receive a future-dated text message.
Step Functions 101
Often is the case that the Lambda function(s) we create contain more than just business logic. For example, they might have a condition:
If the incoming value is greater than 30, run this block of code
Conditions like the above can make our functions bloated and harder to reason about when debugging and auditing. Especially considering that we may want to orchestrate many functions either together, one-after-another, in parallel, or to pause a task and only resume it when a condition is met.
This is the power that Step Functions provide. By orchestrating our tasks with a state machine, we are given more visibility, more control, and leaner functions. The best part is that because Step Functions are a managed service of AWS, there are no servers to manage, and you only pay for what you use.
To get deeper into Step Functions and read up on how they can be used, be sure to check out the Step Functions getting started page on AWS.
Architecture Overview
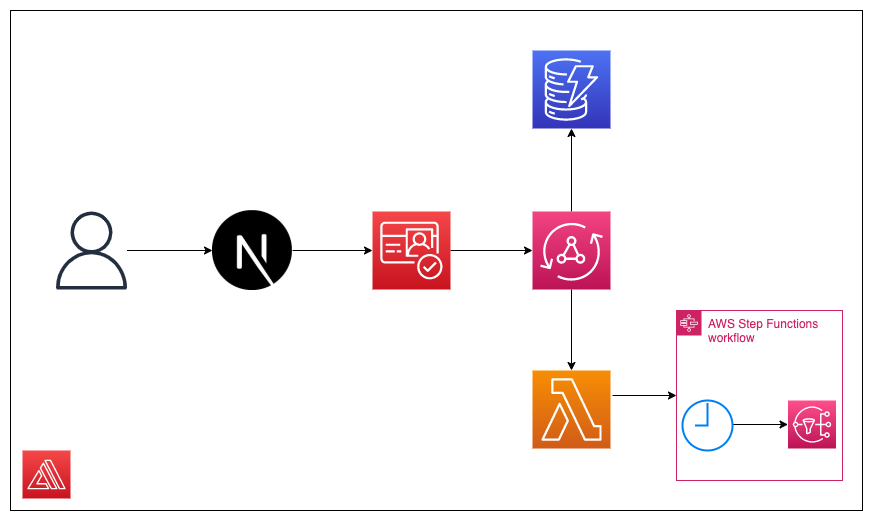
The architecture is fairly small, but perfect for our needs. Essentially, as a user enters our NextJS site, they'll log in with their phone number. Upon doing so, they'll interact with our AppSync API that will both save their message in a database, as well as trigger a Lambda function that will kick off our Step Function workflow. In addition, we'll set a TTL on the messages stored in our database so that we only fetch messages that haven't been sent.
The Step Functions workflow is also small. It will take in, as initial input, a timestamp of when the user would like to receive their notification, a message, and a phone number. After waiting for the timestamp to be reached, it will publish a message using Amazon SNS.
We'll be using AWS Amplify to configure all of this, without touching the AWS Console.
The total cost of building this application out is ~$2.00/month. This is due to needing an AWS-provided phone number. To set up a phone number, head to this link (make sure you're in the same region as your Amplify app and create a toll-free phone number as shown in the screenshot below

Application Scaffolding
🗒️This tutorial uses the latest version of the Amplify CLI, which at this time is
7.6.5. To install the latest CLI version run the following command:npm i -g @aws-amplify/cli
To get started, grab the starter files from this repo directly, or by forking the project to your GitHub profile:
The starter files contain the majority of the frontend code and none of the backend code. Let's fix that by running the following command in our editor's terminal while at the root of our project:
amplify init
Because this project is scaffolded with NextJS, we can accept most of the defaults, but not all.
After declining the default configuration, when asked about the source directory path, type a period, and for the distribution directory path, type "out":
Source Directory Path: .
Distribution Directory Path: out
Everything else can be left as the default. After selecting the AWS profile you'd like to use, we can begin adding in our services.
Adding Services
As seen in the infrastructure diagram above, there are a few services that we'll be adding to this project. While none are difficult to add, by far, the easiest to add with be authentication.
Authentication
Because this is a phone messaging app, we want to capture our users' phone number--not their email.
This means when they signup, they should confirm their account by getting a one-time temporary password (OTTP) sent to their phone, instead of their email.
In the CLI, run the following command:
amplify add auth
- Select the Default Configuration
- Select that you want users to sign in with their Phone Number
- Select Yes, I want to make some additional changes
- 🚨Deselect the email attribute as being required and Select the Phone Number attribute.
- No to enabling other capabilities
After going through that sequence, you should be prompted with the following message:
⚠️ You have enabled SMS-based auth workflow. Verify your SNS account mode in the SNS console: https://console.aws.amazon.com/sns/v3/home#/mobile/text-messaging
If your account is in "Sandbox" mode, you can only send SMS messages to verified recipient phone numbers.
We have successfully set up authentication🎉
Adding a GraphQL API and database
Under the hood, AWS uses a service known as AWS AppSync as a managed GraphQL provider. This allows us to create a schema that automatically scales based on our usage.
Amplify takes this a step further by automatically using the CLI to walk through the configuration and inspecting our schema to create the necessary connections.
To see this in action, run the following command:
amplify add api
- Select GraphQL as the API type
- Arrow up to Authorization modes
- Hit enter and select Amazon Cognito User Pool
- Do not configure additional auth types
- When asked to use a schema template, select Single object with fields
- Select Y to edit the schema now
The schema that gets generated has full public access and is best for testing purposes. Replace the contents of the file with the following:
type Message @model @auth(rules: [{ allow: owner }]) {
    id: ID!
    message: String!
    recipientPhoneNumber: AWSPhone!
    waitTimestamp: AWSDateTime!
    ttl: Int!
}

input FutureMessageInput {
    message: String!
    recipientPhoneNumber: AWSPhone!
    waitTimestamp: AWSDateTime!
}
type Mutation {
    setFutureMessage(futureMessageInput: FutureMessageInput!): String
        @function(name: "invokeFutureSNSStatemachine-${env}")
}
Here, we define our schema with a type of Message and give it an auth rule so that each logged-in person only has access to their messages.
In addition, we automatically create and connect our API to a DynamoDB database by simply specifying the @model directive.
As you can see, AppSync has a few built-in scalar types that help ensure our data is of the right type.
The last part of the schema is where we create a mutation, but instead of having it create/update an item in our database, we instead have it call a lambda function.
Specifically, we create a setFutureMessage mutation that takes in the FutureMessageInput input type and returns a string. Those arguments get passed to our invokeFutureSNSStatemachine Lambda function (that we'll create next).
And with that, our API and database are complete....for now 😉
Creating our Lambda Functions
It's not immediately apparent from our Architecture diagram, but we'll need two Lambda functions that do the following:
- Call our to-be-created state machine (
invokeFutureSNSStatemachine) - Publish our text message (
publishSNSMessage)
To get started with the first function, run the following command:
amplify add function
- Select Lambda function
- Name the function invokeFutureSNSStatemachine
- Select NodeJS
- Select Hello World
- 🚨Select Y to configure advanced settings
- Select N to the provided options until asked if wanting to configure environment variables, then select Y
- For the name, type STATE_MACHINE_ARN
- For the value, type arn:aws:states:REGION:ACCOUNT_NUMBER:stateMachine:future-text-message where
REGIONis the AWS region you're in (us-east-1) andACCOUNT_NUMBERis your AWS account number (feel free to grab that from the AWS Console if unsure - Select I'm done and choose to edit the lambda function now.
Paste in the following code:
const AWS = require('aws-sdk')
const stepFunctions = new AWS.StepFunctions()

exports.handler = async ({ arguments: { futureMessageInput } }) => {
    const params = {
        stateMachineArn: process.env.STATE_MACHINE_ARN,
        input: JSON.stringify({
            message: futureMessageInput.message,
            waitTimestamp: futureMessageInput.waitTimestamp,
            phoneNumber: futureMessageInput.recipientPhoneNumber,
        }),
    }

    await stepFunctions.startExecution(params).promise()

    return 'message sent to workflow'
}
Recall that this function is going to be called by our AppSync API. When that happens, it will take the arguments passed in and send them directly to our state machine as a string of input.
Because this is an asynchronous workflow, we simply return a message to the frontend, without waiting for a response that the workflow is completed.
This function uses the environment variable we just created to call the state machine, but we have yet to give our function permission to call the startExecution method.
To fix that, simply open the newly-created custom-policies.json file in this function's directory and paste in the following to allow access:
[
    {
        "Action": ["states:StartExecution"],
        "Resource": [
            "arn:aws:states:*:*:stateMachine:future-text-message-${env}"
        ]
    }
]
Note that I'm dynamically specifying the environment name of the state machine we'll create later on by using the ${env} syntax.
🗒️ I'm choosing to use
*in the ARN to avoid hard coding the ARN in a public repo. Feel free to substitute those with the same values from the environment variable we created earlier.
We're done creating our first Lambda 🎉
Creating our second Lambda is even simpler, and as such, I won't go through the full flow.
Run the following command to create the function and use the hello world template once more. We won't need any advanced settings for this function.
amplify add function
Name the function SNSPublisher
For the function code, paste in the following:
const AWS = require('aws-sdk')
const sns = new AWS.SNS()

exports.handler = async (input) => {
    const messageParams = {
        Message: input.message,
        PhoneNumber: input.phoneNumber,
    }

    await sns.publish(messageParams).promise()

    return `success`
}
For the function's custom-policies.json file, paste in the following:
[
    {
        "Action": ["sns:Publish"],
        "Resource": ["*"]
    }
]
The
"Resource": ["*"]allows SNS to publish to any number (if out sandbox mode), and allows for us to not have to hardcode our phone number.
That's it!🎉 Our functions are now created and we can move on to our Step Functions workflow.
Before continuing, let's push what we have to AWS by running the following command:
amplify push -y
We've created quite a few services, and Amplify is going to take our backend and automatically write the proper policies so that they can work together.
☕ Now's a good time to stand up and stretch.
Once the build is done, you'll notice in the src directory of our project that there are now graphql queries and mutations created for us. We'll use those towards the end 😉
Extending with the CDK
We now have all the resources created that Amplify supports out of the box. But that doesn't mean we can't access all of the other resources there are to offer.
We'll showcase this by not only creating a Step Functions workflow but also as an example of how our Amplify Lambda functions can be used inside of the CDK.
Configuring our CDK Project
To get started adding custom resources, we'll start by running the following command and select AWS CDK:
amplify add custom
Next, name the resource SFCustom
This will create the necessary files for us to get started. Go ahead and edit the stack now.
Before we hop into the code, note that the SFCustom directory that we are in has its own package.json. This is great because we need to add two CDK packages to our project:
- aws-stepfunctions: The main package for creating a step function state machine.
- aws-stepfunctions-task: A secondary package for different states (tasks) to our state machine.
To best make sure package versions are consistent, replace the package.json file in the SFCustom directory with the following:
{
    "name": "custom-resource",
    "version": "1.0.0",
    "description": "",
    "scripts": {
        "build": "tsc",
        "watch": "tsc -w",
        "test": "echo \"Error: no test specified\" && exit 1"
    },
    "dependencies": {
        "@aws-amplify/cli-extensibility-helper": "^2.0.0",
        "@aws-cdk/aws-stepfunctions": "~1.124.0",
        "@aws-cdk/aws-stepfunctions-tasks": "~1.124.0",
        "@aws-cdk/core": "~1.124.0"
    },
    "devDependencies": {
        "typescript": "^4.2.4"
    }
}
In your terminal, 🚨Change into the SFCustom directory🚨 and run the following command:
rm -rf node_modules package-lock.json && npm i
This will remove the current dependencies and install the dependencies in the package.json file.
Adding our State Machine
A bit anticlimactic, but in the cdk-stack.ts file that was created for us, paste in the following code.
import * as cdk from '@aws-cdk/core'
import * as AmplifyHelpers from '@aws-amplify/cli-extensibility-helper'
// 1.
import { AmplifyDependentResourcesAttributes } from '../../types/amplify-dependent-resources-ref'
import * as stepFunctions from '@aws-cdk/aws-stepfunctions'
import * as Tasks from '@aws-cdk/aws-stepfunctions-tasks'
import * as lambda from '@aws-cdk/aws-lambda'

// 2.
export class cdkStack extends cdk.Stack {
    constructor(
        scope: cdk.Construct,
        id: string,
        props?: cdk.StackProps,
        amplifyResourceProps?: AmplifyHelpers.AmplifyResourceProps
    ) {
        super(scope, id, props)
        /* Do not remove - Amplify CLI automatically injects the current deployment environment in this input parameter */
        new cdk.CfnParameter(this, 'env', {
            type: 'String',
            description: 'Current Amplify CLI env name',
        })

// 3.
        const retVal: AmplifyDependentResourcesAttributes =
            AmplifyHelpers.addResourceDependency(
                this,
                amplifyResourceProps.category,
                amplifyResourceProps.resourceName,
                [{ category: 'function', resourceName: 'SNSPublisher' }]
            )
// 4.
        const publishMessageARN = cdk.Fn.ref(retVal.function.SNSPublisher.Arn)
        const amplifySNSPublishLambda = lambda.Function.fromFunctionArn(
            this,
            'Amplify Created SNS Publisher Function',
            publishMessageARN
        )

// 5.
        const step1 = new stepFunctions.Wait(this, 'Wait state', {
            comment:
                'A future timestamp based on user interaction. This has the message and intended phone number as well.',
            time: stepFunctions.WaitTime.timestampPath('$.waitTimestamp'),
        })

        const step2 = new Tasks.LambdaInvoke(this, 'Publish Message', {
            comment: 'Publish a message to SNS without using a topic',
            lambdaFunction: amplifySNSPublishLambda,
        })

// 6.
        const definition = stepFunctions.Chain.start(step1).next(step2)

        new stepFunctions.StateMachine(this, 'Future dated SMS State Machine', {
// 🚨The name here has to be the same as what is in the `invokeFutureSNSStatemachine` custom-policies.json file.
            stateMachineName: `future-text-message-${cdk.Fn.ref('env')}`,
            definition,
        })
    }
}
Let's break down the code, by following the commented numbers.
- Among the other imports, the
AmplifyDependentResourcesAttributesfile is important because it provides a reference to services that were created by Amplify such as Auth, a database, and for us, our Lambda function. - This entire section is boilerplate and is there setup our CDK project with our Amplify environment.
- We create a return value,
retValthat is of typeAmplifyDependentResourcesAttributes. This allows us to grab a reference to our Lambda function that will publish our message. - Using the Lambda reference from the previous step, we create a CDK Lambda instance that references our Amplify-generated Lambda, based on its ARN. aka, "Grab a reference to my Amplify Lambda and turn it into something that can be used in CDK".
- Now we put it all together. We create a workflow that first waits for a given amount of time, then calls our
SNSPublisherLambda function. - We create a state machine with the name
future-text-message-devthat takes in our previously created workflow.
Setting a TTL on our database
With our state machine created, we're just about to push up our code, before doing so, run the following command:
amplify override api
This will create an override.ts file where we can use a simpler version of the CDK to override Amplify resources. In our case, we want to add a TTL on our database, so that messages are automatically deleted once they have been sent.
In the override file, paste the following code snippet:
import { AmplifyApiGraphQlResourceStackTemplate } from '@aws-amplify/cli-extensibility-helper'

export function override(resources: AmplifyApiGraphQlResourceStackTemplate) {
    resources.models['Message'].modelDDBTable.timeToLiveSpecification = {
        enabled: true,
        attributeName: 'ttl',
    }
}
Those few lines of code essentially say, "Grab the database that was created as part of my Message API, look at the field ttl and use that to turn on TTL for the database.
🗒️ If wanting to learn more on overriding, I have a full post where I go into more detail.
With that out of the way, it's time to push up our code and test out our project 🎉
amplify push -y
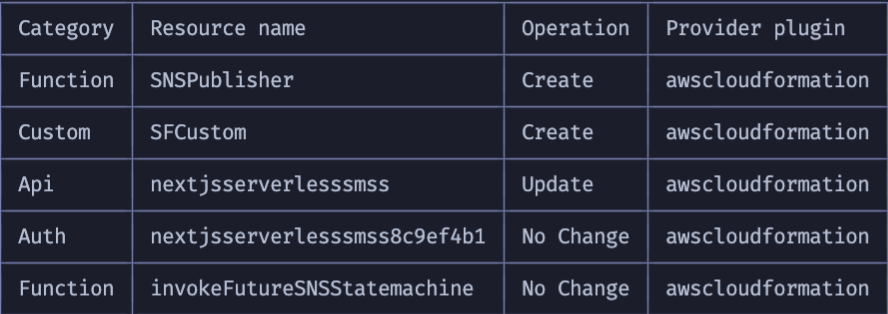
Your resources should look similar to the below table:
Updating the frontend with solution
Now that our code is deployed, let's update our frontend to make use of it.
This starter project already contains much of what we'll need, so let's start by first configuring Amplify on our frontend.
In _app.js, add the following code snippet:
import Amplify from 'aws-amplify'
import config from '../aws-exports'

Amplify.configure(config)
That's it for configuration, the next part is to write the code that will make the API calls. For that, we'll open pages/index.js.
For the imports, add the following lines to bring in both UI components, and Amplify created methods for interacting with our API:
import { withAuthenticator } from '@aws-amplify/ui-react'
import { API } from 'aws-amplify'
import { setFutureMessage, createMessage } from '../src/graphql/mutations'
import { listMessages } from '../src/graphql/queries'
Next, when the application loads, we'll try to fetch any messages that are pending, meaning they have been created, but not yet sent--sorted by date.
After our useState() declarations, add the following snippet:
    useEffect(() => {
        const fetchMessages = async () => await API.graphql({ query: listMessages })

        fetchMessages().then(({ data: { listMessages } }) => {
            const sortedMessages = listMessages.items.sort((a, b) => {
                return a.ttl - b.ttl
            })
            setSentMessages(sortedMessages)
        })
    }, [])
The majority of the work takes place when a user selects a date and time. When the user clicks submit, we'll walk through the steps in the TODO comments.
First add the following snippet above the try-catch block:
const messageParams = {
            message: message,
            recipientPhoneNumber: user.attributes.phone_number,
            waitTimestamp: startDate.toISOString(),
        }
For // TODO: Send message to step function workflow add the following code:
await API.graphql({
                query: setFutureMessage,
                variables: {
                    futureMessageInput: messageParams,
                },
            })
Then for the // TODO: Save message in database add the following:
const { data } = await API.graphql({
                query: createMessage,
                variables: {
                    input: {
                        ...messageParams,
                        ttl: Math.floor(new Date(startDate).valueOf() / 1000),
                    },
                },
            })
In the last TODO in this section, add the following snippet:
setSentMessages((currMessages) => [...currMessages, data.createMessage])
Before running the app and testing everything out, scroll to the bottom of the page, comment out the export line and uncomment the withAuthenticator line:
// export default Home
export default withAuthenticator(Home)
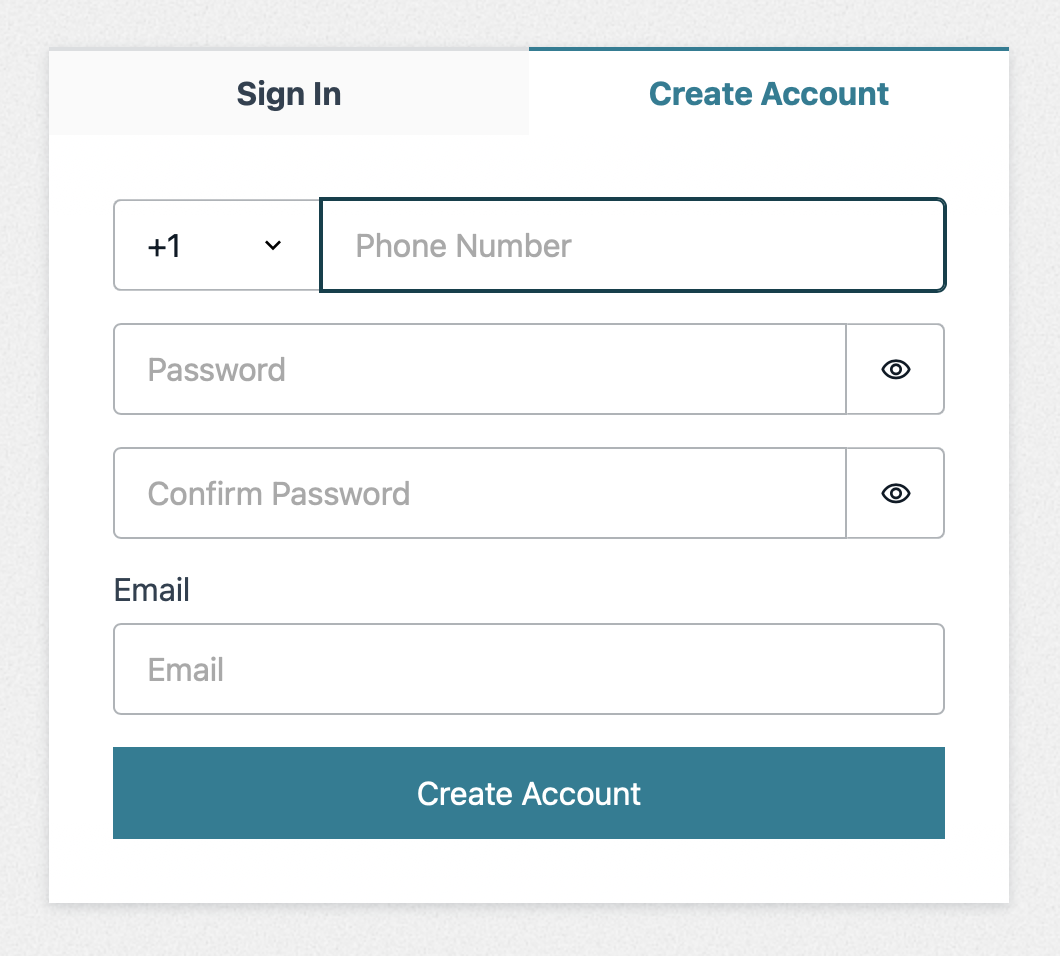
If all went well, we should be able to run npm run dev and test out the app by signing in with our phone number and creating a future-dated message.
If you get an error with the app failing to build, try removing the
.nextdirectory and re-running (sorry, git is hard 🤦🏽♂️).
🚨If testing, and no errors are thrown, but you're not receiving a message, make sure you have an origination number created in your AWS Account (the phone number that SNS is going to use to send messages)
Conclusion
As you can see, Amplify greatly speeds up the delivery of application development and can be a great launching point for your next micro-SaaS idea.
%{https://twitter.com/upen946/status/1478282583297302528?s=20}
For example, it wouldn't take much to integrate Stripe into this project and provide paid subscribers a way to keep their messages longer, or recurring messages to other people.
If wanting to host this project from your own GitHub and AWS Account, running the following command with walk you through the steps to do so, once you have this project on GitHub:
amplify add hosting
This project is already set up for static hosting, though Amplify does also support version 11 of NextJS as well if you're wanting to server-side-render as well.
I hope you enjoyed this workshop, it was a lot of fun to build! If you have any other questions, feel free to hit me up on Twitter, and be on the lookout for this workshop in video form as well ✨


